Easy Cookie Cups Delight
You know those days when you’re craving something sweet but don’t really wanna spend a ton of time baking up a storm? Or when you’re trying to use up that mountain of zucchini left over from last weekend’s harvest? Yeah, I’ve been there. That’s when I whip up this zucchini chocolate swirl bread — it’s like comfort food and a bit of a sneaky veggie all rolled into one. The smell alone, as it bakes, will fill your kitchen with hints of cocoa and warm cake, making everyone come running. My kids actually ask for this all the time, and I swear, they don’t even notice how sneaky healthy those zucchinis are. Trust me, once you try it, it’ll become a regular at your house too!
What is Zucchini Chocolate Swirl Bread?
Think of this as a moist, tender bread that’s packed with shredded zucchini, giving it a subtle veggie boost and incredible moisture. It’s essentially like a soft quick bread, but with a rich swirl of chocolate running through the middle — kind of like a cake meets muffin, but so much better. The name “swirl” comes from the marbled effect you get when you gently swirl the chocolate into the batter before baking. It’s a forgiving recipe — one of those that’s perfect for using up extra produce, satisfying a sweet tooth, or just having a cozy loaf on hand for breakfast, snacks, or dessert. It’s that one recipe I always do this when I want something sweet but don’t want to feel guilty about sneaking in some veggies too.
Why you’ll love this recipe?
What I love most about this zucchini chocolate swirl bread is how it manages to be so deliciously satisfying yet wholesome at the same time. The flavor is rich from the cocoa and chocolate, but the zucchini keeps every slice moist and tender — it’s like magic how the moisture stays locked in! Plus, it’s crazy simple to make; you really just mix a few ingredients, swirl in the chocolate, and bake. No fancy equipment needed here. I also love how budget-friendly it is, since zucchini and basic pantry items are usually already in my kitchen. And oh, the versatility — you can jazz it up with nuts, add a sprinkle of cinnamon, or even swap the chocolate for fruit preserves. This one’s a lifesaver on busy nights or lazy mornings when you need a quick treat that feels special. Plus, it’s a favorite for sharing — the kind of recipe that makes your house smell heavenly and garners compliments from everyone who bites into it. Honestly, I’ve made this countless times, and it never fails to bring a smile to everyone’s face.
How do you make Zucchini Chocolate Swirl Bread?
Quick Overview
This bread comes together in just a few simple steps: grate the zucchini, mix up the batter, swirl in melted chocolate, layer in a loaf pan, and bake until golden and fragrant. The magic happens when you don’t overmix — that keeps the bread tender. I like to prep everything beforehand, so I can just dump and swirl without fuss, especially on busy mornings or after a long day. The best part? You don’t need fancy ingredients — just pantry staples and zucchini you’ll probably have in the fridge. The texture is moist and dense yet tender, and the swirl of chocolate adds that perfect touch of indulgence. Once out of the oven, I let it cool just enough to set, then slice thick and enjoy. Trust me on this one — it’s impossible to stop at just one piece!
Ingredients
For the Main Batter:
– 2 cups all-purpose flour (or almond flour for gluten-free, see FAQ)
– 1 cup granulated sugar
– 1/2 teaspoon baking powder
– 1/2 teaspoon baking soda
– 1/4 teaspoon salt
– 1 teaspoon vanilla extract
– 1 cup shredded zucchini (squeeze out excess moisture)
– 3 large eggs
– 1/2 cup vegetable oil or melted butter
– 1/2 cup milk (dairy or almond milk works great here — I tested with almond milk and it made it even creamier!)
For the Filling:
– 1/2 cup semi-sweet chocolate chips or chopped dark chocolate
– 2 tablespoons heavy cream (to melt chocolate smoothly)
– Optional: 1 tablespoon cocoa powder for extra chocolate flavor
For the Glaze:
– 1/2 cup powdered sugar
– 1-2 teaspoons milk or lemon juice
– A splash of vanilla extract (if desired)
Optional: cacao nibs or sprinkles for decoration
Step-by-Step Instructions
Step 1: Preheat & Prep Pan
Set your oven to 350°F (175°C) and line a loaf pan with parchment paper or grease it well. I always do this first so I don’t forget — makes for easy cleanup and clean slices.
Step 2: Mix Dry Ingredients
In a large bowl, whisk together the flour, sugar, baking powder, baking soda, and salt. This step ensures everything is evenly distributed and prevents clumps later. Trust me, I miss this sometimes if I rush, and the bread isn’t as perfect as it should be.
Step 3: Mix Wet Ingredients
In another bowl, beat the eggs, then add in the oil, milk, and vanilla. Whisk until smooth. I like to use a gentle hand here — overmixing the wet will make the bread dense, so just mix until it’s combined.
Step 4: Combine
Pour the wet into the dry ingredients and fold gently — no aggressive stirring! The batter should be thick but easily stirrable. If it looks too stiff, a splash more milk helps loosen it up slightly.
Step 5: Prepare Filling
In a small bowl, melt the chocolate chips with the heavy cream — microwave in 20-second bursts, stirring after each — until smooth. Let it cool just a bit so it doesn’t cook the batter when swirled in.
Step 6: Layer & Swirl
Pour half the batter into the prepared pan. Drizzle half the melted chocolate over it, then add the rest of the batter on top. Take a knife or skewer and gently swirl the chocolate into the batter — no need for perfect marbling, just a few zig-zags will do the trick.
Step 7: Bake
Pop it in the oven and bake for about 50-60 minutes. Check with a toothpick — it should come out with a few moist crumbs but not wet batter. Don’t open the oven door too early; patience is key here.
Step 8: Cool & Glaze
Once baked, let the bread cool in the pan for 15 minutes, then transfer to a wire rack. The glaze is optional but adds a lovely touch. Mix powdered sugar with a splash of milk, drizzle over the slightly warm bread, and decorate with sprinkles or cacao nibs if you like.
Step 9: Slice & Serve
Slice once cooled to avoid crumbling — thick slices are my favorite, especially when served with a cup of coffee or a cold glass of milk. This bread tastes amazing warm, but it’s just as good at room temp, and it keeps well for a few days wrapped in plastic wrap.
What to Serve It With
This zucchini chocolate swirl bread is so versatile, I’ve served it in all sorts of ways. For breakfast, I love to pair it with a strong cup of coffee or tea — the chocolate and zucchini keep it moist and satisfying. It’s a hit at brunch too, especially when sliced thick and served with fresh berries or a dollop of whipped cream. My family prefers it as an afternoon snack — maybe toasted slightly with a swipe of butter or almond butter, bringing out even more flavor.
As a dessert? Oh yes. Warm slices topped with vanilla ice cream or a drizzle of caramel sauce transform this simple loaf into something truly indulgent. And because it’s subtly sweet, it’s perfect for casual picnics or tea parties too. I love to keep a loaf sliced and layered with small fruit preserves for a little extra sparkle. Honestly, I could go on, but once you try this, you’ll see — it’s a go-to for every cozy occasion.
Top Tips for Perfecting Your Zucchini Chocolate Swirl Bread
Over the years, I’ve learned a few tricks to make this bread absolutely perfect every time. First, when shredding the zucchini, I always squeeze out excess moisture — no one wants soggy bread! I do this by wrapping the shredded zucchini in a clean kitchen towel and gently pressing. It makes all the difference in keeping the loaf moist but not watery.
Second, I recommend folding the ingredients gently. Overmixing the batter will develop gluten and make the bread dense instead of tender. Just mix until everything looks combined, and don’t be afraid to leave a few lumps — they’ll bake out fine.
For the swirl, I like to add a little extra cocoa powder into the melted chocolate for a deeper flavor. When swirling, I do a gentle figure-eight motion, which gives a nice marbled effect without blending the layers too much.
If you want to tweak the recipe, swapping out some of the sugar for honey or maple syrup gives a natural sweetness, but watch the moisture content. I’ve also tried adding chopped walnuts or pecans — crunchy bits are a lovely addition.
Regarding baking, I’ve found that oven positioning matters — middle rack is best for even heat. If your oven runs hot, dropping the temperature by 10-15°F keeps the loaf from over-browning or drying out. Testing for doneness with a toothpick is essential — I’ve learned to keep it in for a few extra minutes if it’s close, because underbaked bread can be disappointing.
As for glazing, I personally don’t like it too sweet — a light glaze of powdered sugar and lemon juice adds just enough sweetness and a bit of zing. If you prefer a richer look, melted white chocolate drizzled on top works beautifully too.
After making this dozens of times, I’ve discovered that patience and gentle handling are what lead to that perfect slice. Once cooled, this bread slices beautifully and keeps its moistness for days. Making a batch on Sunday means cozy slices throughout the week, easy to grab when a quick sweet fix is needed — my kids ask for this constantly, and honestly, so do I!
Storing and Reheating Tips
This bread stays fresh for about 2-3 days at room temperature if wrapped tightly in plastic wrap or stored in an airtight container. Keep it away from direct sunlight, and it’ll stay moist and delicious. If you want to keep it longer, refrigeration works well — just make sure it’s well wrapped so it doesn’t dry out. I always slice it first, then store individual slices so I can grab just what I need.
Freezing is a game-changer. Wrap the whole loaf tightly with plastic wrap, then foil, and freeze for up to 3 months. When ready to enjoy, thaw at room temperature — it still tastes like it’s just fresh out of the oven. I’ve tested this with slices, and it’s perfect reheated in the microwave for about 20 seconds or gently warmed in the oven for a few minutes. Add the glaze afterwards, if desired, for that freshly-baked look and feel.
If you glazed your bread, I suggest adding the glaze only after it’s fully cooled or just before serving. If you do it too early, the glaze might melt or get absorbed, losing its shiny appeal. Also, I recommend eating within a few days for the best texture and flavor, but honestly, leftovers won’t last that long — it’s just too good!
Frequently Asked Questions
Final Thoughts
This zucchini chocolate swirl bread is more than just a pretty loaf; it’s a cozy, delightful treat that’s become part of my family’s weekly rhythm. It’s forgiving, versatile, and just the right comfort to start your day or end a meal. I love how it sneaks in veggies without compromising on flavor, making it a win for everyone around the table. Whether you’re baking for friends, kids, or just yourself on a lazy Sunday, I hope you give this one a try and fall in love with it as much as I have. Happy baking, and I can’t wait to hear how yours turns out! Feel free to leave comments, share your twists, or ask questions — I love hearing from fellow passionate cooks.
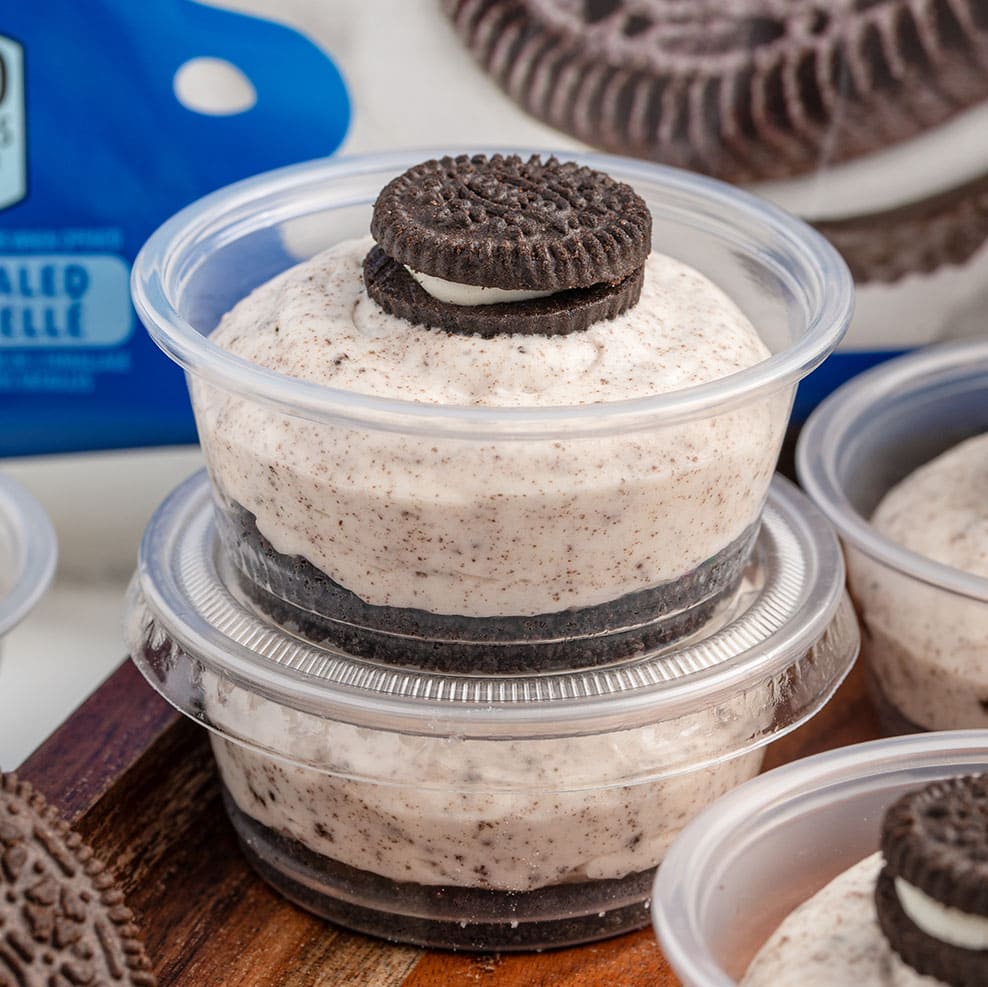
Oreo dessert cups
Ingredients
Method
- Add 2.5 cups of the crushed cookie crumbs and 0.25 cup of melted butter to a small mixing bowl. Stir to completely coat the crumbs.
- Divide the crumb mixture evenly among the cups and tamp down with the back of a spoon or a small cup.
- In a large mixing bowl, beat the softened cream cheese until smooth.
- Gradually add powdered sugar, mixing well after each addition.
- Add the cold heavy whipping cream and vanilla extract. Beat until the mixture thickens and holds its shape.
- Fold in the remaining crushed cookie crumbs gently.
- Transfer the cheesecake filling into a piping bag and pipe onto the prepared cookie base.
- Top each cup with a mini Oreo cookie and chill in the refrigerator for at least 2 hours before serving.