Creamy Mushroom Stroganoff Recipe
There’s something about the smell of baking that instantly makes everything feel cozy, don’t you think? I remember spending lazy Sunday mornings with a cup of coffee in one hand and a slice of warm, fragrant coffee cake in the other — it’s pure comfort. Over the years, I’ve tested countless recipes, but this one’s a true keeper. It’s incredibly moist, with a tender crumb, and those little ribbons of zucchini keep it surprisingly fresh and moist. My kids ask for this all the time — it’s like their favorite weekend treat, but it’s so simple I can whip it up on a busy weekday, too. Honestly, this dish is a lot like a classic crumb cake, but with a sneaky vegetable that makes it healthier and even more delicious. Perfect for breakfast, brunch, or a cozy snack with friends — trust me, once you try it, you’ll be making it all the time!
What is Zucchini Swirl Coffee Cake?
This Zucchini Swirl Coffee Cake is what I like to call a “hidden veggie masterpiece.” Think of it as a soft, buttery cake layered with ribbons of grated zucchini that add both moisture and a little nutritional boost. The name might sound fancy, but it’s genuinely straightforward — it’s just a classic coffee cake with a little green twist. The batter is tender and slightly crumbly, with a sweet cinnamon swirl running through it, giving each slice a warm, gooey surprise. The zucchini keeps it from being overly sweet or dense, making it feel like a balanced treat. It’s essentially a cross between your favorite coffee shop bakery and grandma’s kitchen comfort, but better — because you made it yourself (and possibly with a few secret tweaks). Think of this as the cake that’s as delightful for breakfast as it is for dessert with a dollop of whipped cream or a drizzle of glaze.
Why you’ll love this recipe?
What I love most about this zucchini swirl coffee cake is how effortlessly it wins hearts — even the picky eaters in my family can’t help but go back for seconds. The flavor? Oh, it’s heavenly — rich, cinnamon-spiced goodness with hints of vanilla and a subtle vegetable twist. The scent alone when it’s baking will fill your kitchen with nostalgia and make the house smell like a bakery. It’s super simple to throw together, which is a lifesaver on busy mornings or when guests unexpectedly drop by. Plus, it’s budget-friendly — you probably already have most of these ingredients in your pantry. And versatility? Totally — serve it warm with a smear of butter, topped with fresh berries, or simply enjoy it on its own. It’s one of those recipes I keep returning to because it’s reliable, comforting, and just downright tasty. Truly, once you get the hang of this, it’ll become a staple in your baking arsenal — a little piece of homemade happiness.
How do I make Zucchini Swirl Coffee Cake?
Quick Overview
This cake is all about assembly and gentle mixing. You start with a simple batter, fold in grated zucchini, layer it with a cinnamon-sugar swirl, then bake until golden and aromatic. The trick is not overmixing — just enough to combine everything smoothly. Once baked, it’s best to let it cool slightly before glazing or serving. Honestly, the hardest part is waiting for it to cool, because trust me — it smells so good, you’ll want to dive in straight from the oven!
Ingredients
For the Main Batter:
– 2 cups all-purpose flour (or a blend of gluten-free flours if needed)
– 1 cup granulated sugar
– 1/2 teaspoon baking soda
– 1 teaspoon baking powder
– 1 teaspoon ground cinnamon
– 1/2 teaspoon salt
– 1/2 cup sour cream or Greek yogurt
– 1/2 cup vegetable or olive oil
– 3 large eggs
– 1 teaspoon vanilla extract
– 1 1/2 cups grated zucchini (squeeze out excess moisture for best results)
For the Filling:
– 1/4 cup packed brown sugar
– 1 tablespoon ground cinnamon
– 2 tablespoons unsalted butter, melted (or coconut oil for dairy-free)
– Optional: chopped nuts or mini chocolate chips for extra fun
For the Glaze:
– 1 cup powdered sugar
– 1-2 tablespoons milk or cream
– 1/2 teaspoon vanilla (or almond extract for a twist)
– A pinch of cinnamon (optional)
Step-by-Step Instructions
Step 1: Preheat & Prep Pan
Set your oven to 350°F (175°C) and butter or line a 9-inch square pan with parchment paper. This cake is pretty forgiving, but a good prep makes it easier to get perfect slices. I always do this first — get everything ready, so I’m not scrambling later. And don’t forget to squeeze out as much moisture as possible from the zucchini — I like to grate it then press it between paper towels. Moisture messes with the texture and can make the cake soggy.
Step 2: Mix Dry Ingredients
In a large bowl, whisk together the flour, sugar, baking soda, baking powder, cinnamon, and salt. Sifting isn’t necessary, but it helps create a lighter batter. The key here is even distribution of the leavening agents and spices — trust me, it makes a difference in that perfect rise and flavor.
Step 3: Mix Wet Ingredients
In a separate bowl, whisk together sour cream, oil, eggs, and vanilla until smooth. I find that room temperature eggs blend better — I usually leave mine out for about 30 minutes if I remember. This mixture should feel creamy and slightly thick. If the eggs are cold, it might take a bit longer to combine smoothly.
Step 4: Combine
Pour the wet mixture into the dry ingredients and gently fold together with a spatula or wooden spoon. Be careful not to overmix — just stir until no streaks of flour remain. Overmixing can lead to a dense, tough cake, and nobody wants that. Afterward, fold in the grated zucchini, making sure it’s evenly dispersed.
Step 5: Prepare Filling
Mix the brown sugar, cinnamon, and melted butter in a small bowl. If you’re feeling fancy, sprinkle in some chopped nuts or chocolate chips. This filling adds a lovely spicy sweetness that pairs beautifully with the zucchini — think of it as a cozy cinnamon roll in every slice.
Step 6: Layer & Swirl
Pour half of the batter into your prepared pan, then sprinkle with half of the cinnamon-sugar mixture. Repeat with the remaining batter and filling. Use a butter knife or skewer to swirl gently through the layers — this creates those pretty ribbons of cinnamon and zucchini that make each piece special.
Step 7: Bake
Pop it in the oven for about 45-50 minutes, or until a toothpick inserted into the center comes out clean. Ovens vary — my tip is to start checking at 45 minutes. If it’s browning too quickly, tent it with foil. You want a golden, slightly cracked top and a fragrant house!
Step 8: Cool & Glaze
Let it cool in the pan for 15 minutes, then transfer to a wire rack. While it’s still slightly warm, drizzle with your glaze. It sinks in beautifully, adding just the right touch of sweetness and shine. You can also sprinkle a little extra cinnamon or chopped nuts on top for a fancy finish.
Step 9: Slice & Serve
Cut into squares with a sharp serrated knife, wiping it clean between slices for neat pieces. Serve warm or at room temperature — either way, it’s wonderful with a side of coffee or a glass of cold milk. I love this slightly cooled because the flavors meld together nicely, but honestly, fresh out of the oven? Pure bliss!
What to Serve It With
This zucchini swirl coffee cake is so versatile, you can serve it in many ways. For breakfast, pair it with your favorite coffee or a frothy cappuccino — it’s a nice balance of sweet and savory, with a veggie boost. I’ve also served it at brunch with fresh fruit, whipped cream, or Greek yogurt on the side, and everyone just raves about the flavor. When it’s dessert time, a scoop of vanilla ice cream or a drizzle of caramel makes it feel like a special treat. Or, my favorite — simply cut a warm slice, spread with butter, and enjoy with your morning newspaper. It’s one of those recipes that feels fancy enough for guests but easy enough to whip up on a regular Tuesday. The best part? You get to sneak in vegetables without anyone ever noticing — that’s what I call foodie magic!
Top Tips for Perfecting Your Zucchini Swirl Coffee Cake
Over the years, I’ve learned a few tricks to make this cake even better. First, don’t omit squeezing out that zucchini moisture — it makes all the difference in keeping the cake tender and light. I used to forget this step, and the cakes turned out a bit soggy — lessons learned! When mixing, fold gently to keep the batter airy; overmixing is a quick way to dense results. For the swirl pattern, I like to sprinkle the cinnamon-sugar while the batter is still spooned on, then swirl with a skewer or toothpick in figure-eight motions for a pretty marbled effect. Want to change it up? Try adding chopped walnuts or mini chocolate chips to the filling. Baking tips? Place your rack in the middle of the oven and monitor the cake as it bakes — ovens can vary, and I once overbaked mine, losing that soft crumb. A quick toothpick test always helps. For the glaze, start with less milk, then add more for the desired drizzly consistency. If you want a richer glaze, swap in cream or even a little cream cheese blended into powdered sugar. Practice makes perfect — I’ve made this many times, tweaking for fluffiness and flavor. And trust me, patience and a gentle touch really do make the biggest difference!
Storing and Reheating Tips
This cake is best enjoyed within the first two days — it stays moist and flavorful, especially if stored in an airtight container. Keep it at room temperature for up to 24 hours, then move to the fridge if you’re keeping it longer. I like to cover mine loosely with foil or a cake dome; this preserves the crust while keeping it fresh. If you need to store it longer, freeze it well wrapped with plastic wrap and foil; it’ll keep for about a month. To reheat, gently warm individual slices in the microwave for 15-20 seconds — just enough to bring back that cozy warmth. If you’ve glazed it, I recommend adding the glaze after reheating so it stays nice and shiny. A quick reheat in the oven at 325°F for about 10 minutes works too, especially if you want to keep that freshly-baked texture. Just remember, the longer it sits, the more the flavors meld, so don’t be afraid to bake it a day ahead for fuss-free entertaining or weekday indulgence.
Frequently Asked Questions
Final Thoughts
This zucchini swirl coffee cake has become a family favorite, not just because it tastes so good, but because it’s a little piece of home-baked comfort that I can whip up in no time. The balance of sweet, spicy, and veggie goodness makes it a surprisingly versatile treat — perfect for breakfast, a snack, or even a casual dinner party. Every time I make it, I get that warm nostalgic feeling, thinking about lazy mornings and happy conversations around the table. Plus, sneaking zucchini into the batter means I feel a tad less guilty indulging in seconds! Give it a try — I promise, once you get the hang of the swirl technique and whisking, it’s a breeze. And I’d love to hear how you customize it — different nuts, flavors, or toppings are all welcome. Happy baking, my friend! And don’t forget to leave a comment below with your own variations or photos — I love sharing in your kitchen adventures too.
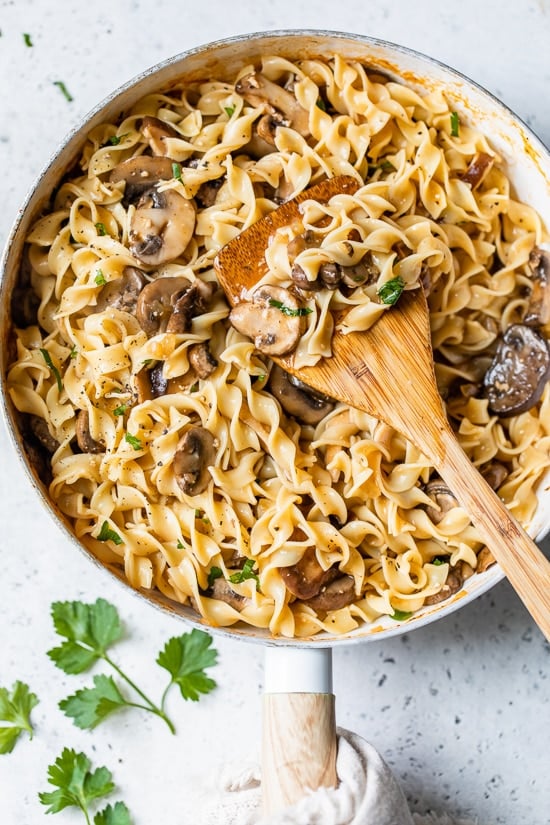
mushroom stroganoff
Ingredients
Method
- Cook noodles in salted water according to package instructions, undercooking slightly to finish with the sauce.
- Heat a large nonstick skillet over medium-high heat.
- Melt butter over medium heat, add onions, cook for 2-3 minutes. Stir in flour for 30 seconds.
- Gradually add broth, Worcestershire sauce, and tomato paste, stirring constantly.
- Add mushrooms, thyme, salt, and pepper; cook for 4-5 minutes until thickened and bubbling.
- Pour in wine or sherry; boil, then reduce heat and simmer for 4 minutes. Remove from heat.
- Stir in sour cream, add cooked noodles, toss to combine, and garnish with parsley.