Spooky Cake Jars How to Make Them Easy
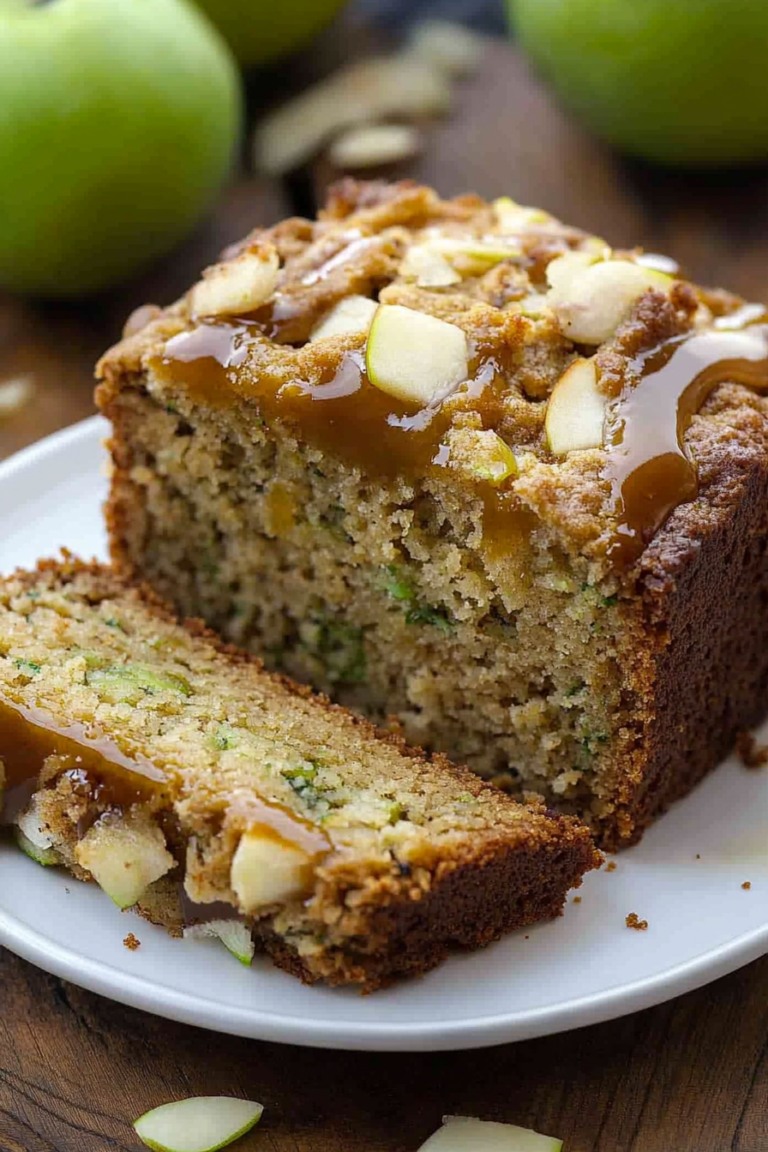
There’s something about a warm slice of coffee cake that just feels like a hug from the inside out. Maybe it’s the sweet aroma that wafts through the kitchen when it’s baking, or the way everyone gathers around the table to share a moment of comfort and joy. I remember my mom always had a version of this on lazy Sunday mornings, and honestly, I still crave it today—especially when I want something sweet but don’t want hours in the kitchen. This particular zucchini lemon coffee cake is a game-changer. It’s incredibly moist, packed with fresh zucchini, and the bright lemon zest just lifts everything. Plus, it’s one of those recipes I’ve made a dozen times, tweaking here and there, and I swear, it tastes better every time. My kids ask for this all the time—it’s become a staple in my house. And trust me, even if you’re not a seasoned baker, you’ll find this one’s a lifesaver on busy nights or when someone needs a little comfort in a slice. And the best part? It disappears in minutes at my house, leaving everyone asking for more!
What is Moist Zucchini Lemon Coffee Cake?
Think of this as a delightful twist on traditional coffee cake—think crumbly topping, but hidden inside is tender, moist zucchini that keeps every bite surprisingly rich and flavorful. It’s essentially a quick bread that acts like a cake, with fresh lemon zest giving it a zingy brightness. The name says it all: it’s a moist, tender cake layered with a fresh, citrusy punch, topped with a crunchy streusel. The zucchini, which might sound odd at first, melts into the batter, adding moisture and a subtle veggie sweetness that makes it feel almost like a healthier treat—except it’s so delicious, nobody will ever guess! This dish’s roots are in my family’s tradition of making the most out of every ingredient; nothing goes to waste, and this cake is proof that healthy can be insanely tasty. Think of it as a cake that’s perfect for breakfast, brunch, or even a cozy afternoon snack—easy, beautiful, and downright addictive.
Why you’ll love this recipe?
What I love most about this zucchini lemon coffee cake is how it balances flavors and textures. The moist crumb is packed with flavor—lemon zest and a hint of vanilla uplift the zucchini’s subtle sweetness, while the crunchy streusel topping adds that irresistible contrast. It’s a symphony of textures that you’ll keep going back for. And the best part? It’s surprisingly simple to whip up, even on a busy weekday. I’ve tested this with regular all-purpose flour, and it’s perfect, but I also tried it with almond flour (because I like experimenting) and it turned out even creamier—trust me on this one! It’s budget-friendly too—frozen zucchini works just as well as fresh, and the ingredients are staples in most kitchens. Flexibility is another huge win; you can tweak the sweetness level, swap out the lemon for orange, or add a handful of blueberries for extra flair. My kids ask for this all the time because it’s not just delicious—it’s comfort in every bite. Whether I’m serving it for brunch or just craving something sweet at 10 p.m., this cake always comes to the rescue.
How do I make Zucchini Lemon Coffee Cake?
Quick Overview
This cake is a breeze to put together and comes together in under an hour. The secret to its incredible moistness is in the grated zucchini, which keeps everything tender and light, while the lemon zest and vanilla add a fresh brightness. The process involves mixing a few simple ingredients, layering the batter with a tangy cream cheese or fruit filling if desired, swirling or sprinkling with cinnamon, and finishing with a crunchy streusel topping. It’s one of those recipes that feels fancy but is honestly so easy—you just need to keep a close eye on it while it bakes. Once out of the oven, a quick glaze ties everything together, making it look just as pretty as it tastes. Perfect for sharing, and I promise, the aroma alone will make everyone rush to the kitchen!
Ingredients
For the Main Batter:
- 2 cups grated zucchini (about 2 small zucchinis, excess moisture squeezed out)
- 1 1/2 cups all-purpose flour (or almond flour for a gluten-free option)
- 1 cup granulated sugar (adjust to taste)
- 1/2 teaspoon baking powder
- 1/2 teaspoon baking soda
- 1/4 teaspoon salt
- 1 teaspoon vanilla extract
- 2 large eggs
- 1/2 cup vegetable oil or melted butter
- Zest of 1 lemon + 2 tablespoons lemon juice
For the Filling:
- Optional: 1/2 cup cream cheese or fruit jam (strawberry, raspberry, apricot)
- A handful of blueberries or raspberries (for that extra fruity pop)
For the Glaze:
- 1 cup powdered sugar
- 2-3 tablespoons lemon juice
- A splash of milk or almond milk (for thinning, if needed)
Step-by-Step Instructions
Step 1: Preheat & Prep Pan
Set your oven to 350°F (175°C). Grease a 9-inch springform or square baking pan and line it with parchment paper—this makes cleanup a lot easier. I always do this in advance and then wash my hands while the oven warms up—that way, I don’t forget anything when it’s time to bake!
Step 2: Mix Dry Ingredients
In a big bowl, whisk together the flour, baking powder, baking soda, salt, and sugar. I find that sifting these together helps keep the batter light and ensures everything’s evenly distributed. Plus, it prevents clumps—trust me, no one wants flour pockets in their cake!
Step 3: Mix Wet Ingredients
In a separate bowl, beat the eggs with the oil, vanilla, lemon zest, and lemon juice until well combined. I like using a fork for this—it’s quick and means less dishes. The smell of lemon and vanilla together is just heaven.
Step 4: Combine
Pour the wet mixture into the dry ingredients and gently fold together with a spatula. Don’t overmix—stir until just combined. You want a smooth, thick batter with no streaks of flour. Overmixing can make the cake dense, and nobody wants that in a coffee cake!
Step 5: Prepare Filling
If you’re using cream cheese, soften it slightly and mix with a tablespoon of sugar for a tangy, sweet layer. Or, spread some jam for a fruitier punch. I love adding blueberries here—so good with that lemon zing. Keep this ready for layering.
Step 6: Layer & Swirl
Pour half the batter into your pan. Spread the filling evenly over this, then top with the remaining batter. Use a toothpick or a skewer to gently swirl the batter and filling to create beautiful marbling. This step is what makes the cake so visually stunning and adds a fun surprise in every slice.
Step 7: Bake
Pop it into the oven and bake for 40-45 minutes. Check with a toothpick inserted in the center—if it comes out clean, you’re golden! Oven times can vary, so start checking at 38 minutes if you’re an overachiever like me. It should be golden brown on top, with the edges pulling away ever so slightly from the sides of the pan.
Step 8: Cool & Glaze
Allow the cake to cool in the pan for about 15 minutes before transferring it to a wire rack. Once cooled slightly, whisk together your glaze ingredients. Drizzle over the top while it’s still a little warm—this helps it soak in and adds that glossy, irresistible finish.
Step 9: Slice & Serve
Use a sharp knife to cut into squares or rectangles. I suggest waiting at least 20 minutes after glazing—let it set so the slices hold their shape. Serve it warm or room temperature, maybe with a cup of coffee or tea. And if you’re feeling fancy, sprinkle a little extra lemon zest on top for a pretty touch. Trust me, this cake looks just as lovely as it tastes, and it’s hard to resist digging in right away!
What to Serve It With
This cake is versatile—it’s happy on any occasion. For breakfast, pair it with a steaming mug of coffee or tea; the lemon and zucchini brighten up those early hours. On brunch, serve it alongside fresh fruit or yogurt, and let everyone dig in. As a dessert, it’s stunning when served with a dollop of whipped cream or a drizzle of honey—my personal favorite way. And it’s perfect as a cozy snack with family on Sunday afternoons—nothing beats the smell of this baking while everyone lounges around. I love keeping leftovers in an airtight container, and honestly, it’s just as good the next day—if it lasts that long! This cake has become a family staple, and I always get asked for the recipe. It’s one of those comforting, crowd-pleasing desserts that also feels a little bit special. Plus, it’s a sneaky way to get my kids to eat more veggies without hearing the usual fuss. Honestly, the secret is in the lemon—bright, fresh, and absolutely addictive.
Top Tips for Perfecting Your Moist Zucchini Lemon Coffee Cake
After making this a dozen times, I’ve learned a few tricks that make all the difference. First, squeeze out as much moisture as possible from the grated zucchini; surplus water can make your batter runny and tricky to bake evenly. I always use a clean dish towel or cheesecloth to wring out excess liquid—it’s a game-changer. Second, don’t overmix your batter once you combine the wet and dry ingredients—a few gentle folds are enough. Overmixing can lead to a dense, gummy texture rather than light and fluffy. When it comes to the swirl, I like to keep some of the batter aside before layering, so I can create a pretty marbled effect that’s not just tasty but also looks professional. For ingredient swaps, I’ve tested coconut oil instead of vegetable oil, which adds a subtle tropical flavor, and almond flour for a nuttier take—both work well, but keep in mind they might change the baking time slightly. When baking, I always position my rack in the middle of the oven; it promotes even browning. And for the glaze, start with less lemon juice and add more if needed—sometimes your powdered sugar can be drier or wetter depending on humidity. Trust your senses here—you want that silky consistency that just coats a spoon nicely. The biggest lesson? Don’t rush the cooling step; patience ensures your slices hold their shape and the glaze sets beautifully. I’ve also learned that adding a sprinkle of lemon zest on top right before serving makes it look so fresh and inviting. Little tweaks like these make your baking more foolproof and way more fun!
Storing and Reheating Tips
This cake keeps beautifully—just store it properly, and it’ll stay moist and delicious for days. If you’re planning to eat it within a day or two, keep it covered tightly with plastic wrap or place it in an airtight container at room temperature. I do this in the morning, and by lunchtime, it’s still soft and fresh. For longer storage, refrigerate it—just make sure to cover it well. It’ll last up to five days, and I actually prefer it cold the next day, as the flavors deepen. If you want to freeze slices, wrap them individually in plastic wrap, then stash in a zip-top bag. They’ll keep for up to three months (if they last that long!). To reheat, I usually microwave a slice for 20-30 seconds—that’s just enough to warm it without drying it out. The glaze is best added fresh, but if you want to re-glaze after refrigeration, just give it a quick warm-up in the microwave first. Keep in mind, the cake will softer as it sits, so serve it at room temperature if you want that perfect tender crumb. Trust me, even leftovers taste amazing, especially when warmed up with a little extra squeeze of lemon juice or a dusting of powdered sugar. This cake is meant to be enjoyed over several days—so don’t be shy about making a double batch! It’s my go-to comfort in cake form.
Frequently Asked Questions
Final Thoughts
Honestly, this moist zucchini lemon coffee cake has become my go-to when I want something comforting yet bright. The combination of fresh zucchini and lemon feels like a little burst of sunshine, and I love how versatile it is—perfect for breakfast, brunch, or even an indulgent afternoon treat. It’s one of those recipes that feels special enough to serve to guests but simple enough to make any night of the week. Over the years, I’ve shared it with friends, tested it with different flours, and adjusted the sweetness to suit different tastes. It always gets rave reviews, and I think that’s because it’s honest—full of flavor, comforting to eat, and speaks of home. I hope you try it and discover how wonderful a little humble zucchini can be when paired with lemon and a touch of sweetness. Happy baking, and I can’t wait to hear how yours turns out! Don’t forget to leave a comment and share your own variations—every batch is a little different, and that’s what makes this super fun.

Halloween cake
Ingredients
Method
- Preheat your oven to 350°F. Grease and flour the cake pans.
- In a large mixing bowl, combine flour, sugar, cocoa powder, baking powder, and salt.
- Add milk, vegetable oil, eggs, and vanilla to the dry ingredients and mix until smooth.
- Pour batter into prepared pans and bake for 45 minutes or until a toothpick inserted in the center comes out clean.
- Allow cakes to cool completely before frosting.
- Decorate with melted red candy melts to create spooky Halloween designs.