Easy Vanilla Syrup Recipe for Drinks & Baking
There’s something about the smell of warm bread filling the house that always feels like a cozy hug, don’t you think? I remember as a kid, mornings when my mom would bake something like this, and the whole kitchen would be full of that irresistible aroma. Ever since then, I’ve been chasing that same feeling — and honestly, it’s perfect for those lazy Sunday mornings or those quick mornings when I need a little comfort boost. This zucchini banana cinnamon bread is one of my favorites because it’s not just insanely delicious, but it’s also a sneaky way to get my kids to eat more veggies. Plus, it’s surprisingly easy to whip up — I promise, no complicated techniques here! The best part? It’s one of those recipes that tastes just as good the next day, or even after a quick freeze. Trust me, once I started making this, it disappeared in minutes at my house. And the thing I love most? It’s so versatile — sweet enough for breakfast, but cozy enough for a snack or a quick dessert. Let me take you through all the little secrets I’ve learned along the way — come on, grab a mug of coffee, and let’s get baking!
What is Zucchini Banana Bread?
Think of this as a lovechild between zucchini bread and banana bread, with a cozy cinnamon twist. It’s essentially a moist, tender loaf bursting with ripe banana flavor, complemented by the subtle sweetness of shredded zucchini — yes, zucchinis! The name might sound fancy, but it’s just a straightforward mashup of healthy and indulgent. The zucchini adds moisture without diluting the flavor, while the bananas keep every bite tender and packed with natural sweetness. I like to call it “hidden veggie bread” at my house, because my kids secretly ask for seconds whenever I make it. The cinnamon? That’s just the warm hug on top, giving it that comforting, bakery-style aroma. It’s perfect for breakfast, a quick snack, or even that surprise afternoon craving. Honestly, when I first tested this recipe, I was just looking for a way to use up some overripe bananas and leftover zucchini. What I got was a family favorite — a loaf I keep coming back to because it’s simple, satisfying, and just feels like home every time I bake it.
Why you’ll love this recipe?
There’s a lot to love here, but honestly, what keeps me coming back is how effortlessly delicious this bread is. First off, the flavor — it’s got that classic banana sweetness with a hint of cinnamon that instantly makes your house smell like a cozy bakery. The zucchini? It’s just enough to keep the bread incredibly moist without any fuss or weird veggie taste. I’ve tested this so many times with different kinds of bananas — from slightly green to completely spotted — and the results are always tender, flavorful, and just the right amount of sweet. Plus, I always do this when I want something comforting but don’t want to spend hours slaving over a fancy dessert. It’s honestly a lifesaver on busy nights, especially because I can prep most of it ahead of time. The ingredients are budget-friendly, too — nothing exotic or hard to find, which makes it perfect for a quick bake anytime. And if you’re feeling fancy, you can toss in nuts, chocolate chips, or dried fruit to switch things up. What I love most about this is how adaptable it is — you can make it healthier, sweeter, or more decadent depending on what mood you’re in. It’s simple, soulful, and totally satisfying.
How do you make Zucchini Banana Bread?
Quick Overview
This recipe comes together in a few straightforward steps. First, you shred the zucchini, squeeze out excess moisture, and mash the bananas. Then, mix your dry ingredients — flour, baking soda, cinnamon, and a pinch of salt. In another bowl, whisk together wet ingredients like eggs, oil, vanilla, and the mashed bananas. Combine everything just until barely mixed, fold in your shredded zucchini, and pour the batter into a loaf pan. Add your optional goodies like nuts or chocolate chips if you fancy. Bake until golden and a toothpick comes out clean. The whole process is forgiving, with plenty of room for tweaking — trust me, once you’ve done it a couple of times, it’s totally routine. This bread is just as good warm out of the oven as it is on the second day — I always find myself sneaking a slice with butter even when it’s cold, no shame!
Ingredients
For the Main Batter:
- 2 ripe bananas, mashed — the riper, the better for sweetness and moisture
- 1 cup shredded zucchini — grated and excess moisture squeezed out (I use a clean dish towel)
- 2 large eggs — room temperature for better binding
- 1/3 cup vegetable oil — or melted coconut oil for a richer flavor
- 1 teaspoon vanilla extract
- 1 3/4 cups all-purpose flour — I’ve tested with half whole wheat, and it’s just as good
- 1 teaspoon baking soda
- 1 teaspoon ground cinnamon
- 1/2 teaspoon salt
- 1/2 cup brown sugar — or coconut sugar for a healthier twist
For the Filling (Optional):
- 1/2 cup chopped walnuts or pecans
- 1/2 cup chocolate chips — because if I’m honest, I love a touch of chocolate in everything!
For the Glaze (Optional):
- 1/2 cup powdered sugar
- 1-2 teaspoons milk or cream
- 1/4 teaspoon vanilla
Step-by-Step Instructions
Step 1: Preheat & Prep Pan
I always start by preheating my oven to 350°F (175°C). Grease a standard loaf pan with butter or non-stick spray — I also like to line it with parchment paper for easy removal. While that’s warming up, I shred my zucchini with a box grater, then squeeze out as much moisture as I can — this really helps keep the bread from getting soggy later on. As for the bananas, I mash them well with a fork until smooth and slightly frothy — this helps them blend beautifully into the batter.
Step 2: Mix Dry Ingredients
In a medium bowl, I whisk together the flour, baking soda, cinnamon, salt, and sugar. I do this first to make sure all the dry bits are evenly distributed. This step is so simple but makes a big difference because it prevents clumps and ensures every bite’s perfectly flavored. I’ve learned over the years that overmixing at this stage or later can make your bread dense, so I keep it light and gentle.
Step 3: Mix Wet Ingredients
In a large bowl, I whisk the eggs, oil, vanilla, and mashed bananas until smooth. The bananas add flavor and moisture, but I like to make sure I mix everything well so there are no streaks of unblended banana. Sometimes, I test the temperature of the eggs — cold eggs straight from the fridge can slow down the mixing process, so I like to use them at room temp if I have a minute.
Step 4: Combine
Next, I pour the dry ingredients into the wet and gently fold everything together with a spatula — just until there’s no visible flour. I avoid overmixing here because that’s how gluten develops and makes the bread tough. If I see lumps, that’s okay; it’s all about keeping it tender. That’s also when I fold in my shredded zucchini, walnuts, or chocolate chips if I’m feeling fancy.
Step 5: Prepare Filling
If I’m adding nuts or chocolate, I just chop them roughly and fold them into the batter now. For a marbled effect, I sometimes dollop half the batter into the pan, spread the filling, and then layer the rest of the batter on top, swirling gently with a toothpick or butter knife. The swirl makes it look pretty and adds a little surprise in every slice.
Step 6: Layer & Swirl
Pour the batter into your prepared loaf pan. If you’re swirling, use a toothpick to create a marbled pattern. Don’t overdo it — just a few gentle zigzags is enough to make it look pretty and keep the flavors mingling beautifully.
Step 7: Bake
Bake in your preheated oven for about 50-60 minutes. The top should be golden, and a toothpick inserted in the center should come out clean (a few moist crumbs are fine — not wet batter). I always check around the 50-minute mark because oven times can vary. If it’s browning too quickly, a loose foil tent can help prevent burning. Patience is key here!
Step 8: Cool & Glaze
Once baked, I transfer the loaf to a wire rack and let it cool for at least 15 minutes before removing it from the pan. If you’re adding glaze, I do it when the bread is just warm — it seeps in beautifully and makes every bite extra special. Whisk together powdered sugar, vanilla, and just enough milk to get a pourable consistency. Drizzle and let it set for a few minutes before slicing.
Step 9: Slice & Serve
The hardest part is waiting, honestly! I use a serrated bread knife and cut thick slices — perfect for breakfast or an afternoon snack. I like to serve mine with a smear of butter or a dollop of Greek yogurt. Sometimes, I toast a slice the next day — it’s just as amazing and keeps that cozy, homey vibe alive.
What to Serve It With
This bread can go a million ways depending on your mood. For a breakfast that feels indulgent but still wholesome, serve it with a steaming mug of coffee or a glass of cold milk. My kids love it for brunch with a side of fresh fruit and maybe a dollop of yogurt — it actually feels like a treat without all the guilt. As a dessert, I like to warm a slice and dust it with powdered sugar or add extra glaze — it’s like a cozy cake in loaf form! And if I want something casual, I cut thick pieces and spread peanut butter or cream cheese on top. The possibilities are endless. Honestly, I’ve made this with almond milk once, and surprisingly, it made the bread even creamier — totally worth trying if you’re dairy-free. And because it’s moist and portable, I often pack a slice into my kid’s lunchbox or keep a few frozen for when that sweet craving hits late at night. It’s one of those recipes that just makes everything a little better, don’t you think?
Top Tips for Perfecting Your Zucchini Banana Cinnamon Bread
Every time I make this, I learn a little more. First, don’t skip squeezing out that zucchini moisture — I learned this the hard way when I had a soggy loaf that took forever to bake through. I keep a clean dish towel nearby to give it a good squeeze — it’s worth the extra minute. When it comes to mixing, I always tell myself: less is more. Overmixing the batter makes for a dense loaf, so I fold everything gently and stop as soon as it looks combined. For the swirl, I like to use a skewer or a toothpick and draw gentle zigzags to create an appealing marbled look. Want to switch things up? Try swapping walnuts for pecans, or add some dried cranberries for a tangy surprise. I’ve also tested this with honey instead of sugar — adds a lovely floral note. Baking times can vary depending on oven calibration, so keep an eye on it after 50 minutes. If the top browns too fast, tent with foil — I’ve learned that from many burnt experiments! To make the glaze extra special, I sometimes add a splash of lemon juice or vanilla extract for a brighter flavor. The key is tasting as you go and adjusting to your preferences. Honestly, this is a forgiving recipe — once you get the hang of it, it comes together in no time, and I promise, everyone will ask for seconds.
Storing and Reheating Tips
This bread stays fresh for a couple of days at room temperature if wrapped well in foil or stored in an airtight container. I find that the flavor actually improves slightly the next day — the cinnamon and banana meld into that perfect cozy flavor. If you want to keep it longer, pop slices into a zip-top bag in the fridge for up to 4 days. To freeze, wrap the whole loaf tightly in plastic wrap, then foil, and it’ll keep for up to 3 months. Thaw at room temp or gently warm slices in the microwave — I like to do a quick 10-15 seconds to revive that soft, warm feel. As for the glaze, I recommend adding it just before serving because it can get a little sticky if stored on the bread for too long. Sometimes, I skip the glaze altogether and just enjoy it plain — either way works beautifully, but I do love that extra sweet touch.
Frequently Asked Questions
Final Thoughts
This zucchini banana cinnamon bread has become a staple in my kitchen because it’s so forgiving and versatile. Whether I’m snuggling on a chilly morning, packing a quick snack for my little ones, or just craving that warm, comforting smell, this loaf never disappoints. It’s a reminder that baking doesn’t have to be complicated — with a few simple ingredients and a little love, you get something genuinely special. Plus, it’s so satisfying to know you’ve sneaked in some veggies and packed a punch of flavor without any fancy tricks. If you try it, I’d love to hear how it turns out — maybe with chocolate chips or a splash of nut butter. Happy baking, and don’t forget to savor that first slice with your favorite cup of coffee. You deserve it!
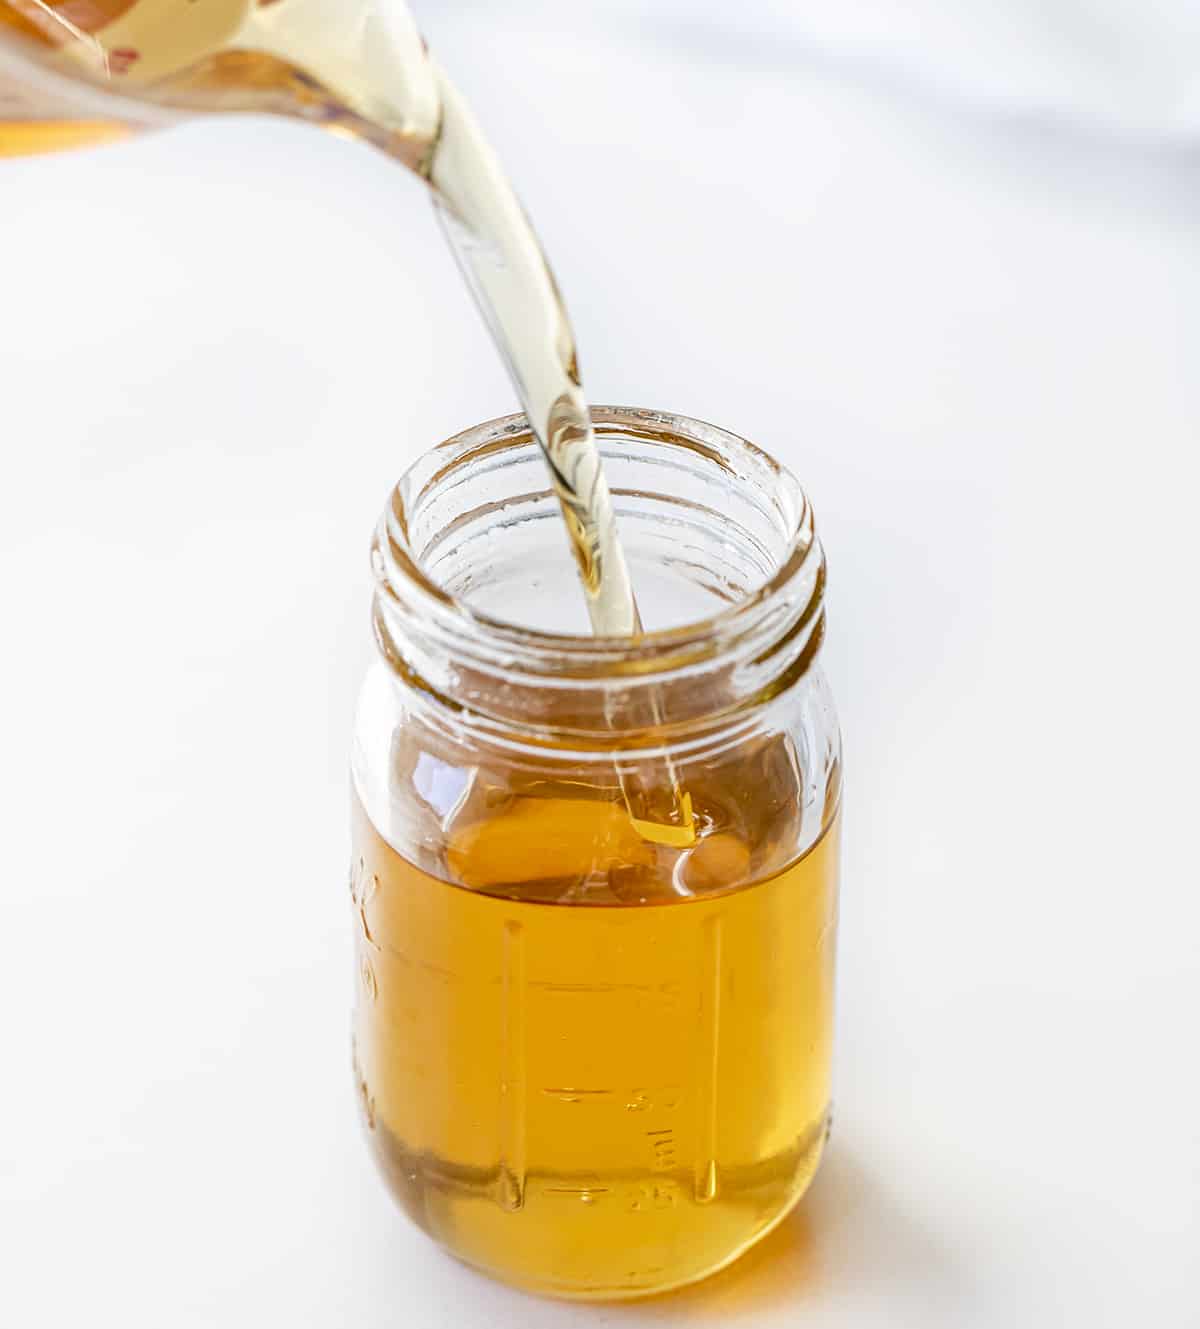
vanilla syrup
Ingredients
Method
- In a medium saucepan over medium-high heat, combine water and sugar.
- Bring to a boil and stir until all sugar is dissolved, approximately 2-3 minutes.
- Remove from heat and add vanilla extract. Stir well.
- Allow the syrup to cool completely, then transfer to an airtight container and store in the refrigerator.