Simple Bourbon Pecan Pie Delight
Honestly, there’s something about waking up to the smell of freshly baked coffee cake that just makes everything feel possible. My grandmother used to make a version of this zucchini swirl coffee cake on lazy weekend mornings, and the aroma alone would draw all of us to the kitchen like moths to a flame. Over the years, I’ve tweaked and perfected her recipe, and I swear—this one’s a lifesaver on busy nights when I want something homemade, comforting, and actually quick to throw together. The best part? The zucchini keeps the cake so moist and tender, plus the swirl of cinnamon-spiced filling somehow makes each bite a little more special. Trust me, once you make this, it’ll become a family favorite—my kids ask for it all the time, and it disappears in minutes at my house. If you’re craving that cozy aroma and a slice of indulgence that doesn’t feel heavy, read on. I’ll walk you through every step, tips, and all the little secrets I’ve learned along the way. Let’s get baking!
What is Zucchini Swirl Coffee Cake?
This zucchini swirl coffee cake is, in essence, a tender, layered treat that combines the freshness of grated zucchini with a cinnamon-spiced swirl within a soft, buttery cake. Think of it as a cross between classic coffee cake and a sweet zucchini bread—perfect for breakfast, brunch, or whenever you need a cozy pick-me-up. The idea is simple: a moist cake base with a swirl of cinnamon-sugar filling running through it, creating beautiful ribbons inside when you slice it. This recipe’s name might sound fancy, but honestly, it’s just an honest homey cake with a little extra flair. The zucchini is almost invisible in the final product—it’s more about adding moisture and nutrition, but don’t worry, the flavor is all cinnamon, vanilla, and just a hint of sweetness. It’s one of those recipes that makes you feel like a pro baker even if you’re just starting out. Plus, it’s a sneaky way to get veggies into kids (and grownups) who might otherwise be skeptical. That’s what I love most about this—literally everyone asks for seconds!
Why you’ll love this recipe?
Let me tell you, what I love most about this zucchini swirl coffee cake is how adaptable and forgiving it is. It’s one of those recipes that I always keep in my back pocket because it’s perfect for so many occasions. First off, the flavor—oh, the flavor! The cinnamon and vanilla combo makes it smell like Fall in the best way, and that warm aroma just makes everyone’s morning brighter. But what really keeps me coming back is the texture. The zucchini makes the cake so tender, almost melt-in-your-mouth—like a gentle hug in every bite. I’ve tested this with different kinds of zucchinis, even frozen grated ones (trust me on this), and it still turns out perfect. It’s also super budget-friendly since zucchinis are in season most of the year, and the pantry staples are pretty much always there. This isn’t just a dessert; it’s a breakfast, a snack, and sometimes even a dessert-after-dinner kind of treat. The swirl is what makes it visually stunning and adds that touch of homemade magic. Honestly, I think what I love most is that it’s a no-fuss recipe—great for busy mornings when you want something homemade quickly, but it still feels special enough to share with friends or family. Plus, it’s one of those recipes I can modify easily—add nuts, swap the glaze, make muffins—I’ve done it all, and each variation turns out just as delightful.
How do I make Zucchini Swirl Coffee Cake?
Quick Overview
This coffee cake is pretty straightforward—mix your dry ingredients, blend your wet, combine them carefully so you don’t overmix, then pour half into your prepared pan. Spread a cinnamon-sugar filling on top, add the remaining batter, swirl it all gently to create those pretty ribbons, and bake. The magic is in the swirl—baking brings out that cinnamon aroma and makes it irresistibly gooey in the middle. It’s quick enough to whip up on a weekend morning, yet cozy enough to call it comfort food anytime. The best part? No fancy equipment needed—just a whisk, a bowl, and a spoon. I love that it’s forgiving, so even if you’re rushing, it’s almost impossible to mess up. The balance of moist cake, spicy filling, and that tender crumb—oh, you’re gonna love the smell too! It takes about 10 minutes prep, then into the oven, and you’re rewarded with a warm, fragrant piece that tastes like home.
Ingredients
For the Main Batter:
– 1 ½ cups all-purpose flour (I always do this with unbleached flour for a heartier texture)
– 1 teaspoon baking powder
– ½ teaspoon baking soda
– ¼ teaspoon salt
– ½ cup granulated sugar
– 1 teaspoon vanilla extract
– ½ cup unsalted butter, melted
– 2 large eggs
– 1 cup grated zucchini (squeeze out as much moisture as you can – it keeps the cake from being soggy)
For the Filling:
– ½ cup brown sugar
– 1 teaspoon cinnamon
– 2 tablespoons softened butter
*Optional: a handful of chopped nuts or raisins for a little extra texture.*
For the Glaze:
– ½ cup powdered sugar
– 1-2 tablespoons milk or cream
– A splash of vanilla or almond extract (if you like a little flavor boost)
Step-by-Step Instructions
Step 1: Preheat & Prep Pan
Set your oven to 350°F (175°C). Grease a 9-inch square pan or round cake pan—trust me, parchment paper works wonders here—then set aside. The smell of the butter melting as you do this always makes me feel cozy already.
Step 2: Mix Dry Ingredients
In a medium bowl, whisk together the flour, baking powder, baking soda, salt, and sugar. This ensures everything’s evenly distributed—important because you don’t want any clumps of baking soda or uneven sweetness. Plus, it helps aerate the mixture, making your cake lighter.
Step 3: Mix Wet Ingredients
In a separate bowl, beat the eggs with vanilla. Mix in the melted butter—I like to do this while it’s still warm because it blends smoothly. Add the grated zucchini last, stirring until evenly distributed. If your zucchini is extra watery, I recommend blotting it with a paper towel first—this keeps the batter from feeling too heavy.
Step 4: Combine
Pour the wet mixture over the dry ingredients and gently fold together with a spatula. Be careful not to overmix; a few lumps are fine! Overmixing can make the cake dense, and nobody wants a brick. Just until everything is combined—think of it as folding in your favorite ingredients without stirring too much.
Step 5: Prepare Filling
In a small bowl, stir together the brown sugar, cinnamon, and softened butter until crumbly. If you want extra crunch, sprinkle some chopped nuts on top or inside the swirl. I love this part because the smell of cinnamon together with the brown sugar is so nostalgic.
Step 6: Layer & Swirl
Spread half the batter into your prepared pan. Even it out with a spatula. Sprinkle or dollop the cinnamon-sugar filling over the batter. Then gently spread the remaining batter on top—careful not to disturb the filling too much. Using a skewer or a butter knife, swirl gently through the batter to create beautiful ribbons—think of it as painting with cinnamon and batter. Don’t overdo it; the goal isn’t a perfect marble—and trust me, the more you swirl, the more delightful the pattern.
Step 7: Bake
Pop it into your preheated oven for about 35-40 minutes. I always start checking around 35 minutes—insert a toothpick in the center, and if it comes out clean, it’s done. If it’s still gooey, give it a few more minutes. Ovens vary, so I like to rotate the pan halfway through baking for even heat. The whole house will smell like warm cinnamon and buttery cake—you might want to turn on all your fans!
Step 8: Cool & Glaze
Allow the cake to cool in the pan for at least 15 minutes—this helps it set up so it won’t fall apart when you slice. Meanwhile, whisk together the powdered sugar with milk and vanilla to make a simple glaze. When the cake is just warm enough to handle but still slightly warm, drizzle that sweet glaze all over. It soaks in just enough to add a glossy, irresistible finish.
Step 9: Slice & Serve
Use a serrated knife for clean slices. I like to serve this slightly warm—my family loves it with a dollop of whipped cream or a scoop of vanilla ice cream if I’m feeling extra indulgent. Hot or cold, it’s equally fantastic, and the swirl looks so pretty on a plate. Trust me, this is one that’s hard to share, but I do if I can—everyone ends up coming back for more.
What to Serve It With
This zucchini swirl coffee cake is so versatile, it practically serves itself. For breakfast on lazy weekends, I love pairing it with a strong cup of coffee or a latte topped with cinnamon. The next morning, I sometimes slice leftovers and toast it lightly—hello, crunchy edges—and smother with butter or jam. It’s also perfect for brunch—serve with fresh fruit, Greek yogurt, or scrambled eggs for a complete feast. When I serve it as a dessert, I like to add a dusting of powdered sugar or a drizzle of caramel sauce—something warm and sweet to complement the cinnamon-spiced interior. If I want a quick snack, I’ll cut small squares and pack them in the lunchbox or take them on picnics. Honestly, I’ve made this for everything from Sunday brunch to kid’s sleepovers—and I’ve never had a single piece leftover. It’s just that good. And trust me, it tastes incredible still warm with a hot cup of coffee or cold with a glass of cold milk. Family traditions? We always have this on our holiday mornings—my grandmother’s secret to making mornings special.
Top Tips for Perfecting Your Zucchini Swirl Coffee Cake
After making this countless times, I’ve got a few tried-and-true tricks I swear by. First, don’t forget to squeeze out excess moisture from your zucchini. A soggy cake isn’t fun, and a little patience with that step makes all the difference. I used to just grate and toss it in, but now I give it a quick squeeze—I promise it makes your crumb tender and light. When folding the wet into the dry ingredients, do it gently—a light hand keeps the batter fluffy. Overmixing ruins the texture, trust me. Regarding the swirl—think of it as a gentle dance. Use a skewer or a butter knife, and do gentle figure eights or zigzags, rather than stabbing straight down. That way, the swirls stay pretty and visible. For ingredient swaps, I’ve tried coconut sugar instead of brown, and it still turns out delightful—just a tad lighter in color. Glaze-wise, I’ve played with lemon juice instead of vanilla—it gives a little bit of zing that cuts through the sweetness. Honestly, I’ve learned that the secret is patience and a light touch. The whole process is forgiving, but paying attention to consistency, moisture, and gentle mixing makes all the difference for that perfect final product. Oh, and don’t forget: a warm kitchen smells so good, it turns everyone into an eager helper!
Storing and Reheating Tips
This cake stays pretty good for a couple of days, but I always recommend storing it properly. If you’re not eating it all right away, let it cool completely, then cover it tightly with plastic wrap or put it in an airtight container. At room temperature, it’s best to enjoy within two days—any longer, and it might start to get a bit dry. For longer storage, pop it into the refrigerator; it’ll keep up to five days. Just remember to reheat slices in the microwave for about 15-20 seconds if you want that fresh-out-of-the-oven warmth—and it’s even better with the glaze slightly softened and sticky. To freeze, wrap individual slices tightly in plastic wrap and then foil, or store in a freezer-safe container—these are good for up to two months. Thaw in the fridge overnight or microwave briefly. If your glaze has hardened, just give it a quick re-whisk with a splash of milk to loosen it up before drizzling again. The cake reheats well, but I find it’s even tastier when eaten at room temp—so sometimes I just let a slice sit out for a bit. The moisture of the zucchini keeps it from drying out, so you can enjoy it for days without losing that tender crumb. This is truly a make-ahead treat, perfect for batch baking your weekend mornings!
Frequently Asked Questions
Final Thoughts
There’s something incredibly satisfying about a slice of this zucchini swirl coffee cake—maybe it’s the warm cinnamon aroma, or maybe it’s the happy memory of weekend mornings with loved ones. Whatever it is, I know you’re going to love making and sharing this. It’s cozy, forgiving, and endlessly customizable—you can add nuts, swap out the glaze, or even serve it with fresh berries. Each time I bake this, it feels like a little celebration in my kitchen, and I hope it brings some of that magic into yours too. So, gather your ingredients, turn on your favorite tune, and let’s get baking. I’d love to see how yours turns out—tag me or leave a comment below! Happy baking, and remember: recipes are only guides—trust your instincts and make it your own. Cheers to good food and even better company around the table!
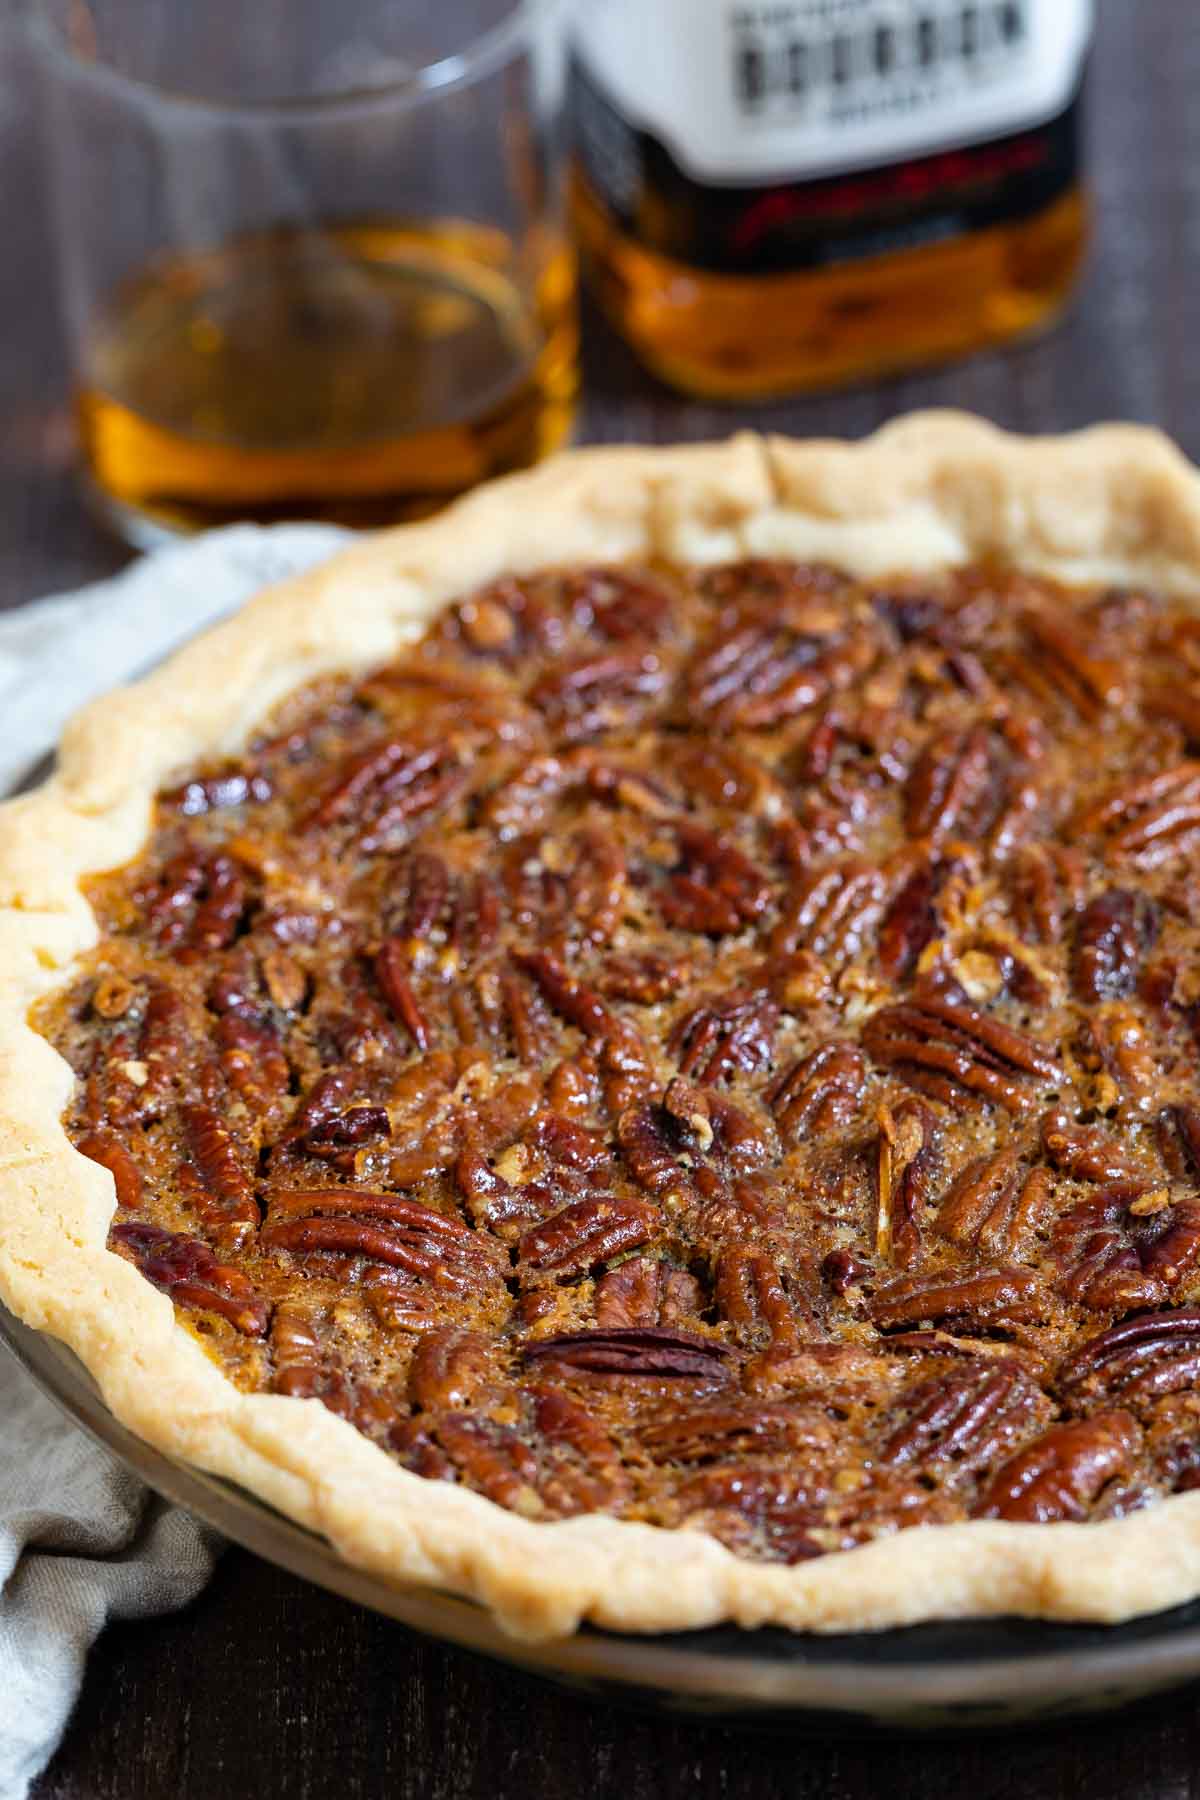
Bourbon Pecan Pie
Ingredients
Method
- Preheat oven to 425°F. Place pie crust in pie pan and chill until filling is ready.
- In a medium bowl, whisk together eggs, corn syrup, brown sugar, melted butter, bourbon, salt, and cornstarch until well combined. Stir in pecans.
- Pour filling into the prepared pie crust.
- Place pie on a baking sheet and cover with a pie shield or strips of foil.
- Bake at 425°F for 10 minutes, then lower the oven temperature to 350°F and bake for an additional 40 minutes or until the filling is set and slightly puffed.
- Remove from oven and cool completely before slicing.