Amazing Shrimp Recipe You’ll Love
There’s something about the smell of warm brownies wafting through the kitchen that instantly takes me back to childhood afternoons spent baking with my grandma. But you wanna know a secret? These zucchini brownies are just as luscious as the classic kind, maybe even better—because they sneak in a little veggie magic that I swear no kid ever notices. I’ve tested these with walnuts, chocolate chips, even a splash of vanilla—trust me, they never fail to disappear in minutes at my house. My kids ask for seconds every single time, and honestly, I love how I can indulge in something sweet without feeling totally decadent. This recipe is a lifesaver on busy nights, or when I want a treat that’s a little healthier but still totally indulgent. Plus, it’s super easy to whip up, which is always a bonus for me when I’m running around trying to get dinner on the table. If you’re ready to wow your family or just treat yourself, stick around—I promise, this one’s a keeper!
What is Zucchini Brownies?
Think of zucchini brownies as the secret weapon of baking—think moist, fudgy, and gooey, but with an unexpected twist: shredded zucchini. The name might sound funny, but it’s all about giving that classic brownie a little extra something. Basically, it’s a dense, chocolatey square that’s enriched by the original veggie—yet you’d never guess it’s in there. This dish is an approachable, no-fuss version of the traditional brownie, perfect when you’re craving something chocolaty but want to sneak in some greens or save room on sugar. The idea originated from that nifty kids’ trick of adding vegetables to desserts—because who says they can’t be delicious AND secretly healthy? And I’ve got to say, once I started experimenting with zucchini, my whole approach to baking got a little more creative. You get all the flavor and fudge factor, but with a bit of added moisture that keeps everything from drying out—perfect for those cozy nights when all I want is a sweet slice of comfort.
Why you’ll love this recipe?
What I love most about zucchini brownies is how they flip the whole idea of dessert on its head. For starters, they’re crazy flavorful—rich chocolate, a hint of sweetness, and that lovely hint of earthiness from the zucchini. The second thing? They’re so simple to make. I always do this when I want something quick but satisfying; just toss things in the bowl, stir, bake, and voila—you’re seconds away from chocolate bliss. Budget-wise, they’re a win too since zucchini is cheap and readily available, especially in summer. And the best part? Versatility. You can toss in nuts, dried fruit, or even a splash of espresso to deepen the flavor. I’ve also made these as gluten-free by swapping in almond flour, and they turned out just as fudgy and delicious. What sets these apart from regular brownies is that sneaky veggie component—no one needs to know it’s in there. I find this recipe especially handy when I want to serve a special treat that’s a little healthier but still hits all the right notes. Honestly, these brownies are my go-to when I need a quick, comforting dessert without the guilt, and I love how they bring my family together—everyone always asks for seconds!
How do I make Zucchini Brownies?
Quick Overview
Making zucchini brownies is pretty straightforward—think of it as combining a few simple ingredients, baking them in a pan, and ending up with something that’s truly comforting. The key is grating the zucchini super fine so it melds into the batter seamlessly, adding moisture and a subtle vegetable boost without changing the texture too much. The batter is rich, chocolatey, and a little thick, just as it should be. Once you layer in the zucchini and maybe some chocolate chips or nuts, it’s all about baking until the center is just set. The smell alone will make you want to eat the whole tray in one sitting. And the best part? No fancy ingredients or complicated techniques—this is classic home baking at its best.
Ingredients
For the Main Batter:
– 1 cup all-purpose flour (I like to use half whole wheat for extra health perks)
– 1/2 cup unsweetened cocoa powder (double-check for good quality, it’s worth it!)
– 1 cup granulated sugar (or coconut sugar if you prefer natural sweetness)
– 1/2 teaspoon baking powder
– 1/4 teaspoon salt
– 3 large eggs (room temperature makes for smoother mixing)
– 1/2 cup vegetable oil or melted coconut oil
– 1 teaspoon vanilla extract
– 1 cup grated zucchini (squeeze out excess moisture — this prevents sogginess)
For the Filling:
– 1/2 cup chocolate chips or chunks (I always go for semi-sweet)
– Optional: 1/4 cup chopped nuts (walnuts or pecans work beautifully)
For the Glaze:
– 1/2 cup powdered sugar
– 1-2 teaspoons milk or cream
– 1 teaspoon vanilla
– Optional: a pinch of cinnamon or espresso powder for a flavor boost
Step-by-Step Instructions
Step 1: Preheat & Prep Pan
Set your oven to 350°F (175°C), and line a 9×9-inch baking pan with parchment paper or lightly grease it. I always do this because clean slices make serving way easier—and less mess. If you’re using parchment, just cut a piece to fit and lightly butter it for extra sticking prevention.
Step 2: Mix Dry Ingredients
In a large bowl, whisk together the flour, cocoa powder, sugar, baking powder, and salt. This step ensures all those powders are evenly distributed—no unexpected clumps in the batter. Give it a good stir; this is where most of the flavor comes together.
Step 3: Mix Wet Ingredients
In a separate bowl, beat the eggs, then stir in the oil and vanilla until smooth. If I want an extra depth of flavor, I sometimes add a splash of almond extract here. The key is to get everything nice and combined without overmixing at this stage, or you might end up with tough brownies. The batter should be glossy and thick but pourable.
Step 4: Combine
Pour your wet mixture into the dry ingredients and fold gently until just combined. Resist the urge to overmix—this keeps the brownies tender and fudgy. If you notice a few lumps, that’s totally fine; a few streaks of flour won’t ruin the texture.
Step 5: Prepare Filling
Stir in the chocolate chips and nuts, if using. I love the bursts of melty chocolate hidden throughout, so I tend to add more than I probably should! If you prefer a gluten-free version, use allergy-safe chocolate chips, and you can even toss in some dried cherries or coconut flakes for extra flavor.
Step 6: Layer & Swirl
Pour the batter into your prepared pan. If you’re feeling fancy, spread some extra chocolate chips on top or gently swirl in a spoonful of peanut butter or Nutella—you’ll love the marbled effect. Use a toothpick or knife to swirl it around gently, creating beautiful ripples in the batter.
Step 7: Bake
Pop it into the oven and bake for about 25-30 minutes. The hardest part? Not opening the oven door too often! Check for doneness by inserting a toothpick into the center—if it comes out with moist crumbs (not wet batter), you’re good to go. Every oven is different, so start checking at 25 minutes.
Step 8: Cool & Glaze
Let the brownies cool in the pan for at least 15 minutes—this helps them set up. Once cooled, drizzle with the glaze or dust with powdered sugar. If you want a shiny finish, gently heat the glaze until smooth and pour it on top—allow to set for a few minutes.
Step 9: Slice & Serve
Cut into squares with a sharp knife, wiping between cuts for neat edges. Serve them slightly warm, with a dollop of whipped cream or a scoop of vanilla ice cream if you’re feeling indulgent. These are perfect with a cup of coffee or milk, but honestly—they’re wonderful on their own. Keep leftovers in an airtight container for up to three days, or freeze slices for later. Just microwave for about 10 seconds for instant coziness!
What to Serve It With
These zucchini brownies are real crowd-pleasers, whether you’re serving them for breakfast, a casual snack, or dessert. For breakfast, pair them with a strong cup of coffee or a glass of almond milk. They’re hearty enough to be a quick morning treat when your kids are rushing out the door—just cut and go. During brunch, pile a piece on a plate with some fresh berries and a dusting of powdered sugar, alongside a mimosa or a latte. As an after-dinner dessert, serve warm with a scoop of vanilla ice cream or a drizzle of caramel—trust me, it’s a game-changer. And if you’re relaxing with friends, these brownies are perfect cut into smaller pieces with tea or coffee—they feel indulgent but secretly healthy enough to justify seconds.
Top Tips for Perfecting Your Zucchini Brownies
Over the years, I’ve learned a few tricks that make these brownies even better. First, when grating zucchini, be sure to squeeze out as much moisture as possible—this prevents sogginess and helps the brownies stay fudgy. I keep a clean tea towel handy for that. If you don’t have unsweetened cocoa, dark chocolate powder works beautifully, and I’ve even swapped in mashed banana for a fruity twist (though the batter gets a little thicker). For mixing, I use a rubber spatula instead of a whisk—gentle, thorough, and less risk of overmixing. When layering the batter, I like to sprinkle a few extra chocolate chips on top and swirl a little bit of caramel for added decadence. Baking is all about watching and feeling—every oven is different, so start checking around the 25-minute mark. If you want a super moist brownie, bake a little less time; for more of a chewy crust, go a little longer. Lastly, I tested glaze options like cream cheese frosting and simple chocolate ganache, but honestly, a light dusting of powdered sugar keeps it classic and fuss-free. Trust me—these little tweaks make the process more fun and the results even more irresistible.
Storing and Reheating Tips
To keep your zucchini brownies fresh, store them properly. If you’re planning to eat them within a day or two, pack them in an airtight container at room temperature—just don’t leave them out in the sun! They’ll stay moist and delicious for about 2-3 days this way. For longer storage, pop them into the fridge, covered, for up to a week. If you want to freeze some, wrap individual pieces tightly in plastic wrap, then place in a resealable bag—these can last for a couple of months. When ready to enjoy, just microwave your slice for about 10-15 seconds until warm and gooey, or let it thaw at room temperature. Since the zucchini adds moisture, I recommend waiting to add the glaze until just before serving—otherwise, it might get soggy during storage. Keep in mind, if you’ve glazed the brownies, store them uncovered in the fridge; the glaze might not hold up well in airtight containers. Trust me, storing these right helps them stay fresh and chewy for as long as possible!
Frequently Asked Questions
Final Thoughts
Honestly, these zucchini brownies have become a staple in my home. They’re proof that dessert doesn’t have to be overly complicated or loaded with refined sugars. The zucchini keeps them astonishingly moist, while the chocolate keeps everyone coming back for just one more piece. I love making these when I need a quick treat, but I also keep a batch stashed in the freezer for those unexpected moments of sweet craving. Whether you’re trying to sneak in some greens or just want a rich, fudgy chocolate fix, I promise these will not disappoint. They remind me that baking is all about experimenting, tasting, and making something that feels like a warm hug. I hope you give this recipe a try—and I’d love to hear how your version turns out! Happy baking, friends!
Ingredients
Method
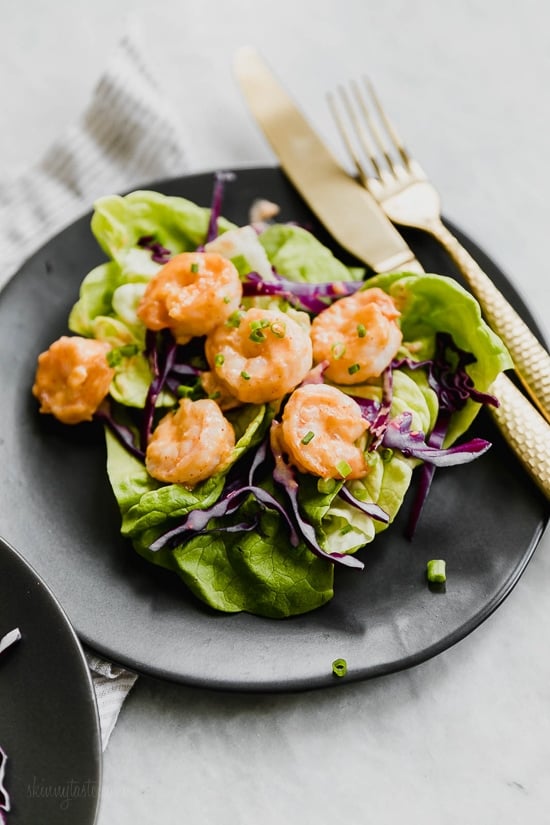
- Combine mayonnaise, Thai sweet chili sauce, and Sriracha in a bowl. Set aside.
- Pat dry the shrimp. Toss the shrimp with cornstarch until evenly coated.
- Heat the canola oil in a skillet over high heat. Add shrimp and cook until pink and crispy, about 3 minutes.
- Remove shrimp from skillet and toss with the sauce mixture to coat evenly.
- Serve hot, garnished with chopped scallions if desired.