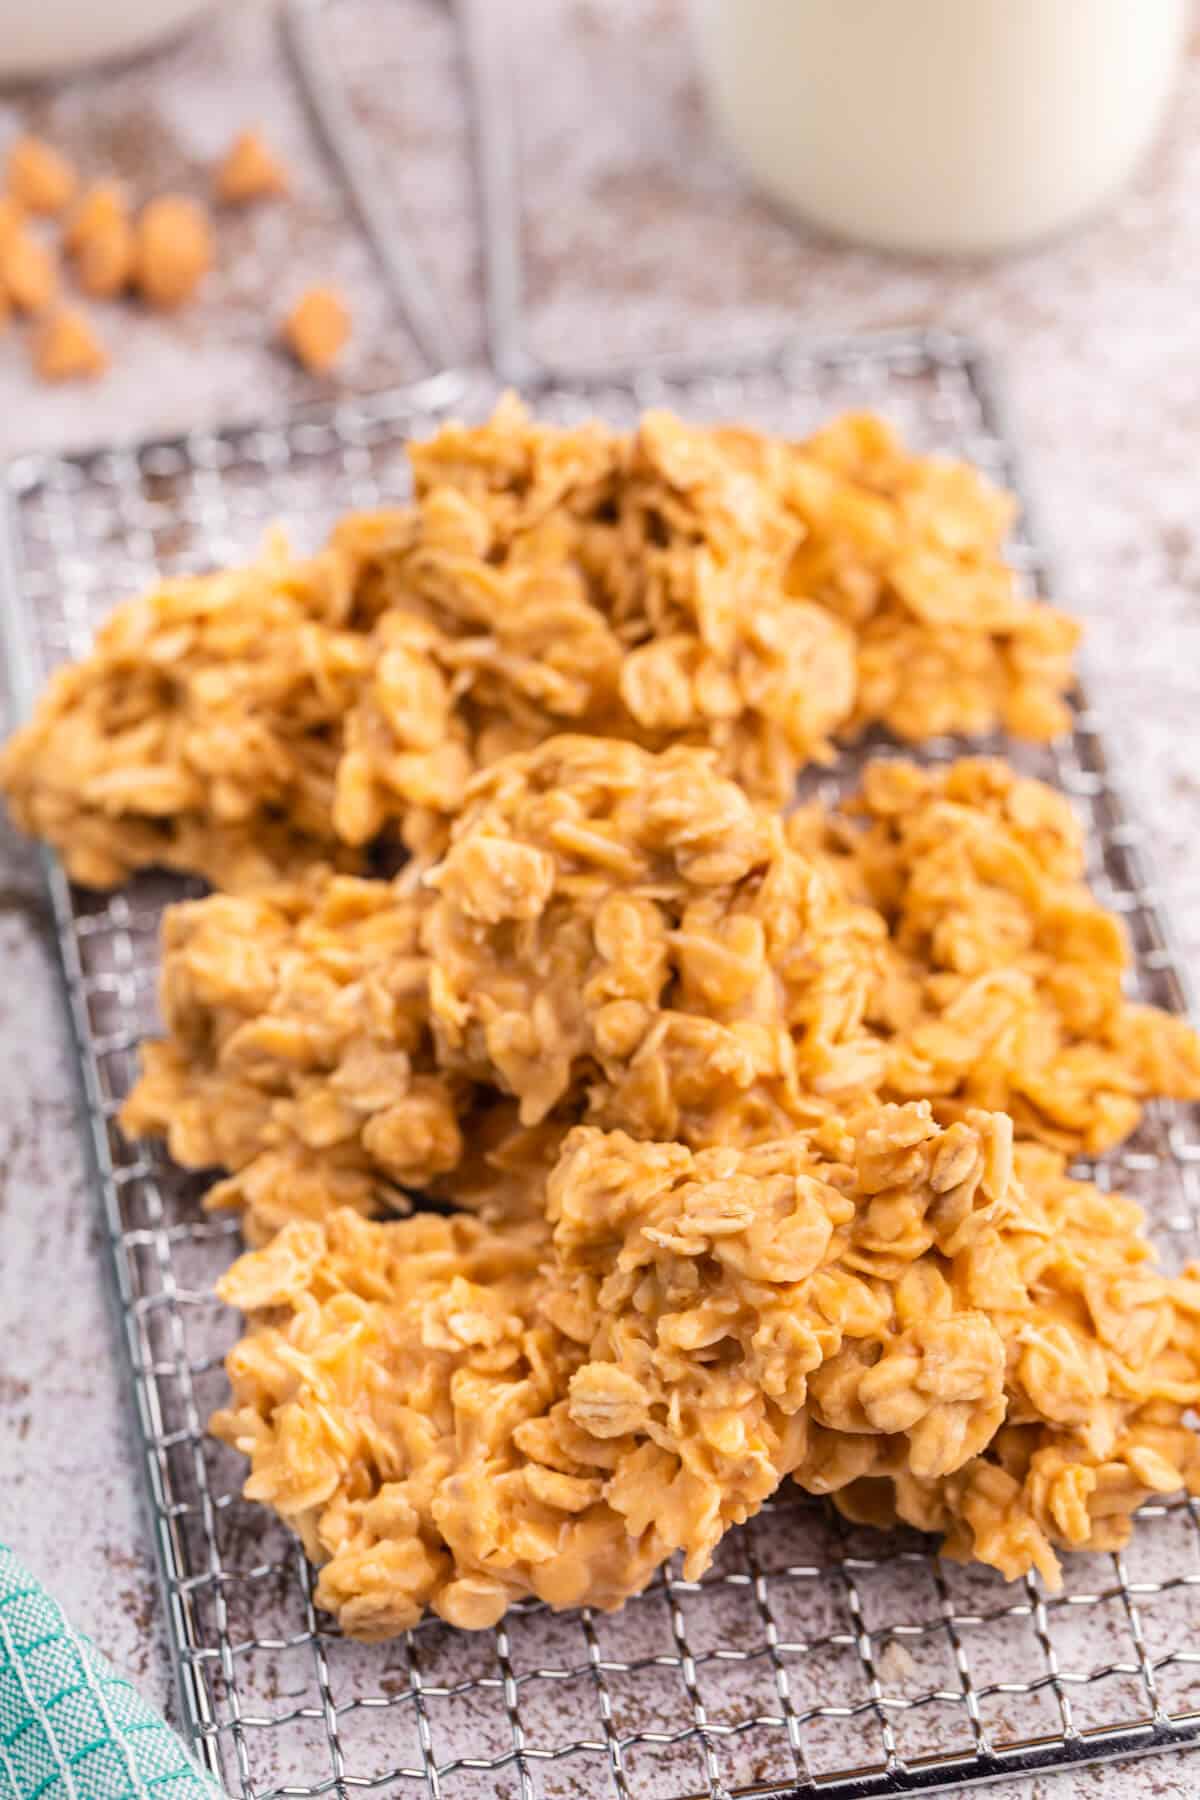
Easy Butterscotch Treats You’ll Adore
What is a secret that is whispered from one generation to the next?What is the ultimate zucchini swirl bread recipe? is absolutely that for me. Every summer, when the garden overflows with those glorious green squash, my heart practically sings because I know this bread is on its way. It’s not just a recipe; it’s a tradition, a memory in the making, and honestly, a lifesaver for using up that mountain of zucchini. Forget your everyday banana bread – this one takes all that comforting moistness and elevates it with a ribbon of sweet, spiced deliciousness. The smell alone, wafting through my kitchen as it bakes, brings back childhood summers and the joy of simple, homemade goodness. Trust me, you’ll want a slice (or three!) of this incredible zucchini swirl bread the moment it comes out of the oven. It’s truly something special.
What is the ultimate Zucchini Swirl Bread?
So, what exactly is this magical creation? Well, think of it as the sophisticated, slightly more exciting cousin to your classic zucchini bread. It’s essentially a perfectly spiced, incredibly moist zucchini quick bread, but with a delightful twist: a luscious, cinnamon-sugar filling swirled right through the middle. Imagine a dense, tender loaf studded with flecks of green zucchini, creating an almost impossibly soft crumb, all punctuated by pockets of gooey, caramelized cinnamon goodness. It’s not quite a cake, not strictly a bread, but rather a harmonious blend of both – sweet enough for dessert, yet wholesome enough for breakfast. The “swirl” is what truly sets it apart, adding an extra layer of flavor and a beautiful visual appeal that makes it feel extra special, even though it’s wonderfully simple to achieve.
Why you’ll love this recipe?
Oh, where do I even begin? This isn’t just another loaf of bread; it’s a culinary triumph in my kitchen, and I know it’ll be in yours too. What I love most about this ultimate zucchini swirl bread is how it manages to be both incredibly comforting and unexpectedly elegant. First off, the **flavor** is out of this world. You get that warm, inviting spice from the cinnamon and nutmeg, perfectly balanced by the subtle sweetness and moisture from the zucchini. It’s not overly sweet, which is something I really appreciate, letting the natural flavors shine. It reminds me a bit of my grandmother’s apple crumb cake, but with that unique zucchini freshness.
Then there’s the sheer **simplicity**. Honestly, this recipe comes together in a flash. We’re talking minimal effort for maximum reward. You don’t need any fancy equipment, just a couple of bowls and a loaf pan. It’s truly a beginner-friendly recipe, but the results taste like you slaved away all day. On a busy Tuesday, when I’m juggling work and school pickups, this one’s a lifesaver. Plus, it’s incredibly **cost-efficient**. Zucchini is often plentiful and inexpensive, especially during peak season, and the rest are pantry staples. You’re getting gourmet flavor without the gourmet price tag!
And let’s not forget the **versatility**. While it’s absolutely divine on its own, I love serving it warm with a scoop of vanilla bean ice cream for an impromptu dessert, or toasted lightly with a smear of cream cheese for a decadent breakfast. My kids, who are usually suspicious of anything green, actually ask for seconds of this zucchini swirl bread! It’s perfect for gifting, potlucks, or just a quiet afternoon with a cup of tea. It truly stands out from other quick breads because that rich, spiced swirl elevates it from simply “good” to “unforgettable.”
How to Make Ultimate Zucchini Swirl Bread
Quick Overview
Making this ultimate zucchini swirl bread is genuinely easier than you might think, and that’s coming from someone who’s had her share of kitchen mishaps! We’re essentially combining two simple mixtures – a spiced, moist batter and a rich cinnamon-sugar swirl – and then layering them into a loaf pan before baking to golden perfection. The trickiest part, if you can even call it that, is just not overmixing the batter (we’ll chat more about that). But honestly, it’s a foolproof method that consistently delivers a tender, flavorful loaf with that gorgeous, inviting swirl. You’ll be surprised at how quickly this comes together, leaving you more time to savor the incredible aromas filling your home.
Ingredients
For the Main Batter:
Here’s what you’ll need for the base of our incredibly moist zucchini bread. I always opt for good quality, all-purpose flour – about 1 ¾ cups (220g) – it gives the perfect tender crumb. Then, 1 teaspoon of baking soda and ½ teaspoon of baking powder are our leavening agents, making sure it rises beautifully. A pinch of salt, around ½ teaspoon, is crucial for balancing the sweetness. For spices, I go with 1 ½ teaspoons of ground cinnamon and ½ teaspoon of ground nutmeg; they just sing together. As for the star, we’ll need 2 cups (about 2 medium) grated zucchini, *lightly* squeezed of excess moisture – don’t skip that step! For the wet ingredients, 1 large egg, ⅓ cup (80ml) neutral oil (like canola or vegetable) for that incredible moistness, ½ cup (100g) granulated sugar and ¼ cup (50g) packed light brown sugar for depth, and 1 teaspoon of vanilla extract to round it all out. Don’t worry about measuring everything perfectly, this recipe is forgiving!
For the Filling:
This is where the magic happens for our irresistible swirl! You’ll need ⅓ cup (65g) packed light brown sugar – its molasses notes are key here. Then, 2 teaspoons of ground cinnamon, because we want that spice to truly shine through the swirl. And finally, 2 tablespoons of melted unsalted butter, which helps bind everything together and creates that luscious, almost caramel-like ribbon when baked. I often add a tiny pinch of salt here too, just to amplify the flavors even more.
For the Glaze:
A simple, elegant glaze is what takes this bread over the top. Grab 1 cup (120g) of powdered sugar (confectioners’ sugar). Then, you’ll need 2-3 tablespoons of milk – I usually use whole milk for richness, but almond milk works beautifully too and gives it a slightly nuttier undertone. And, for that extra pop of flavor, ½ teaspoon of vanilla extract. Sometimes, if I’m feeling fancy, I’ll add a tiny squeeze of lemon juice for a bright, tangy counterpoint to the sweetness!

Step-by-Step Instructions
Step 1: Preheat & Prep Pan
First things first, let’s get our oven ready. Preheat your oven to 350°F (175°C). While that’s warming up, grab a 9×5 inch (23×13 cm) loaf pan. I always give mine a good spray with non-stick cooking spray, then line it with parchment paper, leaving an overhang on the long sides. This little trick is a lifesaver when it comes to lifting the finished loaf out easily. Trust me, you’ll thank yourself later when you’re not wrestling a warm, delicate loaf out of the pan!
Step 2: Mix Dry Ingredients
In a large mixing bowl, whisk together your dry ingredients: the all-purpose flour, baking soda, baking powder, salt, ground cinnamon, and ground nutmeg. Give them a good whisk for about 30 seconds to a minute. This isn’t just about combining them; it’s about evenly distributing those leavening agents and spices so every bite of our zucchini swirl bread is perfectly flavored and rises just right. This small step makes a big difference!
Step 3: Mix Wet Ingredients
Now, in a separate, medium-sized bowl, we’ll combine all our wet ingredients. Crack in your large egg, then add the neutral oil, granulated sugar, light brown sugar, and vanilla extract. Whisk these together until they’re smooth and well combined. You’re looking for a uniform mixture, with no streaks of egg or unincorporated sugar. This creates the sweet, rich foundation for our bread.
Step 4: Combine
It’s time to bring it all together! Pour the wet ingredients into the bowl with your dry ingredients. Add the *lightly squeezed* grated zucchini. Now, using a spatula or a wooden spoon, gently fold everything together until *just* combined. This is crucial: stop mixing as soon as you no longer see streaks of dry flour. Overmixing develops the gluten too much, leading to a tough, dense bread, and we’re aiming for that wonderfully moist, tender crumb. Lumps are perfectly fine, even desirable!
Step 5: Prepare Filling
In a small bowl, combine the light brown sugar, ground cinnamon, and melted butter for our irresistible swirl. Stir these together until they form a thick, pasty mixture. You want it to be spreadable, almost like a thin paste, so it holds its shape when we swirl it. This is where all that spiced, sweet goodness for the swirl comes from, so give it a good mix!
Step 6: Layer & Swirl
Time for the fun part – creating that gorgeous swirl! Pour about two-thirds of your zucchini batter into the prepared loaf pan and spread it evenly. Next, dollop spoonfuls of your cinnamon-sugar filling over the batter in the pan. Don’t worry about being too neat. Then, take a butter knife or a skewer and gently swirl the filling into the batter. Aim for a nice S-shaped pattern or random swirls, making sure not to go all the way to the bottom of the pan. Finally, carefully spoon the remaining zucchini batter over the swirl, spreading it gently to cover the filling. I sometimes do a very light second swirl on top, just for visual appeal.
Step 7: Bake
Pop your loaf pan into the preheated oven. Bake for 50-65 minutes. Now, oven temperatures can vary, so keep an eye on it! You’ll know it’s done when the top is beautifully golden brown, and a wooden skewer or toothpick inserted into the center (making sure you don’t hit a big pocket of the swirl) comes out clean or with just a few moist crumbs attached. If the top starts browning too quickly, you can loosely tent it with aluminum foil for the last 15-20 minutes. I usually start checking around the 50-minute mark.
Step 8: Cool & Glaze
Once baked, remove the zucchini swirl bread from the oven and let it cool in the pan for about 10-15 minutes. This cooling period is important because it allows the bread to set and prevents it from crumbling when you remove it. Then, using the parchment paper overhang, carefully lift the loaf out of the pan and transfer it to a wire rack to cool completely. While it’s cooling, whisk together your powdered sugar, milk, and vanilla extract for the glaze until it’s smooth and pourable. Once the bread is *completely* cool (otherwise the glaze will melt right off!), drizzle that delicious glaze all over the top. I love watching it cascade down the sides!
Step 9: Slice & Serve
After the glaze has set (give it about 15-20 minutes), it’s time for the moment of truth! Using a serrated knife, slice your beautiful zucchini swirl bread into thick, generous slices. I find a gentle sawing motion works best for clean cuts. Serve it slightly warm or at room temperature – honestly, both are divine. The smell alone brings everyone to the kitchen, so be ready for compliments! It’s perfect with a cup of coffee or tea, or even as a simple dessert after dinner.
What to Serve It With
This ultimate zucchini swirl bread is so incredibly versatile, it feels right at home no matter the occasion. I’ve served it in countless ways, and it always gets rave reviews. It’s truly a chameleon of deliciousness!
For Breakfast: Oh, this is a no-brainer. A thick slice, gently warmed in the microwave for a few seconds, with a steaming mug of coffee or a comforting herbal tea? Absolute perfection. Sometimes I’ll toast a slice lightly and add a pat of butter, or even a dollop of Greek yogurt with a sprinkle of berries for a touch of freshness. It’s hearty enough to kickstart your day but feels like a luxurious treat.
For Brunch: When I’m hosting brunch, I like to arrange slices on a pretty platter, perhaps with a side of fresh fruit salad – think sliced peaches, berries, and melon. It looks so inviting and elegant. A mimosa or a sparkling cider pairs wonderfully with its sweet, spiced notes. It’s less fussy than pancakes but still feels incredibly special.
As Dessert: This is where it really shines for an after-dinner treat. Serve a warm slice with a scoop of good quality vanilla bean ice cream (or even cinnamon ice cream if you’re feeling adventurous!). A drizzle of caramel sauce or a sprinkle of chopped toasted pecans takes it to a whole new level of decadence. It’s just the right amount of sweetness to end a meal without feeling too heavy, much like a good apple pie but easier!
For Cozy Snacks: This is my personal favorite. A mid-afternoon pick-me-up with a cup of Earl Grey, or a comforting treat on a rainy day. My kids ask for this all the time after school. It’s lovely simply on its own, but if you’re feeling a bit fancy, a smear of homemade cream cheese frosting (if you skipped the glaze) or even just a dusting of powdered sugar adds a nice touch. It’s perfect when you’re craving something sweet at 10pm but don’t want to bake a whole cake!
Top Tips for Perfecting Your Ultimate Zucchini Swirl Bread
Over the years, making this zucchini swirl bread countless times, I’ve picked up a few little tricks and learned from my own kitchen adventures. These tips are my secret weapons for ensuring your loaf turns out absolutely perfect every single time. Trust me on these; they’ll make all the difference!
Zucchini Prep: This is probably the most crucial step! Once you grate your zucchini, it’s going to release a *lot* of water. You absolutely must squeeze out the excess moisture. I usually place the grated zucchini in a clean kitchen towel or several layers of paper towels and wring it out really well. Seriously, wring it like you’re trying to get every last drop. If you skip this, your bread will be too wet and gummy. You want it moist, not soggy! And don’t worry about peeling the zucchini; the skin practically melts away and adds nice little flecks of green.
Mixing Advice: When combining your wet and dry ingredients with the zucchini, resist the urge to overmix! Mix just until the flour streaks disappear. A few lumps are totally fine; in fact, they’re preferred. Overmixing develops the gluten, leading to a tough, dry bread. We’re aiming for that tender, melt-in-your-mouth crumb. This is a quick bread, not a yeasted one, so a gentle hand is key here. I learned this trick after years of making it and wondering why my first loaves were sometimes a bit dense.
Swirl Customization: For that gorgeous swirl, don’t overdo it with your knife or skewer. Just a few gentle passes are enough to create those beautiful ribbons of cinnamon sugar. If you swirl too much, the filling will completely incorporate into the batter, and you’ll lose that distinct, lovely pattern. Also, feel free to play with the filling! A tiny pinch of cardamom or a sprinkle of mini chocolate chips can be a fun addition to the cinnamon swirl. I often add a tablespoon of finely chopped walnuts for a bit of crunch.
Ingredient Swaps: This recipe is wonderfully forgiving.
If you don’t have brown sugar for the batter, you can use all granulated sugar, though I do prefer the depth brown sugar adds. For the oil, any neutral-flavored oil like canola, vegetable, or even melted coconut oil works. I’ve tested this with almond milk in the glaze, and it actually made it even creamier and added a subtle, lovely flavor. You can also experiment with different spices; sometimes I’ll throw in a tiny dash of allspice or ginger for a different warming note.
Baking Tips: Ovens can be quirky, so keep an eye on your loaf. If the top starts to brown too quickly before the center is cooked through, loosely tent it with aluminum foil. This protects the top while allowing the inside to continue baking. Always use the toothpick test – insert it into the center of the loaf. If it comes out clean or with just a few moist crumbs, it’s done. If it’s wet, give it a few more minutes. Also, avoid opening the oven door too much during the first 30-40 minutes, as this can cause your bread to sink.
Glaze Variations: The vanilla glaze is classic and delicious, but don’t feel limited! You could do a simple dusting of powdered sugar instead, or a cream cheese frosting for something richer (my personal favorite for special occasions!). A lemon glaze, made with lemon juice instead of milk, adds a wonderful bright, zesty contrast. The key is to wait until the bread is *completely* cool before glazing; otherwise, it will just melt into a sticky mess.
Storing and Reheating Tips
You’ve put all that love into making this incredible zucchini swirl bread, so let’s make sure it stays fresh and delicious for as long as possible! Honestly, this bread is so good it rarely lasts long in our house, but I’ve got you covered for storage.
Room Temperature: For maximum freshness and that classic moist texture, I recommend storing your zucchini swirl bread at room temperature for the first 2-3 days. Make sure it’s completely cooled before you put it away. Wrap the whole loaf (or individual slices) tightly in plastic wrap, or place it in an airtight container. This keeps it from drying out and maintains that lovely tender crumb. The flavors actually meld and deepen a bit after the first day, which is a wonderful bonus!
Refrigerator Storage: If you’re planning to keep it longer, or if your kitchen runs particularly warm, storing it in the refrigerator is a good option. Again, wrap it tightly in plastic wrap or place it in an airtight container. It will last for up to 5-7 days this way. Just be aware that chilling can sometimes make the bread a little denser. Don’t worry, a quick reheat or bringing it back to room temperature will fix that right up!
Freezer Instructions: Yes, this zucchini swirl bread freezes beautifully! This is my go-to strategy when I make a double batch or want to save some for later. Once the loaf is completely cooled and *before* glazing (if you’re planning to glaze it later), wrap it tightly in plastic wrap, then an additional layer of aluminum foil. Label it with the date. It will stay fresh in the freezer for up to 2-3 months. When you’re ready to enjoy, simply thaw the wrapped loaf at room temperature for several hours, or overnight in the refrigerator. Once thawed, you can add your fresh glaze, or simply slice and enjoy.
Glaze Timing Advice: If you’re freezing the bread, definitely glaze it *after* thawing. Glazing a warm loaf, or freezing an already glazed loaf, can lead to a sticky, watery mess when thawed. The glaze will hold up best when applied to a completely cool loaf that hasn’t been frozen. If you plan to eat the entire loaf within a few days, then go ahead and glaze it all at once!
Frequently Asked Questions
Final Thoughts
Well, there you have it, friend – my heart-on-my-sleeve, absolute favorite recipe for ultimate zucchini swirl bread. I truly hope you give this one a try, because it’s more than just a recipe; it’s a little piece of summer joy, wrapped up in a perfectly moist, spiced loaf. The way that cinnamon swirl marries with the tender zucchini crumb? It’s just pure magic. This disappeared in minutes at my house, and I bet it will at yours too. It’s the kind of bake that makes your kitchen smell like home and fills your soul with warmth. If you loved this, you might also enjoy my Best-Ever Apple Crumb Muffins or my Classic Banana Nut Loaf – they share that same comforting, easy-to-love vibe. Don’t be shy about experimenting with your own twist on the swirl, or how you serve it. I can’t wait to hear how yours turns out! Happy baking!
butterscotch cookies
Ingredients
Method
- Add sugar, butter, and evaporated milk to a saucepan. Bring to a boil on medium high. Boil for 1 minute, stirring constantly.
- Remove from heat and stir in butterscotch chips. Stir in oats and coconut.
- Let cool 5 minutes. Drop by teaspoonful onto a piece of wax paper. Let cool for 2 to 3 hours before eating.