Festive Cookie Baking Ideas You’ll Love
There’s something about baking with zucchini that always makes me feel a bit nostalgic. Maybe it’s because I grew up in a household where every summer, my grandma would turn her bounty of garden zucchinis into all sorts of goodies — bread, muffins, & this very cake. I remember the smell of warm cinnamon filling the house and my kids asking if they could have a slice before dinner (spoiler: I let them!). It’s incredible how a humble vegetable like zucchini can become the star of a sweet, tender cake that’s moist, flavorful, and just the right level of indulgence. Honestly, I always do this when I want something cozy but don’t want to fuss in the kitchen too long. Plus, the swirl of lemon cream cheese in the middle? Total game-changer. It’s a recipe that’s easy enough for weeknights but fancy enough for a brunch or a casual dessert table. If you’re craving something sweet, sneaky healthy (well, mostly!), and so delicious you’ll want to make it again—and again—this one’s for you.
What is Zucchini cake?
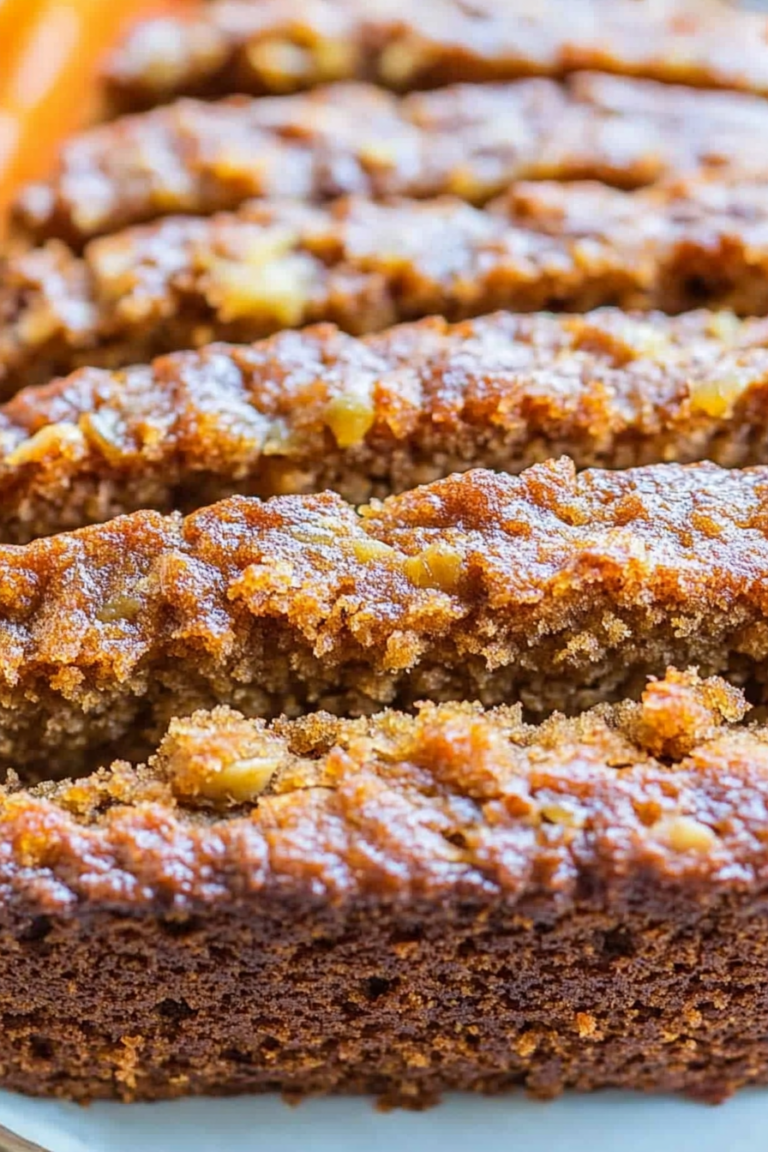
This zucchini cake is a moist, tender dessert that’s more than just a quick way to use up extra summer squash. Think of it as a cozy, warmly spiced cake with a surprise layer of tangy lemon-cream cheese swirl in the middle. The name pretty much says it all — it’s a cake that gets its moisture and hearty texture from shredded zucchini, which melts right into the batter. It’s like a sneaky vegetable hidden in a sweet treat — but honestly, once you taste how good it is, no one will complain! This cake is essentially a cross between moist zucchini bread and a layer cake, with a zesty, creamy middle that makes each bite feel special. It’s a classic in my house, especially when zucchinis are overflowing from the garden and I want something that’s easy to whip up and even easier to love.
Why you’ll love this recipe?
What I love most about this zucchini cake is how forgiving and flexible it is. I’ve tested it with different kinds of oil — olive oil, coconut oil — and each gives it a slightly different but equally lovely personality. The flavor? Imagine warm cinnamon, a hint of vanilla, and that fresh pop of lemon in the filling — it’s like sunshine in baked form. And the best part? It’s super simple to make. No complicated frosting or fancy decorating skills needed, just a mixing bowl, a spoon, and your oven. This one’s a lifesaver on busy nights when you want something homemade but don’t want to spend hours fussing in the kitchen. Plus, it’s budget-friendly — the ingredients are staples you probably already have. If you ask me, the versatility is what makes this stand out. You can serve it for breakfast, brunch, or dessert, and even jazz it up with different toppings or fillings. Honestly, once I made this recipe, I couldn’t stop. It’s become a family favorite, and I’m pretty sure it’ll be yours, too.
How do I make Zucchini cake?
Quick Overview
This zucchini cake comes together quickly, with a straightforward batter bathed in warm spices and shredded zucchini. The swirl of lemon-cream cheese sits right in the center, creating a beautiful marbled effect and a zingy contrast to the sweet, moist cake. You’ll start by mixing dry ingredients, then wet ones, combining everything gently, adding the filling layer, swirling, and baking. Once it’s baked and cooled, a light glaze and a dusting of powdered sugar finish it off. It’s really a simple process, but each step is critical for that perfect moistness and beautiful swirl. Trust me, once you get the hang of layering and swirling, it’s almost meditative — and so satisfying to see that beautiful pattern emerge as it bakes!
Ingredients
For the Main Batter:
- 1 ½ cups all-purpose flour (or almond flour for gluten-free; I tested with almond & it worked beautifully)
- 1 teaspoon baking powder
- ½ teaspoon baking soda
- ½ teaspoon ground cinnamon
- ¼ teaspoon nutmeg (optional but recommended!)
- ½ teaspoon salt
- ¾ cup granulated sugar (you can reduce to ½ cup if you want it less sweet)
- ⅓ cup vegetable oil (or melted coconut oil for a tropical twist)
- 2 large eggs
- 1 teaspoon vanilla extract
- 1 ½ cups shredded zucchini (squeeze out excess moisture with a clean kitchen towel)
For the Filling:
- 4 oz cream cheese, softened
- ¼ cup powdered sugar
- Juice and zest of 1 lemon
For the Glaze:
- ½ cup powdered sugar
- 1-2 teaspoons lemon juice
- Fresh lemon zest (for topping)
Step-by-Step Instructions
Step 1: Preheat & Prep Pan
Start by preheating your oven to 350°F (180°C). Grease a standard 9-inch round cake pan or line it with parchment paper. I like to spray it well because this cake can stick if I’m not careful — especially around the edges. Set it aside while you prepare the batter.
Step 2: Mix Dry Ingredients
In a large bowl, whisk together the flour, baking powder, baking soda, cinnamon, nutmeg, and salt. This step ensures the leaveners are evenly distributed, so the cake rises beautifully without lumps of spices or baking soda. I always do this first — it makes a big difference in the texture.
Step 3: Mix Wet Ingredients
In a separate bowl, beat the eggs with the sugar until wells combined and slightly fluffy. Add the oil, vanilla, and lemon zest, mixing until smooth. The lemon zest makes the whole house smell amazing, trust me. I actually tested this with a little bit of orange zest, and it turned out really bright and fresh.
Step 4: Combine
Pour the wet mixture into the dry ingredients and mix gently with a spoon or spatula until just combined. Be careful not to overmix — that’s where gluten development can make the cake dense instead of tender. Gently fold in the shredded zucchini, making sure it’s evenly dispersed.
Step 5: Prepare Filling
In a small bowl, beat the softened cream cheese with powdered sugar, lemon juice, and zest until smooth and creamy. This filling adds just the right tangy contrast and richness. Feel free to add a little honey or maple syrup if you want it sweeter.
Step 6: Layer & Swirl
Spread about half of the batter into your prepared pan. Drop dollops of the lemon-cream cheese mixture over the batter, then add the rest of the batter on top. Use a skewer or knife to gently swirl the filling into the batter, creating a marbled effect. Don’t overdo it — just a few gentle strokes will get that beautiful pattern.
Step 7: Bake
Pop it into the oven and bake for about 45-50 minutes, or until a toothpick inserted into the center comes out clean. If it starts to brown too quickly, tent it with foil for the last 10 minutes. The smell alone will have everyone peeking into the oven!
Step 8: Cool & Glaze
Let the cake cool in the pan for about 15 minutes, then transfer it to a wire rack. Once fully cooled — about an hour — whisk together your glaze ingredients and drizzle it over the top. I love sprinkling extra lemon zest or fresh herbs for a little glam.
Step 9: Slice & Serve
Slice with a serrated knife, cleaning it between cuts to keep the pattern looking sharp. Serve it at room temperature or lightly chilled. I always do this with a hot cup of tea or a strong espresso; it’s just the perfect cozy combo. This cake is best enjoyed the day it’s made but holds up well for about 2 days — if it lasts that long!
What to Serve It With
This zucchini cake is incredibly versatile—think of it as a chameleon that works for breakfast, brunch, or dessert. I often serve it for brunch with a dollop of whipped cream or a scoop of vanilla ice cream if I’m feeling fancy. My family loves it fresh out of the oven, paired with a big mug of coffee or fresh squeezed juice. On weekends, I like to offer slices with a tangy fruit compote or berries for added brightness. It’s also fantastic alongside a simple green salad with honey vinaigrette if you’re serving it as a light lunch or teatime treat. And for a casual snack, it pairs nicely with a glass of cold milk or even a homemade iced tea. Honestly, I’ve made this for picnics, family gatherings, and just because — and it always disappears in minutes. Such a crowd-pleaser! Plus, I love how flexible it is—I sometimes add chopped nuts, coconut flakes, or swap out lemon for orange or lime zest. The possibilities are endless!
Top Tips for Perfecting Your Zucchini Cake
This cake might seem simple, but trust me, small tweaks really make a difference. First, be sure to squeeze out as much moisture as possible from your shredded zucchini. I learned that the hard way — too much moisture can make the batter too runny, and then you get a dense, soggy cake. I always wrap the shredded zucchini in a clean kitchen towel and press out the excess water; it’s a game-changer. When mixing the batter, I avoid overmixing because that can make the cake dense instead of fluffy. Just fold everything together until it’s mostly combined, and that’s it. For the swirl pattern, I recommend using a skewer or butter knife in gentle, swirling motions — avoid mixing it in completely, or the pattern disappears! As for ingredient swaps, I’ve tried replacing half the oil with applesauce for a lighter version, and it still turned out moist and delicious — just watch the baking time a little longer. Baking in the oven about 10 degrees lower than usual helps prevent over-browning, especially if your oven runs hot. When making the glaze, if you want a more tart lemon punch, add extra lemon juice or zest. For a richer texture, fold in some chopped nuts or dried fruit—my kids love the surprise bites! Honestly, I’ve learned so much over the years—sometimes the simplest tweaks change the game entirely. Just trust your instincts, and don’t overthink it. Patience, a gentle touch, and a little love are the secret ingredients in this recipe.
Storing and Reheating Tips
This cake keeps well for a couple of days, but it’s at its best when fresh. I recommend storing it in an airtight container at room temperature for up to 2 days, especially if you plan to serve it the same day. If you want to keep it longer, pop it into the fridge, wrapped tightly with plastic wrap or in an airtight container. It’ll stay fresh for about 4-5 days — just warm it up slightly in the microwave if you want that just-baked warmth. Freezing? Definitely! Wrap slices individually in plastic wrap, then in foil, and store for up to 3 months. Thaw at room temperature or gently reheat in the microwave. I’ve found that adding the glaze just before serving ensures it stays glossy and fresh-textured. If you froze it with the glaze on, the texture can be a little sticky once defrosted, so I prefer to add the glaze later. Also, if you’re planning to serve the cake later, it’s best to do the swirl and glaze right before slicing — that way, it looks pretty and tastes fresh. Trust me, a little planning makes all the difference in keeping this cake at its tastiest!
Frequently Asked Questions
Final Thoughts
There’s truly something special about a homemade zucchini cake that’s both simple and a little extravagant at the same time. It’s the kind of recipe that feels like a warm hug, perfect for sharing with family and friends, or even just indulging solo with a good book. The way the lemon-cream cheese swirl peeks through each slice makes every piece feel like a little celebration. Over the years, I’ve tweaked and adapted this recipe to suit different tastes, adding nuts, swapping out the lemon for orange, or even testing out gluten-free flour. No matter how I make it, the result is always moist, flavorful, and just a little special. If you’ve got zucchinis in your garden or still have some frozen from last summer, definitely give this a try. You might find, as I did, that it becomes a staple in your home, too. Happy baking—and I can’t wait to hear how yours turns out! Don’t forget to leave a comment or tag me in your photos — I love seeing your creations!

holiday cookie recipes
Ingredients
Method
- In a large bowl, beat the butter and sugar until creamy. Add the egg and vanilla and mix well.
- Gradually add the flour, baking powder, and salt. Mix until dough forms.
- Divide the dough in half, wrap in plastic, and refrigerate for 30 minutes.
- Preheat oven to 350°F. Roll out dough and cut out cookies with cookie cutters.
- Bake for 12-15 minutes until edges are golden brown. Let cool before decorating.