Easy Slow Cooker Lasagna Recipe
There’s something about a slice of moist zucchini cake that instantly transports me back to summer afternoons at my grandma’s house. The smell of freshly grated zucchini mingling with warm cinnamon, the soft crumble of the cake as I cut into it, and that sweet, velvety glaze drizzling down—it’s pure comfort. Honestly, I’ve made this more times than I can count, and each time I do, I can’t help but think, this is one of those recipes that’s almost too easy to be true. My kids ask for this all the time, especially when zucchini’s in season — and I always do this when I want something sweet but don’t want to bake a whole bunch of complicated pastries. It’s perfect when you’re craving a little treat at 10 pm but don’t want to mess up the kitchen. Trust me, once you get the hang of it, this will become a family staple. The best part? It’s simple, budget-friendly, and honestly, taste-wise, it’s like having a slice of summer in every bite.
What is a Moist Zucchini Cake?
This moist zucchini cake is essentially a tender, lightly spiced cake made with freshly grated zucchini. Think of it as a cozy, slightly rustic dessert that’s packed with hidden veggies — so it’s a sneaky way to get your kids (or yourself) to eat more greens! The name might sound a little fancy, but it’s truly a homey, straightforward treat. The concept is simple: shredded zucchini keeps the cake incredibly moist, almost like a banana bread but with a lighter, fluffier texture. It’s reminiscent of classic carrot cake but with its unique zucchini twist. Think of it as a cross between a dessert and a snack; it’s just as delightful with a big mug of coffee or afternoon tea. This dish has been a household favorite in my family because it’s versatile enough to serve for breakfast, brunch, or dessert — and it always gets rave reviews.
Why you’ll love this recipe?
What I love most about this moist zucchini cake is how fuss-free it is — no complicated techniques or specialty ingredients needed. The ingredients are all pantry staples, which means I can whip this up on a lazy Sunday or during a busy weeknight when I need a quick, satisfying sweet fix. The flavor profile is simply wonderful: warm cinnamon, a touch of vanilla, and a hint of nutmeg come together to create this comforting aroma that fills my kitchen and makes everyone come running. Plus, it’s incredibly economical; you probably already have everything you need in the fridge or pantry. And because it’s made with grated zucchini, it stays moist and tender longer than most cakes — almost like it’s giving you a little hug with every bite. My other favorite thing? How customizable it is. You can add chopped walnuts or raisins, swap in coconut flakes, or go dairy-free with almond milk — I’ve tested all sorts of variations, and they all turn out delicious.
How do I make Zucchini cake?
Quick Overview
This cake comes together in just a handful of steps — grate your zucchini, mix dry ingredients, whisk wet ingredients, combine carefully, and then bake. The magic is in the moisture from the zucchini, which keeps the cake soft and almost custardy inside. The filling and glaze are totally optional but highly recommended for that classic finish that makes this cake so irresistible. It’s a straightforward process that anyone can master — I’ve made this dozens of times, and it never fails to come out perfectly moist and flavorful. The best part? No fancy equipment required; just a whisk, a spatula, and your oven. Once baked, a quick glaze adds that glossy, sweet shine that’s as gorgeous as it is delicious.
Ingredients
For the Main Batter:
- 2 cups grated zucchini (about 2 small zucchinis, well drained)
- 1 ½ cups all-purpose flour (or gluten-free blend if you prefer)
- 1 teaspoon baking powder
- ½ teaspoon baking soda
- ½ teaspoon ground cinnamon
- ¼ teaspoon nutmeg (optional but adds warmth)
- ½ teaspoon salt
- ¾ cup granulated sugar (you can reduce this if you like it less sweet)
- ½ cup vegetable oil or melted butter
- 3 large eggs
- 1 teaspoon vanilla extract
For the Filling (optional but recommended):
- 4 oz cream cheese, softened (or dairy-free alternative)
- ¼ cup powdered sugar
- 1 teaspoon vanilla
For the Glaze:
- 1 cup powdered sugar
- 2-3 tablespoons milk (or almond milk)
- ½ teaspoon vanilla extract
- Optional: a sprinkle of cinnamon or lemon zest for extra flavor
Step-by-Step Instructions
Step 1: Preheat & Prep Pan
Crank your oven up to 350°F (175°C). Grease a 9-inch round or square baking dish lightly with butter or cooking spray. I always line mine with parchment paper for easy removal. Set aside. This step ensures your cake won’t stick and makes cleanup a breeze.
Step 2: Mix Dry Ingredients
In a large bowl, whisk together the flour, baking powder, baking soda, cinnamon, nutmeg, and salt. This step is all about evenly distributing the leavening agents and spices so each bite is perfectly flavorful.
Step 3: Mix Wet Ingredients
In another bowl, beat the eggs, then add in the oil, vanilla, and sugar. Whisk until smooth. I’ve found that using room temperature eggs helps everything blend better and gives that nice fluffy rise.
Step 4: Combine
Pour the wet ingredients into the dry, stirring gently just until combined. Don’t overmix — the batter should be thick but slightly pourable. Overmixing can make the cake dense, and nobody wants that!
Step 5: Prepare Filling
If you’re using the cream cheese filling, beat the softened cream cheese with powdered sugar and vanilla until smooth. It’s a nice tangy contrast to the sweet cake, but if you’re in a rush, just skip this step!
Step 6: Layer & Swirl
Pour half the batter into your prepared pan. Dollop spoonfuls of the cream cheese mixture across the surface, then add the rest of the batter on top. Use a skewer or toothpick to swirl gently — don’t overdo it, or you’ll lose that pretty marbled look.
Step 7: Bake
Pop it into your oven for about 35-40 minutes. Check for doneness by inserting a toothpick in the center; it should come out clean. Oven times vary, so keep an eye on it toward the end.
Step 8: Cool & Glaze
Cool the cake in the pan for at least 15 minutes, then transfer to a wire rack. While still warm, drizzle on the glaze — it should be thick but spreadable. If it’s too runny, just add a little more powdered sugar.
Step 9: Slice & Serve
Once cooled completely, cut into slices. I like to serve this with a dollop of whipped cream or a splash of fresh lemon juice — it brightens the whole thing. Trust me, it’s even better the next day once the flavors meld!
What to Serve It With
This moist zucchini cake is so versatile that it works for many occasions. For breakfast, pair a slice with your morning coffee and a dollop of Greek yogurt — the slight tang balances the sweet perfectly. When brunch rolls around, serve it with fresh berries and a side of scrambled eggs for a comforting, simple spread. It’s a showstopper for dessert too — warm with a scoop of vanilla ice cream, or topped with a handful of toasted nuts for crunch. My family loves to have this on hand for cozy weekend afternoons when everyone’s craving something sweet without going overboard. It’s great with a cup of chai or even a glass of cold milk — a little piece of home wherever you are.
Top Tips for Perfecting Your Moist Zucchini Cake
Over the years, I’ve learned a few tricks to ensure this cake turns out just right every single time. First, be sure to squeeze out as much moisture as possible from the grated zucchini. I usually toss it in a clean dish towel and give it a good squeeze — otherwise, the cake can turn out a bit watery. When mixing, fold the ingredients gently; overmixing can make the cake dense instead of tender. If you want more flavor, try adding a pinch more cinnamon or a handful of chopped walnuts into the batter. As for the swirl, I like playing around with food coloring or cocoa powder; it’s a fun way to make it visually stunning. Don’t forget to keep an eye on the baking time — every oven is a little different, and you don’t want to overbake this delicate crumb. For the glaze, I tested different thicknesses; I prefer mine a bit thick so it clings nicely, but you can dilute it if you want a more drizzly effect. Trust me, the little tweaks I’ve picked up over the years make all the difference in getting that perfect bite every time.
Storing and Reheating Tips
This moist zucchini cake is wonderful because it stays fresh for several days. If you’re eating it within a day or two, keep it in an airtight container at room temperature — just cover it with a clean cloth or foil to prevent it from drying out. For longer storage, refrigerate it in a tightly sealed container; I find that it actually tastes better on the second day when the flavors have had a chance to settle in. It will last up to five days—if it makes it that long! To freeze, wrap slices individually in plastic wrap and store in a freezer bag for up to three months. Thaw overnight in the fridge, then warm slightly in the microwave or oven before serving. If you like your glaze fresh, I recommend adding it just before serving for that bright, glossy finish that makes it look as good as it tastes.
Frequently Asked Questions
Final Thoughts
Honestly, this moist zucchini cake has become one of my all-time favorites because it combines simplicity with a little bit of magic. It’s a wonderful way to make the most of zucchini season and turn it into something that everyone in the family will devour. I love how it’s subtly spiced, beautifully moist, and topped with that shiny glaze that makes it feel special — even if it’s just an everyday dessert. Once you try it, I bet you’ll be hooked, just like I am. And don’t forget, experimenting with add-ins like chopped nuts or dried fruits makes it even more fun — the kitchen is your playground. I can’t wait to hear how yours turns out, so don’t forget to leave a comment or share your variations. Happy baking, my friend — and enjoy every delicious bite!
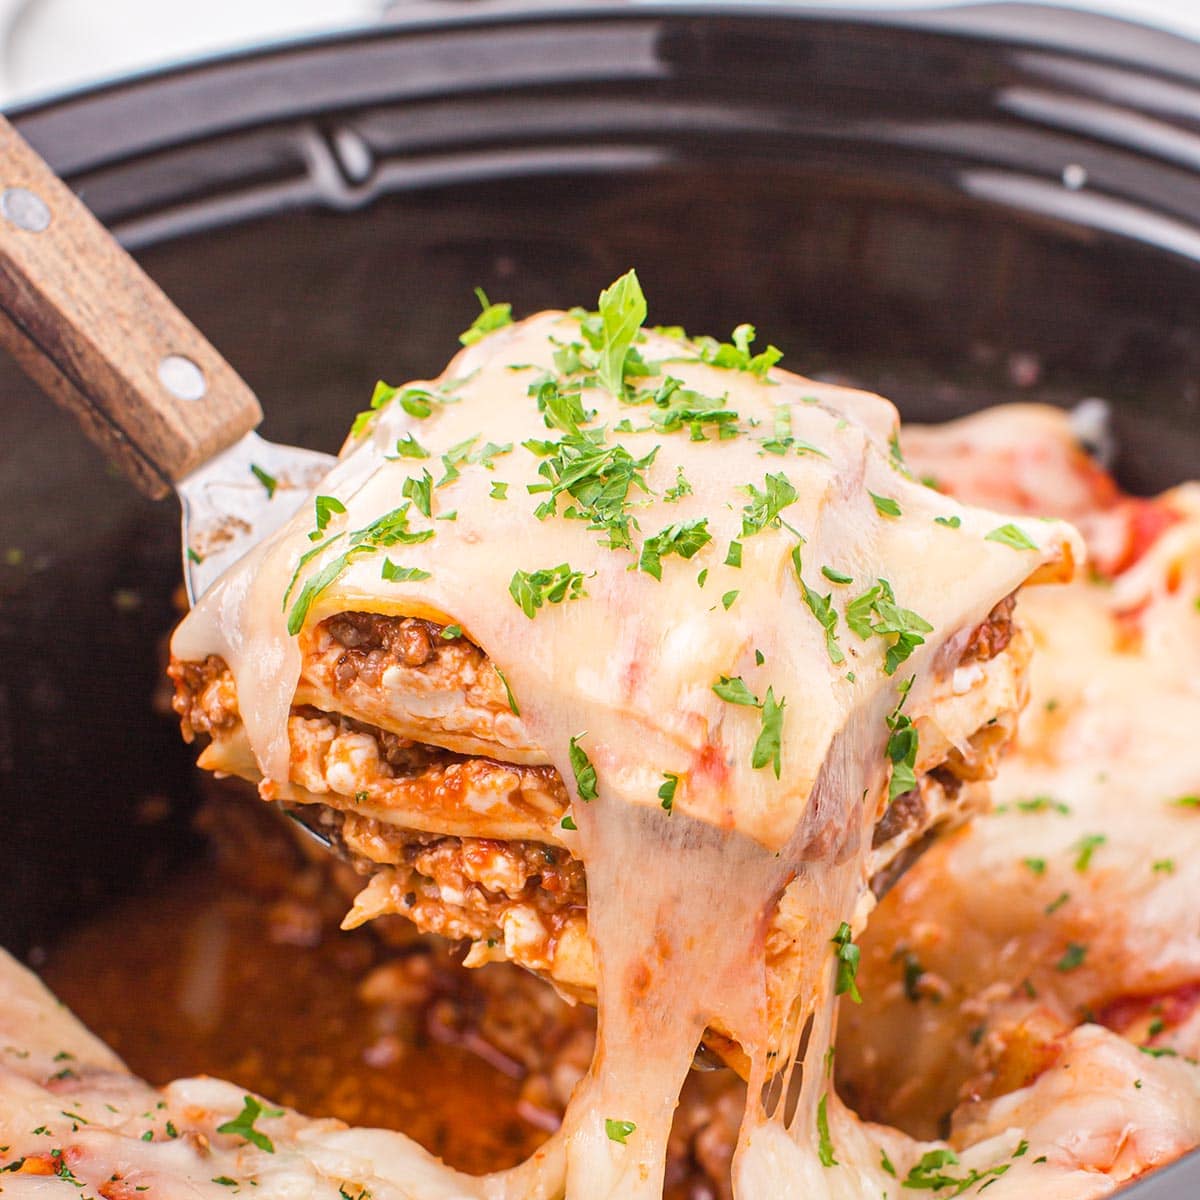
slow cooker lasagna
Ingredients
Method
- In a large deep skillet over medium high heat, brown the ground beef until no longer pink.
- Drain any excess grease and then add the spaghetti sauce, beef broth, and 1 tablespoon of Italian seasoning to the skillet and stir until everything is well mixed.
- Simmer uncovered for 10 minutes or until slightly thickened.
- In the meantime, combine 1 ½ cups of the divided mozzarella cheese, small curd cottage cheese, 1 tablespoon Italian seasoning, and large egg together in a bowl. Stir everything together well.
- Spray the bottoms and sides of your crockpot and begin layering.
- Spread a layer of 1 cup of the meat sauce on the bottom of the crockpot.
- Layer 3 lasagna noodles on top of meat sauce. Fit the crock pot by breaking two lasagna noodles and leave one unbroken for the middle layer.
- Spread 1 cup of the cheese mixture on top of the noodles.
- Repeat the layering until everything is used. You should have enough for four sets of layers.
- Top the last layer of noodles with the remaining mozzarella cheese.
- Cover and cook on low for 3-5 hours or until the noodles absorb the liquid and are soft. Check tenderness with a fork or knife.
- Plate and serve warm with some minced parsley as a garnish, optional.