Easy Samoa Cheesecake Without Baking
Have you ever snuck a big slice of cake at midnight—because honestly, sometimes, the cravings hit hard and just won’t wait? That’s me all the time with this zucchini cinnamon swirl coffee cake. It’s one of those recipes I’ve made so many times I could bake it in my sleep, and yet, it always feels special. The smell alone—warm cinnamon, toasty nuts, a hint of butter—never fails to bring everyone running into the kitchen like it’s a family reunion. It’s surprisingly simple, too, which is perfect on crazy busy mornings or when I want a treat that doesn’t make me feel guilty. Plus, I love that I can sneak in zucchini without anyone batting an eye—my kids actually ask for this all the time! If you’re like me—someone who loves a little sweet comfort but wants it to be wholesome—this recipe is basically your new best friend.
What is Zucchini cinnamon swirl coffee cake?
This cozy, homey cake is essentially a quick bread meets coffee cake, with a delightful cinnamon swirl running through moist, tender batter infused with shredded zucchini. Think of it as a breakfast cake or a snack that’s just as good with your morning coffee as it is with an afternoon tea. The name might sound fancy, but trust me, it’s super simple to make. The zucchini keeps the cake wonderfully moist—and if you’ve ever added zucchini to your muffins or bread, you already know how sneaky and delicious it can be. The cinnamon swirl is like a sweet hug in every bite, and I like to sprinkle chopped nuts or a drizzle of glaze on top for that bakery vibe. The best part? It’s budget-friendly, so you don’t need any fancy ingredients—just common pantry staples—and it’s a great way to use up that extra zucchini growing in your garden or fridge.
Why you’ll love this recipe?
What I love most about this zucchini cinnamon swirl coffee cake is how versatile and forgiving it is. You can swap out ingredients easily and still get a bakery-worthy result. The flavor is just incredible—moist, sweet with warm cinnamon, and a hint of nuttiness from the streusel or nuts that you add. The smell alone makes my entire house feel cozy and inviting. Plus, it’s a total lifesaver on busy nights when I need something quick and satisfying. Honestly, I often whip this up in early morning chaos or after a quick trip to the farmers’ market when I’ve got zucchini and eggs but no time for complicated baking. It’s budget-friendly, too—I always keep a bag of shredded zucchini in the freezer for moments just like this. And what makes it even better? It’s endlessly customizable. Want to add blueberries or swap the glaze for a dusting of powdered sugar? Go for it. I’ve tested this with almond milk, coconut sugar, and even gluten-free flour, and it still turns out fantastic. That’s the beauty of this recipe—it’s like your cozy baking secret, always ready when you need it.
How do you make Zucchini Swirl Coffee Cake?
Quick Overview
This cake comes together like a warm hug from start to finish. First, you grate and lightly squeeze out moisture from zucchini—because nobody wants a soggy cake! Then, you mix the dry ingredients, whisk the wet, and fold everything together gently. The cinnamon swirl is just a quick mixture of cinnamon sugar and butter that you layer into the batter, creating that delightful marbled look. Then, it’s just a matter of baking until the aroma fills your house and a toothpick comes out clean. The whole process takes about an hour—or less if you’re quick—and it’s honestly easier than it sounds. Trust me, once you get the hang of swirling, you’ll be doing it in your sleep. This is one of those recipes I always do when I want something homemade but don’t want to fuss over complex baking projects.
Ingredients
For the Main Batter:
– 2 cups all-purpose flour (or your favorite gluten-free blend, if you prefer)
– 1 cup granulated sugar (trust me, the sweetness is perfect)
– 1 teaspoon baking powder
– 1/2 teaspoon baking soda
– 1/2 teaspoon salt
– 1 teaspoon ground cinnamon (more if you’re a cinnamon lover!)
– 1/2 cup vegetable oil or melted butter
– 1 cup shredded zucchini, excess moisture squeezed out
– 3 large eggs or a flaxseed egg substitute for dairy-free
– 1 teaspoon vanilla extract
For the Filling:
– 1/4 cup brown sugar
– 1 teaspoon ground cinnamon
– 2 tablespoons softened unsalted butter (or coconut oil)
– Optional: chopped nuts, mini chocolate chips, or a handful of blueberries
For the Glaze:
– 1 cup powdered sugar
– 2-3 teaspoons milk or plant-based milk
– 1/2 teaspoon vanilla extract
– Optional: a sprinkle of cinnamon or lemon zest for extra zing
Step-by-Step Instructions
Step 1: Preheat & Prep Pan
Set your oven to 350°F (175°C). Grease a 9-inch square baking pan or line it with parchment paper—trust me, wax paper works fine too. This step prevents sticking and makes your life so much easier when it’s time to serve. I always do this first so I can focus on mixing and layering without worrying about my cake sticking to the pan—because nobody wants a cake that pulls apart when you’re ready to serve.
Step 2: Mix Dry Ingredients
In a big bowl, whisk together the flour, sugar, baking powder, baking soda, salt, and cinnamon. Combining dry ingredients well ensures that your baking soda and powder distribute evenly, giving your cake a nice rise and consistent texture. I’ve learned the hard way—lumps are okay in dry ingredients, but uneven spices can be tricky, so whisking is your best friend here.
Step 3: Mix Wet Ingredients
In a separate bowl, beat the eggs, then stir in the oil or melted butter, vanilla, and shredded zucchini. I like to beat the eggs first to ensure everything’s smooth and combined. The zucchini should be shredded finely and squeezed out (just press gently with your hands or a paper towel) to remove excess moisture—you don’t want a soggy cake, after all. Testing with almond milk is a recent tweak I tried, and honestly, it made the cake even creamier and kept it dairy-free without sacrificing taste.
Step 4: Combine
Pour the wet mixture into the dry ingredients and fold gently with a spatula until just combined. Be careful not to overmix—that’s the secret to a tender crumb! It’s tempting to keep stirring to get everything perfect, but overdoing it can make the cake dense. I always stop as soon as the streaks disappear and you see batter that looks just uniformly moist.
Step 5: Prepare Filling
Mix the cinnamon and brown sugar, then cut in the butter until crumbly. If you’re feeling adventurous, toss in some chopped walnuts or mini chocolate chips—it’s my kids’ favorite version. Set this aside; it’ll be layered into the batter later for that signature cinnamon swirl.
Step 6: Layer & Swirl
Pour half the batter into the prepared pan. Sprinkle half of the cinnamon sugar filling evenly over it. Then, add the remaining batter on top and carefully swirl with a knife or skewer to create a marbled effect. Don’t overdo it—you want distinct ribbons of cinnamon, not a muddy mess. It’s like painting with your batter—fun and so satisfying!
Step 7: Bake
Bake for 40-45 minutes, or until a toothpick inserted in the center comes out clean. If your oven runs hot, check at 38 minutes. The house will smell incredible—this is when I usually pause to sneak a tiny taste of the batter or the edges just to check. The top should be golden brown, and the swirl should be visible as you slice into it.
Step 8: Cool & Glaze
Let the cake cool in the pan for about 15 minutes—this helps set the layers and makes slicing easier. While it cools, whisk together the powdered sugar, milk, and vanilla until smooth. Drizzle generously over the cake when it’s just warm (not hot!) for that sweet finishing touch. Honestly, I love adding a sprinkle of cinnamon or zest of lemon on the glaze—it elevates the flavor without complicating anything.
Step 9: Slice & Serve
Use a sharp serrated knife to cut neat slices. Give it a few minutes to settle — this keeps the swirl defined and prevents everything from squishing out. It’s best enjoyed slightly warm with a cup of coffee or tea. My family loves it for breakfast, but I won’t judge if you sneak a slice after dinner — it’s that good.
What to Serve It With
This cake is versatile enough to shine in lots of ways. For breakfast, pair it with a strong cup of coffee or a glass of cold oat milk. I love to serve it with fresh berries on the side—adds a little tartness that balances the sweetness. For brunch, a dollop of whipped cream or a scoop of vanilla ice cream makes it feel extra indulgent, especially if you’re entertaining guests. It also makes the perfect cozy dessert—warm from the oven with a dusting of powdered sugar or a drizzle of caramel sauce. And honestly, I keep a few slices in the fridge for that emergency sweet craving—I swear, it’s even better the next day after sitting in its own flavors. My kids ask for this all the time, and I don’t mind hiding a slice or two for myself before they spot it. It’s one of those recipes that just makes home feel even cosier.
Top Tips for Perfecting Your Zucchini Cinnamon Swirl Coffee Cake
Over the years, I’ve learned a few neat tricks to make this cake even better. First, always squeeze out as much moisture from the zucchini as you can—wet batter is no fun when you’re trying to get that nice rise. I’ve tested this with different zucchinis—summer squash works too, but you might need to add a little extra flour if it’s extra watery. When mixing, resist the urge to overdo it—gentle folding is your friend for a tender crumb. The swirl is easy once you get the pattern—try making a figure-eight with your knife or a broad swirl for more dramatic ribbons. For ingredient swaps, coconut sugar adds a caramel note, and almond flour can replace part of the white flour if you want a nuttier, gluten-free version. As for baking, I rotate my pan halfway through to avoid hot spots, and I always test doneness with a toothpick—trust me, every oven is different. The glaze is optional but makes such a lovely finish; I sometimes add a splash of lemon juice or a splash of bourbon for a grown-up version. Just remember: patience is key when glazing—wait until the cake is just cooled enough to hold the glaze but not cold enough to harden instantly. Those little tricks make all the difference in achieving that bakery-quality finish I dream of.
Storing and Reheating Tips
This cake stays fresh for a couple of days if wrapped tightly in foil or stored in an airtight container. If kept at room temperature, I recommend eating within 24 hours to enjoy the best moistness and flavor. For longer storage, pop slices into the fridge—just be sure to keep them covered to prevent drying out. Reheating is easy—just microwave a slice for about 20 seconds or warm it in the oven at 325°F for 10 minutes. I find that a little dab of butter or extra glaze when reheating makes it taste just as good as fresh. If you want to freeze it for later, wrap individual slices well in plastic wrap, then foil, and keep for up to 3 months. Thaw overnight in the fridge, then warm gently in the microwave or oven. For the glaze, I usually add it right before serving because it keeps that glossy, fresh look and balances the richness. Trust me, a little prep and storage can keep this treat coming back for more—perfect for busy mornings or lazy weekends when you want something homemade but effortless.
Frequently Asked Questions
Final Thoughts
This zucchini cinnamon swirl coffee cake has quickly become a staple in my home—part because it’s so forgiving and part because it’s just darn tasty. Whether I need a quick breakfast, a comforting treat, or something to share with friends over tea, it never disappoints. I love how versatile it is—you can easily swap ingredients, tweak sweetness, or add fun mix-ins. Most of all, it’s a reminder that good, honest baking doesn’t have to be complicated to feel like magic. I hope you try it and love it as much as my family does. And hey, I’d love to hear your twists—I always end up adding a little something new each time I make this beautiful, moist, cinnamon-laced loaf. Happy baking—and don’t forget to save me a slice!
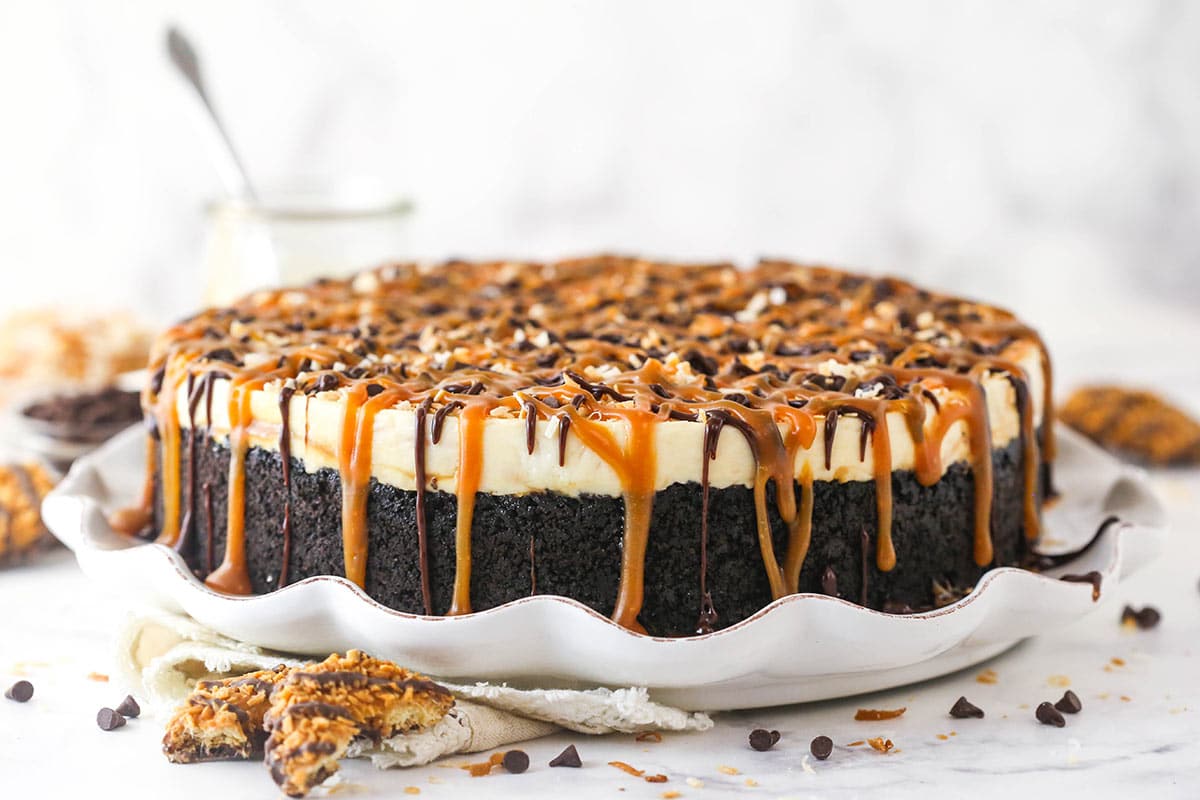
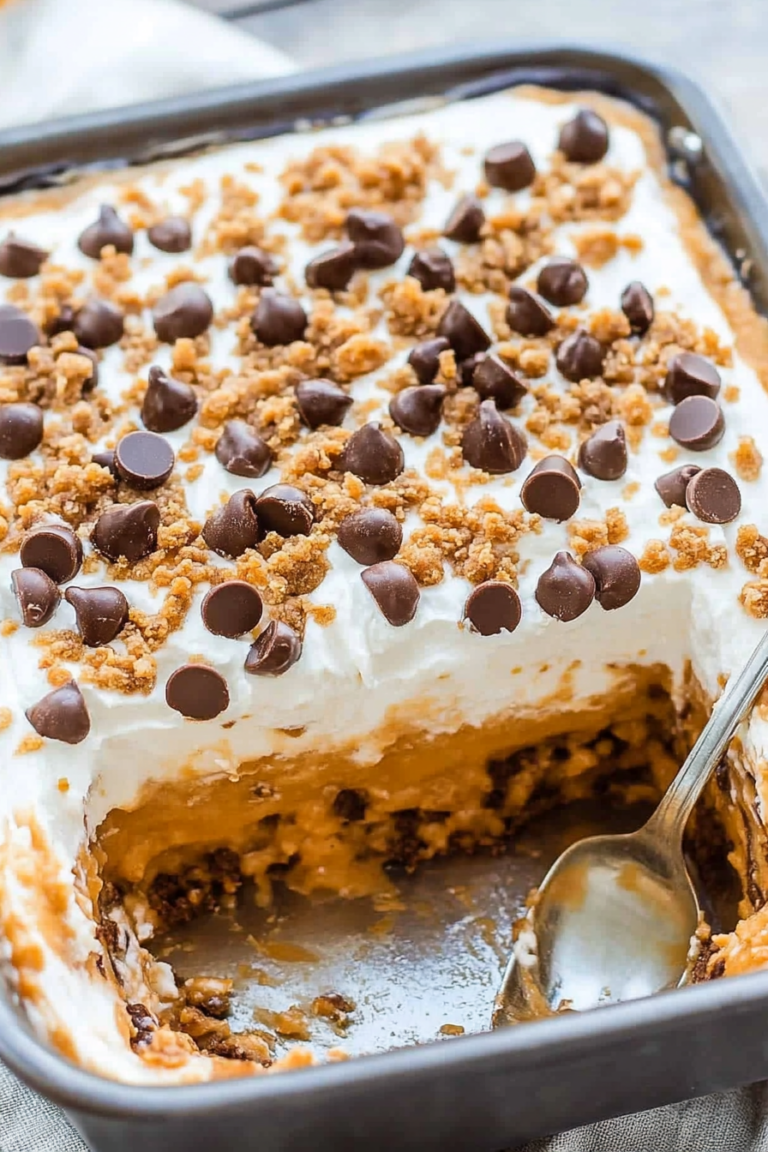
Samoa Cheesecake
Ingredients
Method
- Line a 9-inch springform pan with parchment paper and grease the sides.
- Combine Oreo crumbs and melted butter, then press into the bottom of the pan to form the crust.
- Bake the crust at 350°F for 5 minutes, then set aside to cool.
- Toast coconut flakes in the oven until lightly browned, then set aside to cool.
- Beat cream cheese, sugar, vanilla, and coconut extract until smooth.
- Add caramel sauce and mix well.
- Gradually fold in whipped cream, then add toasted coconut, mini chocolate chips, and crushed Oreos.
- Pour the filling over the prepared crust and smooth the top.
- Refrigerate for at least 4 hours or until set.
- Optional: Drizzle melted chocolate or additional caramel on top before serving.