Easy Sheet Pan Red Velvet Cake
If there’s one thing I’ve learned over the years, it’s that comfort food doesn’t have to be complicated. This zucchini swirl coffee cake is my go-to whenever I need a little slice of homey goodness—perfect for lazy weekend mornings, quick brunches, or even sneaking a quick dessert after dinner. I’ve made this countless times, and honestly, it never fails to bring a smile—especially when you get that first bite, warm and flaky, with just the right touch of sweet and spice. My kids ask for this all the time, and I’ve learned to stash leftovers in the freezer for when guilt hits me about that second slice at midnight! And trust me on this—adding a splash of almond milk makes it even creamier. This one’s a lifesaver on busy nights or when you’re craving something sweet but don’t want to turn on the oven for a full cake.
What is Zucchini Swirl Coffee Cake?
Think of this zucchini swirl coffee cake as a cozy twist on the classic breakfast treat. It’s essentially a tender, moist batter layered with a cinnamon-sugar swirl and topped with a crunchy streusel. The magic is in the zucchini—yes, that humble veggie—and how it sneaks in moisture and a subtle sweetness. I’ve always loved coffee cake’s slightly crumbly topping and the way it fills the house with warm, spicy aromas. What makes this version special is that the zucchini doesn’t overwhelm; instead, it adds a whisper of freshness that balances out the richness of the cinnamon and sugar. Think of it as a sneaky way to get extra veggies in, without anyone knowing! Plus, it’s super forgiving—doubles easily, so you can make a huge batch on Sunday and eat slices all week long.
Why you’ll love this recipe?
What I love most about this zucchini swirl coffee cake is how it manages to feel indulgent but still somehow light. The zucchini keeps it incredibly moist—my secret weapon for a cake that stays fresh from breakfast to bedtime. The flavor is a cozy, cinnamon-spiced hug, with just enough sweetness to satisfya sweet tooth without going overboard. Plus, it’s so simple that even a beginner baker can nail it—no fancy techniques, just straightforward mixing and layering. I always do this when I have a few zucchinis from my garden that need using up, or when I want a breakfast or snack that doesn’t feel like a cheat. It’s economical, too—good ingredients, easy to find, and I usually have everything in my pantry. The versatility is a bonus; you can freeze leftovers, turn this into muffins if you’re in a hurry, or even add nuts or chocolate chips for different variations. Trust me, what I love most about this is how it’s perfect for any time of day—breakfast, brunch, or even a cozy evening treat.
How do I make Zucchini Swirl Coffee Cake?
Quick Overview
This zucchini swirl coffee cake is all about simple pleasures. You whip up a tender batter flavored with warm cinnamon, fold in grated zucchini, and pour half into your pan. Then, you spread a cinnamon-sugar filling right on top, swirl it gently, add a crunchy streusel, and bake until golden. It’s basically as easy as making pancakes but with a more satisfying, layered outcome. The trick is not overmixing the batter and letting it cool slightly before glazing. That way, you get a fluffy, moist cake with crisp topping and a rich, sweet swirl inside. This process is forgiving—you can make it in advance or whip it up on a weekday when you’re craving comfort food in less than an hour.
Ingredients
For the Main Batter:
– 2 cups all-purpose flour
– 1 teaspoon baking powder
– ½ teaspoon baking soda
– ½ teaspoon salt
– 1 tablespoon ground cinnamon
– 1 cup granulated sugar
– ½ cup vegetable oil or melted butter
– 2 large eggs
– 1 teaspoon vanilla extract
– 1 cup grated zucchini (squeeze out excess moisture)
For the Filling:
– ¼ cup brown sugar
– 1 teaspoon ground cinnamon
– 2 tablespoons melted butter or coconut oil
For the Glaze:
– ½ cup powdered sugar
– 1-2 teaspoons milk (almond, cow, or plant-based)
– ½ teaspoon vanilla extract
– Optional: a pinch of cinnamon or lemon zest for extra flavor
Step-by-Step Instructions
Step 1: Preheat & Prep Pan
Set your oven to 350°F (175°C). Grease a 9-inch square or round cake pan with butter or non-stick spray. Lining with parchment paper is a good idea if you want super-easy removal—trust me, this cake sticks less than you think! Have all your ingredients measured out so you can work smoothly—baking’s all about timing and preparation.
Step 2: Mix Dry Ingredients
In a large bowl, whisk together the flour, baking powder, baking soda, salt, and cinnamon. This ensures everything’s evenly distributed and gives the cake a consistent rise. I always do this first—it’s a simple step, but skipping it can lead to uneven baking or pockets of baking soda, which no one wants.
Step 3: Mix Wet Ingredients
In a separate bowl, whisk the eggs, sugar, oil, and vanilla until smooth. I like to use a fork or a whisk—makes things easier, especially with the eggs. After that, fold in the grated zucchini. I usually squeeze out the excess moisture with a clean dish towel or paper towel; otherwise, your batter gets gloopy, and we don’t want that!
Step 4: Combine
Gently fold the wet mixture into the dry ingredients just until they’re combined. Don’t overmix—it’s tempting to keep stirring, but overdoing it makes the cake dense. The batter will be thick but pourable, like a slightly stiff pancake batter. That’s perfect!
Step 5: Prepare Filling
Mix the brown sugar, cinnamon, and melted butter in a small bowl to create a sweet, fragrant paste. This will layer into your batter, giving that lovely swirl—my kids love watching me do this because it looks almost like a dessert art project.
Step 6: Layer & Swirl
Pour half the batter into your prepared pan. Spread the cinnamon-sugar mixture evenly on top. Then, add the remaining batter over the filling. Use a knife or skewer to swirl everything gently—don’t go too deep, just enough to see that beautiful marbled pattern forming. The visual effect is almost as fun as the smell in the oven!
Step 7: Bake
Pop it in the oven for about 30-35 minutes, or until a toothpick inserted near the center comes out clean. Every oven varies, so start checking at 30 minutes. If the top is getting too dark but the center isn’t done, tent it loosely with foil for the remaining minutes.
Step 8: Cool & Glaze
Let the cake cool in the pan for about 10 minutes before transferring to a wire rack. Once cooled slightly, drizzle on your glaze—powdered sugar mixed with milk and vanilla. I usually add a cinnamon pinch or lemon zest for extra punch. Wait until the cake isn’t piping hot; otherwise, the glaze will melt right off.
Step 9: Slice & Serve
Use a sharp knife to cut clean slices—hot cake might melt the glaze, so wait a few minutes if needed. Serve warm or at room temperature with a cup of coffee or tea. My favorite is pairing it with a dollop of Greek yogurt or a glass of cold milk. Trust me, it disappears faster than I can say “yum.”
What to Serve It With
This zucchini swirl coffee cake is so versatile, it pretty much fits any occasion. For breakfast, I love serving it with a strong cup of coffee, a splash of cream, and maybe some fresh berries on the side. It’s a hit with my Sunday brunch crew—especially when I warm slices slightly before serving, so the cinnamon scent hits your nose first. For a cozy snack, I sometimes sprinkle chopped nuts or mini chocolate chips into the batter—my kids go crazy for the little crunch. As a dessert, I think a dusting of powdered sugar or a dollop of whipped cream elevates it nicely. It’s also perfect for packing in a lunchbox, especially since it tastes even better the next day. Honestly, I usually bake this on a Sunday afternoon just to have a slice waiting for me when the evening gets chilly. It’s perfect with a mug of chai or a glass of cold milk—anytime, really.
Top Tips for Perfecting Your Zucchini Swirl Coffee Cake
Over the years, I’ve picked up a few tricks that make this cake even better. First, when grating zucchini, always squeeze out the excess moisture—it prevents sogginess and helps give that fluffy crumb we love. After testing different flours, I found that using a mix of almond flour and all-purpose works great if you want a slightly denser, nuttier cake, but stick with plain all-purpose for fluffiness. When mixing the batter, I keep my movements gentle—overmixing makes it tough and rubbery, especially if you’re adding extras like nuts or chocolate. Swirling is an art; try to make gentle, figure-eight patterns, and don’t overdo it—you want a nice marbled effect, not a muddy mess. Substituting coconut oil for vegetable oil adds a hint of tropical flavor, but I recommend sticking to neutral oils unless you want to experiment. For the glaze, you can swap vanilla for citrus zest or add a splash of almond extract for more complexity. Lastly, bake on the middle rack for even heat; I’ve learned that the edges brown faster on the top rack. Checking for doneness is key—don’t rely solely on timing. A clean toothpick in the center is your best friend. Trust me, after a few tries, you’ll get perfect slices every time. I’ve even experimented with adding chopped pecans or dried cranberries in the swirl—delicious variation that you can customize based on what you love.
Storing and Reheating Tips
This cake keeps wonderfully, which is why I often bake a big batch on Sunday. Store leftovers in an airtight container at room temperature for up to two days—cover it loosely with foil or a cloth to keep it moist but prevent it from getting stale. If you want to keep it longer, pop slices into an airtight container in the fridge—will last about four days, and I find it still tastes just as good reheated gently in the microwave for about 15-20 seconds. For freezer storage, wrap individual slices tightly in plastic wrap, then tuck them into a zip-top bag or airtight container. They’ll keep for up to three months, and all you need to do is thaw at room temperature or warm in the microwave. I do this all the time when I want a quick snack or dessert—no fuss, no waste. Just remember, if you’re planning to add the glaze later, wait until the cake has thawed completely for best results. The cake’s moisture helps the glaze set nicely, making the slices look pretty and taste fresh.
Frequently Asked Questions
Final Thoughts
Honestly, this zucchini swirl coffee cake has become a staple in my home—not just because it’s delicious, but because it’s reliable, forgiving, and makes the house smell like heaven. Sometimes I bake it in the morning, sometimes for a lazy Sunday brunch, and often I just want a slice with my afternoon coffee. The best part? It’s flexible—no fuss in the kitchen, just good ingredients and a little love. I love how the zucchini adds a touch of freshness, balancing out all that cinnamon-sugar goodness. Plus, I’ve sneaked in extra walnuts or cranberries, and it’s always a hit. I hope you give this a try and find it as comforting as I do. Feel free to experiment—add your favorite nuts or even a splash of orange zest for a different twist. Can’t wait to hear how yours turns out—happy baking, my friend!
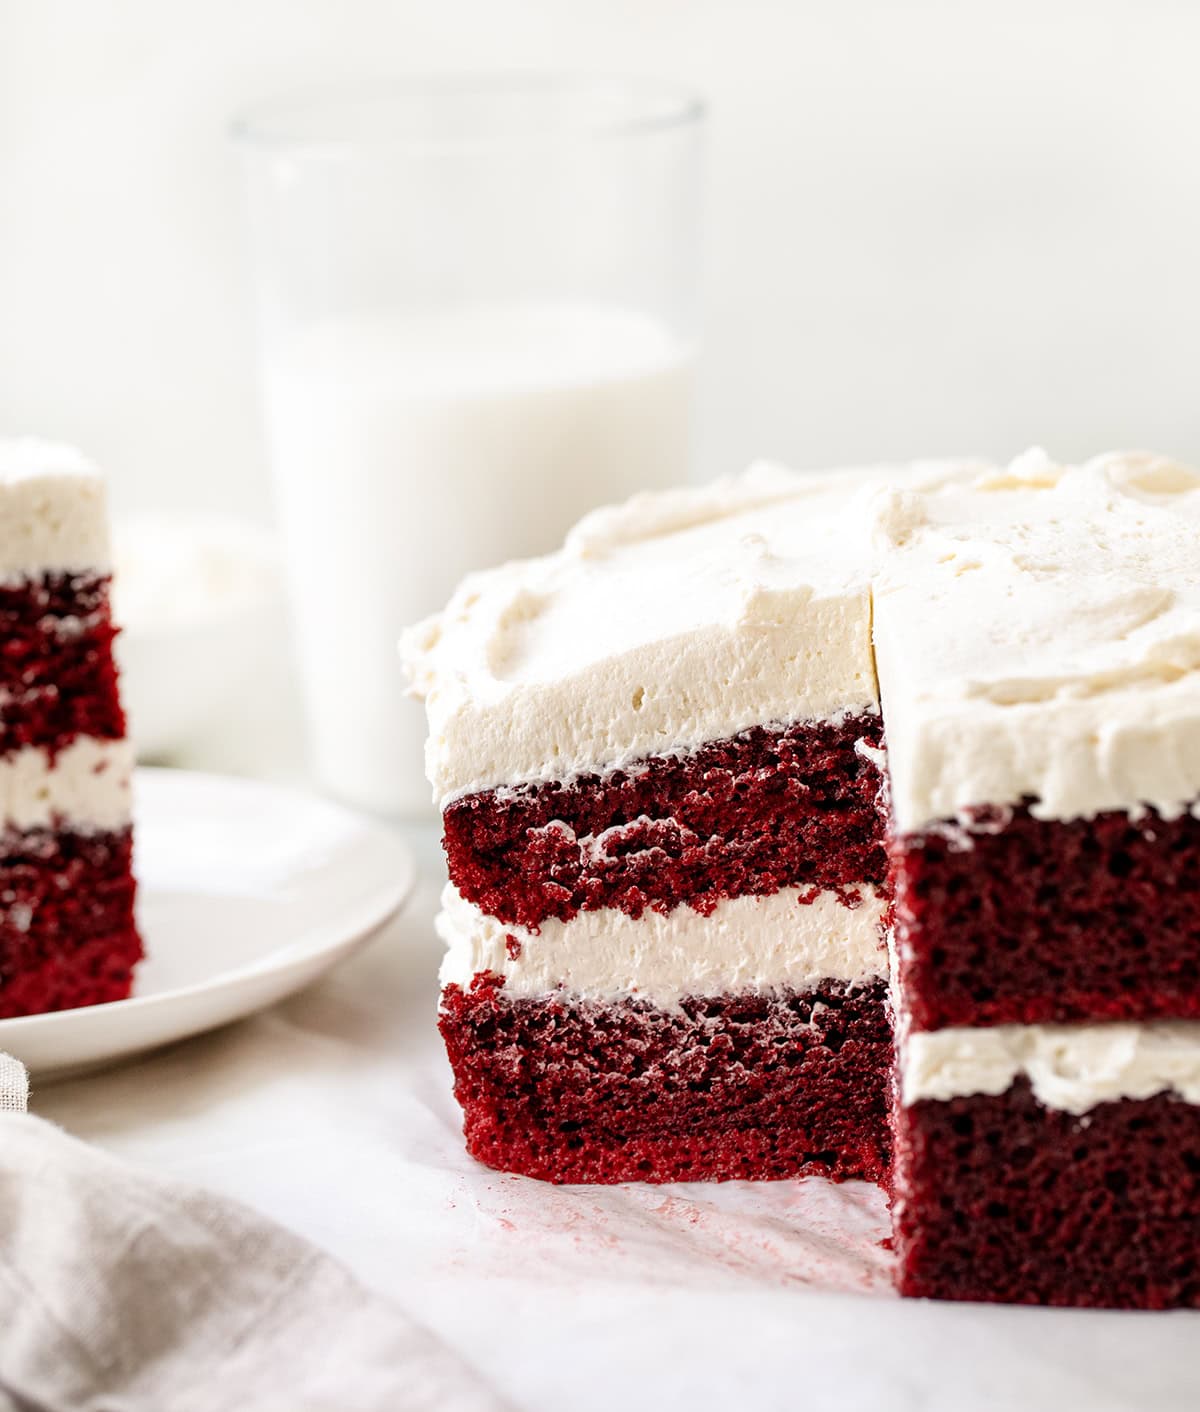
red velvet cake
Ingredients
Method
- Preheat oven to 325°F. Line a 10×15-inch jelly roll pan with parchment paper and spray with nonstick cooking spray.
- In a large bowl, whisk together the flour, sugar, baking soda, baking powder, cocoa powder, and salt.
- In a medium bowl, whisk together mayonnaise, eggs, buttermilk, vanilla extract, red food coloring, hot water, and vinegar until smooth.
- Add wet ingredients to dry, stirring until just combined.
- Pour batter into the prepared pan and bake for 35 minutes or until a toothpick inserted in the center comes out with moist crumbs.
- Allow the cake to cool on a wire rack to room temperature.
- Prepare the frosting while the cake cools.
- In a saucepan, whisk milk and flour and cook until thickened, then cool completely.
- Cream butter and sugar until fluffy, then beat in the cooled milk mixture.
- Add vanilla extract and beat until smooth and creamy.
- Assemble the cake: Slice cooled cake if needed, then layer with frosting.
- Serve and enjoy your red velvet cake.