How to Make Sweet Apple Caramel Sauce
There’s something about biting into a slice of freshly baked bread that just feels like a hug from the kitchen. I remember as a kid, my grandma’s oven always bubbling with some kind of sweet bread, and the smell alone would make everything in the house feel cozy and bright. That’s exactly what inspired me to create this zucchini swirl loaf. It’s deceptively simple but packed with flavor — a perfect way to sneak in a little veggie goodness without sacrificing that soft, sweet-yet-savory bite. Honestly, I’ve made this recipe dozens of times, tweaking until I got it just right; my kids ask for this all the time, especially on lazy weekend mornings. And I love that it’s not just delicious but also versatile — great as a quick breakfast, a sweet snack, or even a light dessert. Plus, I promise, it’s easier than you think. Trust me on this one — it’s a lifesaver on busy nights or when you just want to treat yourself to something homemade and soulful.
What is Zucchini Swirl Loaf?
Think of zucchini swirl loaf as a love child between your favorite quick bread and a beautifully marbled cake. It’s essentially a moist, tender bread infused with grated zucchini — which keeps it super soft and adds a subtle vegetable flavor. The “swirl” part comes from swirling in a cinnamon-sugar mixture or cream cheese filling, creating beautiful marbled patterns with each slice. The name might sound fancy, but this is a down-to-earth recipe that’s perfect for using up summer’s bountiful zucchinis or hiding a bit of leftover squash in the fridge. It’s kind of like a cross between bread, cake, and muffin territory — all rolled into one. What I love most about this is it’s so flexible; you can dress it up with nuts, chocolate chips, or even lemon zest if you’re feeling fancy. It’s warm, comforting, and strangely addictive, especially when served fresh out of the oven.
Why you’ll love this recipe?
First off, this zucchini swirl loaf tastes incredible. The tender crumb with tiny bits of zucchini and those sweet, cinnamony ribbons — it’s a flavor combo that just works. Every time I pull this out of the oven, my whole house fills with that warm, inviting aroma. It’s comforting—like something your grandma would bake when you visit, or like that cozy Sunday morning feeling I always chase. On top of that, it’s such a simple recipe. No complicated techniques, no hard-to-find ingredients — just straightforward pantry staples and some fresh zucchini. This one’s a lifesaver on busy nights when I need to whip up something quick but still want to serve up a homemade treat. Cost-wise, it’s definitely budget-friendly; zucchini costs next to nothing, and the rest—flour, sugar, eggs—is staple stuff I always keep in the house. Plus, the versatility is fantastic. You can switch up the fillings or tweak the sweetness depending on whether you want breakfast, snack, or dessert. I’ve tested this with almond milk, and honestly, it made the bread even more tender and moist — so don’t be shy about experimenting! It’s just that kind of recipe — forgiving and adaptable. And what’s more, the swirl pattern? It makes each slice look like a little piece of art, so it’s great to serve to guests or just enjoy yourself. Trust me, once you make this, it’ll become a regular in your baking rotation—because who doesn’t need a little slice of cozy in their day?
How do you make Zucchini Swirl Loaf?
Quick Overview
This zucchini swirl loaf comes together in just a handful of steps — mix, swirl, and bake. The best part? It’s all about keeping things simple. You start by preparing your zucchini, then whisk up your batter, spread half of it in the loaf pan, swirl in your cinnamon-sugar filling, top with the remaining batter, and then gently swirl again. A quick bake later, you’ve got a golden-brown, aromatic bread that’s perfect for slicing and sharing. It’s honestly foolproof once you get the hang of it. Plus, I always do this when I want something sweet but don’t want to spend hours in the kitchen. The smells alone are worth the effort; my house smells like cinnamon rolls waking up on a Sunday morning. It’s that cozy. And I love that I can make extra to freeze or share with friends — it’s always met with happy smiles!
Ingredients
For the Main Batter:
– 2 cups all-purpose flour (or a gluten-free blend if you prefer)
– 1 teaspoon baking powder
– ½ teaspoon baking soda
– ½ teaspoon salt
– 1 teaspoon ground cinnamon
– ¾ cup granulated sugar
– ½ cup vegetable oil or melted butter
– 2 large eggs
– 1 teaspoon vanilla extract
– 1 cup grated zucchini (squeeze out excess moisture)
For the Filling:
– ¼ cup brown sugar or coconut sugar
– 1 teaspoon cinnamon
– Optional: 1/4 cup chopped nuts or chocolate chips
For the Glaze (optional):
– ½ cup powdered sugar
– 1-2 tablespoons milk or cream
– A splash of vanilla or lemon juice for flavor
Step-by-Step Instructions
Step 1: Preheat & Prep Pan
Preheat your oven to 350°F (175°C). Grease your loaf pan well — I love using butter or cooking spray, and I line it with parchment paper for easy removal. Make sure your zucchini is grated ahead of time — I like to do this first so it’s ready to go. If your zucchini is very watery, give it a good squeeze in a clean towel to extract excess moisture. This way, your bread stays tender without becoming soggy.
Step 2: Mix Dry Ingredients
In a medium bowl, whisk together the flour, baking powder, baking soda, salt, and cinnamon. I always do this first to ensure everything is evenly distributed, especially the cinnamon, which can clump. Properly mixed dry ingredients help your batter rise evenly and give that lovely texture we’re after.
Step 3: Mix Wet Ingredients
In a large bowl, beat the eggs and sugar until they’re light and slightly puffy — I usually do this with a whisk or hand mixer for about a minute. Then stir in the oil and vanilla until combined. Last, fold in the grated zucchini. The zucchini will seem like a lot, but it cooks down and stays moist, keeping the bread super tender. If you’re feeling adventurous, I’ve tested this with almond milk or coconut oil — both work beautifully and make the loaf even richer.
Step 4: Combine
Add the dry ingredients to the wet and gently fold just until combined. Be careful not to overmix — that can make the bread dense. I usually stop mixing as soon as the streaks of flour disappear. A few lumps are totally fine; they’ll bake out.
Step 5: Prepare Filling
In a small bowl, mix together the cinnamon and brown sugar. If you want crunch or extra flavor, stir in some chopped nuts or chocolate chips. This is totally optional but adds a fun surprise inside each slice. I prefer using brown sugar because it creates a lovely caramelized topping when baked, but regular sugar works just fine, too.
Step 6: Layer & Swirl
Pour half of the batter into your prepared loaf pan, spreading it out evenly. Sprinkle half of your cinnamon-sugar mixture on top, then add the remaining batter. For that beautiful swirl, use a butter knife or skewer to gently swirl through the batter, creating waves of cinnamon — don’t overdo it; just a few swooping motions will do. Think of it as creating a marbled effect that makes each slice look like a work of art.
Step 7: Bake
Pop the loaf into your preheated oven and bake for about 50-60 minutes. Check for doneness by inserting a toothpick into the center — if it comes out clean, you’re good. Oven times vary a little based on your pan and climate, so start checking around the 50-minute mark. If the top gets too browned but the center’s not quite done, tent it with foil and keep baking. Nothing’s worse than a soggy loaf!
Step 8: Cool & Glaze
Let your loaf cool in the pan for about 10 minutes, then transfer it to a wire rack. I know the temptation is real, but waiting at least 20 minutes before slicing ensures the bread sets nicely, giving you clean cuts. If you’re glazing, whisk together powdered sugar and your favorite liquid — milk, cream, lemon — until smooth. Drizzle it over the warm loaf for that glossy, sweet finish. Honestly, that drizzle makes it look as good as it tastes.
Step 9: Slice & Serve
Use a sharp serrated knife to cut even slices — I like thick pieces with a generous spread of butter or a smear of cream cheese. This bread is delicious warm or at room temperature. I often serve it alongside a cup of coffee or a glass of milk, but it also pairs beautifully with a dollop of Greek yogurt or a splash of honey. Leftovers are perfect toasted the next day, bringing back that just-baked goodness in every bite.
What to Serve It With
Honestly, this loaf is a chameleon. I often slice it up and serve it for breakfast — maybe with a schmear of butter or ricotta and a drizzle of honey. It’s also fantastic for brunch, paired with fresh berries and a hot espresso. As a dessert, I like to warm a slice and top it with whipped cream or vanilla ice cream — the warm/cold combo is irresistible. When I’ve got friends over, I cut thick slices, serve with tea or Apple Cider, and watch it disappear. This bread is also a go-to snack when the kids come home from school — I throw in a few extra nuts or raisins if I want to make it more festive. It’s hearty enough to enjoy on its own, but also subtle enough that you can jazz it up with whatever toppings or sides you love. I’ve even taken slices camping; it travels beautifully, stays moist, and always draws compliments. Truly, this zucchini swirl loaf is a staple I’ll keep baking forever.
Top Tips for Perfecting Your Zucchini Swirl Loaf
After making this dozens of times, I’ve learned a few tricks that really elevate the end result. For instance, when grating zucchini, I always use the fine side of my box grater — it blends seamlessly into the batter without adding too much moisture. To keep the loaf moist, I squeeze out as much excess water as possible; I’ve found that skipping this step can make the bread a bit dense or damp.
Mixing is key — I never overmix once I add the dry ingredients, because that creates a tough crumb. Gently folding everything together with a spatula ensures lightness. When swirling in the cinnamon-sugar, I use a skewer or thin knife to drag through the batter in figure-eight motions; that technique gives me nice marbled patterns every time. If you don’t have cinnamon, you can try other seasonings like pumpkin pie spice or cardamom for a different flavor profile.
For ingredient swaps, I’ve tested coconut oil, which adds a subtle tropical note, and almond flour for a grainy, protein-packed twist. Just remember, a little goes a long way — you may need to adjust the liquids slightly. Baking-wise, I recommend placing the loaf in the center of the oven for even heat and start checking around 50 minutes to prevent over-browning. If the top gets dark too quickly, tent with foil; it prevents burning without sacrificing doneness.
For glaze variations, I love citrus flavors — a splash of lemon or orange juice cuts through the sweet and adds a fresh brightness. If you prefer a less sweet topping, a simple dusting of powdered sugar or even a drizzle of honey works beautifully. The key is to add the glaze when the loaf is still warm so it seeps slightly into the crumb, making every bite even more luscious.
Overall, this recipe is forgiving and adaptable — once you get the rhythm, you’ll find all sorts of ways to make it your own. I learned to add a pinch more cinnamon if I want it a little more fiery; I’ve even experimented with shredded carrots and zucchini combo for extra color and flavor. The secret? Don’t be afraid to tweak and taste. Nothing beats the thrill of pulling out golden, fragrant bread that you made from scratch — that warm, homemade feeling never gets old.
Storing and Reheating Tips
This loaf lasts well for a few days, but I always recommend wrapping it tightly in plastic wrap or storing in an airtight container to keep it fresh. At room temperature, it stays good for about 2-3 days; beyond that, I pop it in the fridge, especially if I want to keep the zucchini from getting mushy. Just make sure it’s well wrapped — it prevents it from drying out and absorbing fridge odors.
If you’re planning to keep it longer, the freezer is your friend. Wrap slices individually in plastic wrap and slide them into a resealable bag. They’ll stay good for up to 3 months. To reheat, just warm a slice in the microwave for about 15-20 seconds or toast it lightly. The smell alone will make your kitchen smell like freshly baked bread, and that’s half the joy, right?
If you’ve glazed it, I recommend adding the glaze just before serving, especially if it’s been stored in the fridge. The glaze can get a little sticky or melt if you freeze it, so it’s best to add fresh before serving for that glossy, luscious look.
Frequently Asked Questions
Final Thoughts
This zucchini swirl loaf has become one of my go-to recipes — it’s a quick way to fill the house with warmth and sweet aroma. Every time I bake it, I feel a little nostalgia, recalling lazy weekend mornings and family gatherings where everyone ends up sneaking seconds. It’s easy enough for beginner bakers but special enough to impress friends or brighten a weekday. I love experimenting with different fillings, pairing it with all kinds of toppings, and sharing slices with loved ones. Once you get the hang of this recipe, I promise it’ll become a staple in your baking arsenal. There’s something incredibly satisfying about creating something so beautiful and delicious from simple ingredients. So, gather your zucchinis, warm up that oven, and I can’t wait to hear how yours turns out! Happy baking!
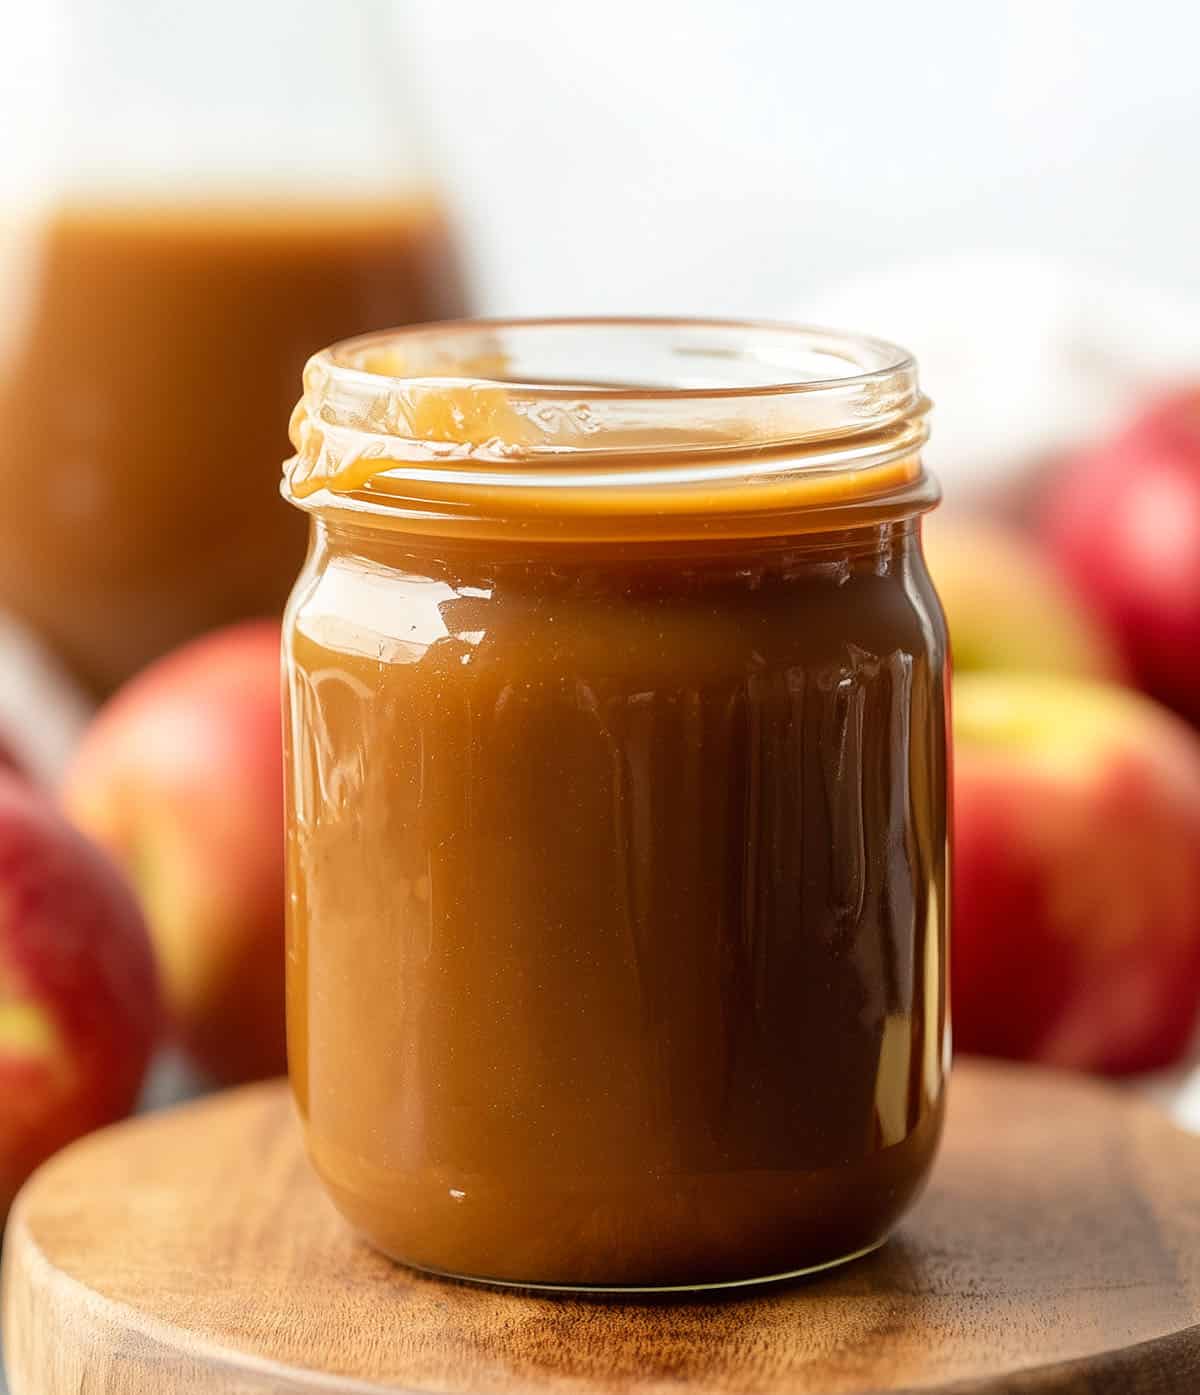
apple caramel sauce
Ingredients
Method
- To a small saucepan over medium-high heat, add the apple cider and cinnamon. Cook for 18-20 minutes until it is reduced to about 1/4 cup. Set aside.
- Add the granulated sugar to a separate medium heavy-bottomed saucepan. Spread it out evenly over the bottom of the pan. Set the saucepan over medium-low heat. Do not stir the sugar at this point. Allow the sugar to begin melting on its own.
- As the sugar starts to melt around the edges, gently tilt the pan to help the sugar melt evenly. Once you see a significant amount of melted sugar, start gently stirring with a wooden spoon or heatproof silicone spatula to ensure all the sugar melts evenly. Be patient. It may seem slow at first, but the sugar will eventually melt completely and turn golden.
- Continue to cook the sugar, stirring gently, until it reaches a deep amber color (about 5-10 minutes). Be careful not to let it burn.
- Once the sugar is a deep amber color, reduce the heat to low. Carefully add the butter, stirring constantly until melted.
- Gradually add the warm heavy cream while stirring. The mixture will bubble up, so be cautious.
- Stir in the reduced apple cider and vanilla until well combined. Add a pinch of kosher salt and stir to incorporate.
- Continue cooking on low until smooth, about 5-10 minutes.
- Remove from heat and allow the sauce to thicken as it cools. Use warm or cold.