Easy Eggplant Sandwiches with Pesto
There’s something about the smell of baking zucchini bread that instantly takes me back to lazy weekend mornings at my grandma’s house. The way it fills the kitchen with warm, sweet-spicy perfume makes everyone stop whatever they’re doing and head straight for the oven. I remember helping her grate zucchini — which, if you’ve ever done it, can be a messy, slightly damp affair. But oh, that first bite of her classic zucchini bread with a touch of butter melting on top? Absolutely worth every minute of prep. I’ve made a lot of versions over the years, but honestly, this zucchini swirl loaf — yes, the one I’m about to share — has quickly become a family favorite. It’s incredibly delicious, unexpectedly easy, and perfect for when you’re craving something sweet but also a little healthy. Trust me, this one’s a lifesaver on busy nights, especially when my kids ask for seconds before I even get a chance to plate it up. It disappeared in minutes at my house, and I bet it will at yours, too.
What is Zucchini Swirl Loaf?
Think of this zucchini swirl loaf as a cozy mash-up between a classic zucchini bread and a irresistible marble cake. If you’ve ever baked a chocolate swirl cake or a cinnamon marbled loaf, you’ll get the vibe. It’s essentially a tender, moist loaf that combines grated zucchini with a hint of cinnamon and vanilla, swirled together with a sweet batter. The “swirl” part is what makes it pretty and fun to serve — creating a beautiful marbled effect that’s almost too pretty to cut. The name might sound fancy, but honestly, it’s just a smart way to sneak extra veggies into a treat you’ll love. My favorite part? The texture — moist, soft, and just slightly crumbly, with little pockets of cinnamon sugar running through, making each bite a little adventure. It’s also versatile: breakfast, snack, or—even better—dessert, depending on how you serve it.
Why you’ll love this recipe?
There are so many reasons to get excited about this zucchini swirl loaf. First off, the flavor is unbeatable. The zucchini adds a subtle moisture and freshness that balances the sweetness perfectly, while the cinnamon and vanilla give it that cozy, homemade feel. What I really love most about this is how incredibly simple it is — honestly, I’ve tested this with just a handful of pantry staples, and it never fails. No fancy ingredients or complicated techniques. It’s a one-bowl wonder, which makes clean-up a breeze, especially when you’re trying to get dinner on the table after a long day. Plus, it’s budget-friendly because zucchinis are cheap and plentiful during summer — and if you’ve got some frozen or canned zucchini, it works just as well. This loaf is also super versatile. You can customize it by adding nuts or chocolate chips, or even swapping out the sugar for honey or maple syrup. It’s a great way to use up any extra zucchinis, and trust me — once you try this, it’ll become part of your regular baking rotation. My kids ask for this all the time, and it’s a hit at potlucks, school lunches, and Sunday brunch. Honestly, I think what makes this recipe special is that it’s accessible, comforting, and downright delicious — like a warm hug in loaf form.
How do you make Zucchini Swirl Loaf?
Quick Overview
This zucchini swirl loaf is all about simplicity and flavor. You start by grating zucchini, squeezing out excess moisture (because no one wants a soggy loaf!), then mixing it into a basic batter flavored with cinnamon and vanilla. The batter is then layered with a cinnamon sugar mixture, swirled to create beautiful marbling, and baked until golden and set. It’s a straightforward process that takes about an hour from start to finish, but the results? Totally worth it. The best part? You don’t need a mixer — just a big bowl, a whisk, and a spatula. Once out of the oven, I like to give it a few minutes to cool before drizzling a simple glaze or just dusting with powdered sugar. It’s perfect for baking on lazy weekends or whenever you want a little piece of home comfort.
Ingredients
For the Main Batter:
– 2 cups grated zucchini (about 2 medium zucchinis)
– 1 1/2 cups all-purpose flour (or a 1:1 gluten-free blend)
– 1 teaspoon baking powder
– 1/2 teaspoon baking soda
– 1/2 teaspoon salt
– 1 teaspoon ground cinnamon
– 1/2 teaspoon nutmeg (optional but recommended)
– 1 cup granulated sugar or coconut sugar for a healthier twist
– 1/2 cup vegetable or olive oil
– 3 large eggs
– 1 teaspoon vanilla extract
For the Filling:
– 1/4 cup brown sugar
– 1 teaspoon ground cinnamon
– 2 tablespoons melted butter or coconut oil
For the Glaze:
– 1/2 cup powdered sugar
– 1-2 tablespoons milk or almond milk
– 1/4 teaspoon vanilla extract
Step-by-Step Instructions
Step 1: Preheat & Prep Pan
Preheat your oven to 350°F (175°C). Grease a standard loaf pan with butter or non-stick spray, then line it with parchment paper for easy removal. As I always do when baking loaves, I like to set everything up beforehand — it makes the process smoother and less stressful, especially if I’m multitasking with kids running around.
Step 2: Mix Dry Ingredients
In a large bowl, whisk together the flour, baking powder, baking soda, salt, cinnamon, and nutmeg. This step helps evenly distribute the leavening agents and spices, so every bite gets that perfect cinnamon kick. It also helps avoid clumps and uneven baking.
Step 3: Mix Wet Ingredients
In another bowl, whisk the eggs, sugar, oil, and vanilla until well combined. I’ve tested this with almond milk, and guess what? It actually made it even creamier and lighter! Just make sure all the wet ingredients are nicely blended before adding the zucchini.
Step 4: Combine
Add the grated zucchini to the wet mixture, and fold it gently. Then, pour the wet into the dry ingredients, stirring just until everything is combined. Be careful not to overmix — overworking the batter can make the loaf dense, and nobody wants that. It should be a bit lumpy, with no streaks of dry flour.
Step 5: Prepare Filling
Mix the brown sugar, cinnamon, and melted butter until crumbly. This cinnamon sugar mixture is what gives our swirl that beautiful marbled effect and extra flavor. You can add chopped nuts or chocolate chips here if you’re feeling indulgent, but I stick with the classics.
Step 6: Layer & Swirl
Pour about half of the batter into the prepared loaf pan. Sprinkle half of the cinnamon sugar mixture over it, then layer the rest of the batter on top. Finish with the remaining cinnamon sugar and gently swirl with a toothpick or skewer — creating a marbled effect that’s part art, part science. I’ve learned to swirl just enough so the layers are visible, but not so much that the pattern gets obliterated.
Step 7: Bake
Pop it in the oven and bake for 55-60 minutes. Keep an eye on it after 50 minutes — if the top begins to brown too quickly, tent with foil. To test doneness, insert a toothpick into the center; it should come out clean. Every oven is different, so trusting your nose and eye is key here!
Step 8: Cool & Glaze
Let the loaf cool in the pan for about 15 minutes, then transfer to a wire rack. I usually wait at least 20 minutes before glazing because a hot loaf will just melt the glaze away. Mix the powdered sugar, vanilla, and enough milk until it’s just pourable. Drizzle over the cooled loaf for a little extra sweetness and shine.
Step 9: Slice & Serve
Use a serrated knife to cut into slices — patience is key, especially when it’s still slightly warm. Serve slices with a pat of butter, a dusting of powdered sugar, or a dollop of yogurt for breakfast. Or simply enjoy it plain with your afternoon coffee. I promise, it’s just as good the next day, stored in an airtight container on the countertop or in the fridge.
What to Serve It With
Honestly, this loaf is so versatile that it shines in many contexts. For breakfast, I love slicing a warm piece and spreading it with butter or cream cheese — it’s like a healthier version of a cinnamon roll. My kids ask for this all the time with a tall glass of milk or a hot cup of coffee. When I serve it at brunch, I like to add a few fresh berries on the side and sprinkle some chopped nuts for crunch. It’s also a fantastic after-dinner treat — paired with a scoop of vanilla ice cream or a drizzle of caramel sauce makes it feel extra indulgent.
And if I’m just craving something cozy to nibble on during a movie night, a thick slice with a cup of tea is pure comfort. It’s a hit with guests, and I’ve even made mini muffin versions for quick snacks that still hold the marbled beauty. Honestly, I think what makes this such a winning recipe is that it’s not just tasty but also makes the kitchen smell like home — sweet, warm, and inviting.
Top Tips for Perfecting Your Zucchini Swirl Loaf
After making this countless times, I’ve learned a few tricks I want to share. First, when grating zucchini, I always squeeze out as much moisture as possible — a clean kitchen towel or cheesecloth makes this easier. You want the zucchini damp but not wet, or your batter might turn out too runny. Trust me, a slightly drier zucchini keeps the loaf perfectly moist without sogginess.
Mixing is another critical point. Overmix dough leads to dense loaves, so fold gently and stop as soon as everything is just combined. For the swirl, I recommend using a butterknife or skewer to create a gentle figure-eight pattern — it’s satisfying to watch the batter transform into a marbled masterpiece. You can also personalize the sweetness by adding chopped chocolate or dried fruit, or spice it up with a pinch of ground cloves or ginger.
When it comes to baking, every oven is different. I suggest checking early; if I notice the top browning too fast, I shield it with foil midway through baking. The toothpick test remains my best friend — no guessing, just reliable results. The glaze, too, can be customized — a cream cheese frosting could act as a decadent topping, or a drizzle of honey gives a more natural finish.
Eventually, I learned to make this loaf with a little less sugar, swapping half for applesauce for a healthier take. The texture stays soft, and it’s not overly sweet, which means I can enjoy a slice with my tea in the evening. Making these small tweaks keeps the recipe feeling fresh and tailored to my mood or dietary needs.
Storing and Reheating Tips
This loaf stays fresh for quite a while, especially if you store it properly. If I plan to eat it within a day or two, I just keep it in an airtight container on the countertop — it’s soft and delicious for about 2-3 days that way. After that, I pop it into the fridge, where it still stays moist and tasty for up to a week. Just make sure it’s wrapped tightly or in a sealed container, or it might dry out a little.
If I want to keep it even longer, I freeze slices individually wrapped in plastic wrap, then put them in a zip-top bag. Thaw at room temperature or gently reheat in the microwave for about 20 seconds. The microwave is my secret weapon for that fresh-out-of-the-oven warmth, especially on mornings when I need a quick but satisfying breakfast. To preserve the glaze’s shine, I like to add it right before serving or warm the loaf gently and then drizzle fresh glaze on top.
Overall, this loaf is forgiving and tends to taste just as good reheated as fresh, especially if you add the glaze last. I’ve experimented with topping it with a dusting of powdered sugar or even a splash of cream — endless options for a homemade treat that feels just right.
Frequently Asked Questions
Final Thoughts
This zucchini swirl loaf has become my little baking sanctuary — a simple way to bring comfort, sweetness, and a hint of nostalgia into my home. I love how versatile and forgiving it is, making it perfect for everything from quick breakfasts to casual get-togethers. It’s proof that you don’t need fancy ingredients or complicated techniques to create something truly special. Every time I bake it, I get warm memories flooding over — my kids asking for seconds, friends raving about the flavor, and me, simply happy to have a home-baked treat that feels like a hug in every bite. I hope you give this recipe a try and find as much joy in making it as I do. And hey, don’t forget to customize it! Add your favorite mix-ins, swap ingredients, or tweak the sweetness — baking should always be personal. Happy baking, and I can’t wait to hear how yours turns out!
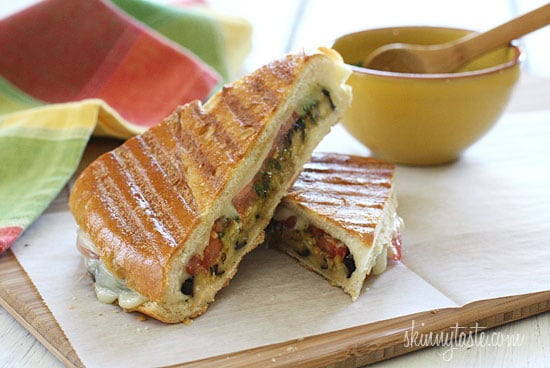
Eggplant Panini with Pesto
Ingredients
Method
- Slice the eggplant into 1/4-inch thick slices.
- Place the eggplant slices on paper towels, sprinkle with salt, and let sit for 30 minutes to draw out moisture.
- Pat the eggplant dry with paper towels.
- Preheat the panini grill.
- Spray the eggplant slices lightly with olive oil, and season with salt and pepper.
- Grill the eggplant about 7-8 minutes, turning once halfway through.
- Set the grilled eggplant aside.
- Slice the bread open, and layer 3 slices of eggplant, 1 slice of mozzarella, 1/2 tablespoon of pesto, and 2 slices of tomato on each sandwich.
- Close the sandwich and lightly spray the top with oil.
- Place in the panini press and cook until the cheese melts and bread is toasted.
- Cut in half diagonally and serve immediately.