Easy Cookie Peanut Butter Dip Delight
There’s something pure and comforting about baking a loaf that’s simple, wholesome, and just a little indulgent all at once. I remember those lazy Sunday afternoons at my grandma’s house, the smell of warm chocolate drifting through the air, and her always saying, “You gotta hide the zucchini, or no one will believe it’s in there.” And honestly? That’s exactly what makes this zucchini chocolate swirl loaf so special. It’s like sneaking a vegetable into a treat — the kids never suspect a thing — but really, it’s got hidden goodness in every bite. I’ve tested this with a splash of almond milk, and it made it even creamier — trust me on this one. Plus, it’s perfect when you’re craving something sweet at 10 pm but don’t want to turn on the oven for a big cake. This recipe’s a lifesaver on busy nights, and my friends always ask for the secret ingredient. Spoiler alert: It’s zucchini! But shh, I don’t tell everyone until after they’ve devoured it. Let me walk you through all my tips and tricks for making the best zucchini chocolate swirl loaf you’ll ever taste—loaded with flavor, super easy, and downright comforting.
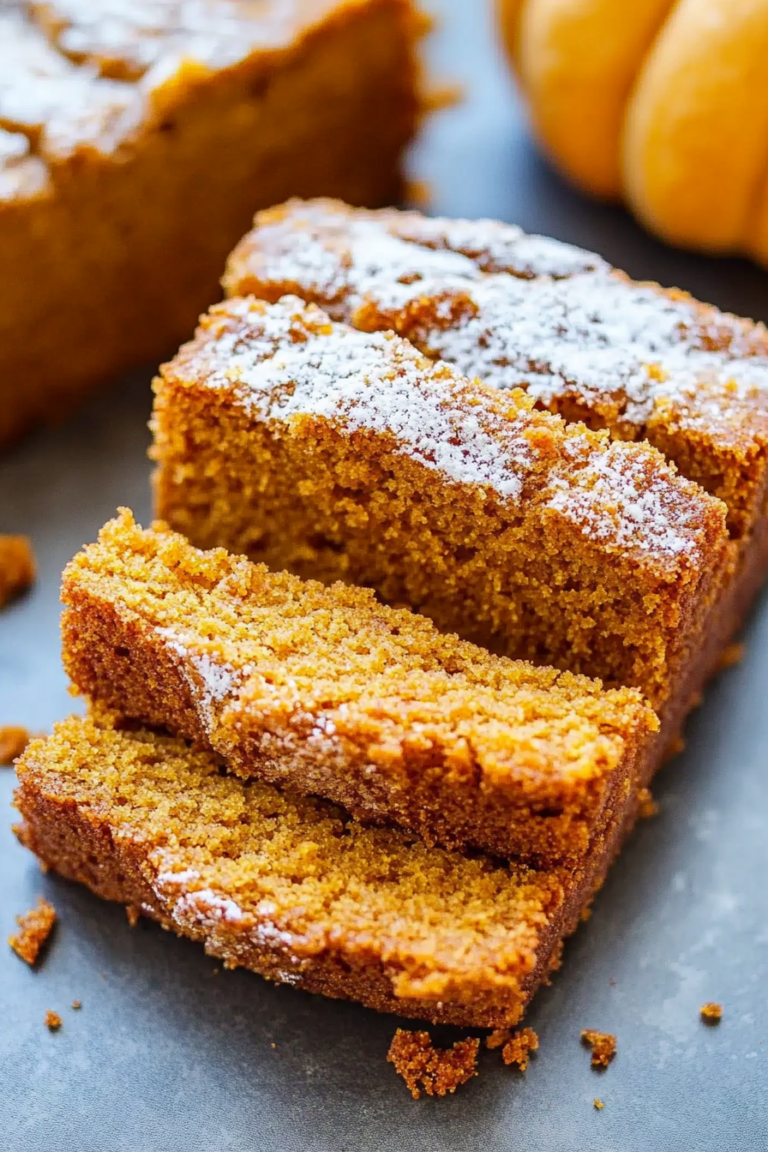
What is Zucchini Chocolate Swirl Loaf?
Think of this loaf as the lovechild of cozy baking and sneaky vegetables. It’s essentially a soft, tender bread, layered with a rich chocolate swirl that’s almost like a grown-up version of a childhood favorite. The name might sound fancy, but it’s really just a simple quick bread—a loaf that comes together in one bowl, with no fuss. What makes it unique is the way you fold in shredded zucchini, which keeps the bread moist and tender without making it heavy or dense. The swirl of chocolate adds a little decadence—think of it as a ribbon of molten cocoa running through the loaf, making each bite feel a bit special. It’s almost like a cross between banana bread and a chocolate babka, but so much easier to whip up on a weekday. And because you use zucchini, it’s a sneaky way to get some greens into the kids’ lunchboxes or your morning coffee break without anyone knowing. I love that it’s versatile enough for breakfast, snack time, or an after-dinner treat. Plus, it’s perfect for those days when you want something comforting but don’t want to spend hours baking.
Why you’ll love this recipe?
Honestly, what I love most about this zucchini chocolate swirl loaf is how it manages to be both healthy and indulgent at the same time. The zucchini adds moisture and a bit of nutritional boost—without tasting “vegetably” at all. My kids actually ask for seconds, which is a huge win in my book! The flavor is just divine—soft, sweet, with a burst of chocolaty richness that melts in your mouth. And you know what? It’s shockingly easy to make. You’ll be amazed at how quickly the batter comes together—no complicated techniques or special equipment needed, just a basic mixing bowl and a spoon. Cost-wise, it’s super budget-friendly because you probably already have most of the ingredients in your pantry: flour, sugar, cocoa powder, and zucchinis. Plus, there are so many ways to customize it. Want more intense chocolate? Fold in some dark chocolate chips. Prefer a nuttier touch? Add chopped walnuts or hazelnuts. This is one of those recipes I turn to when I need a comfort treat that also feels a little virtuous. What I love most about this is that it feels like a hug in loaf form, perfect for sharing with loved ones or just keeping a slice for yourself with a cuppa in the afternoon.
How do you make Zucchini Chocolate Swirl Loaf?
Quick Overview
This loaf couldn’t be simpler to make. It’s all about mixing the wet ingredients, tossing in the grated zucchini, creating a rich chocolate batter, and then swirling the two together before baking. The trick is to not overmix—because a tender crumb is all about gentle folding. Once baked, you get a beautifully moist loaf with a decadent chocolate ripple that almost looks like a fancy bakery find, but it’s really homey and relaxed. The steps are straightforward, making this recipe perfect for a beginner baker or someone in a rush. Plus, I always do this when I want an impressive-looking treat with minimal effort. The smell alone during baking is enough to bring everyone to the kitchen. Trust me — once you try this, it’ll become one of your go-to recipes for satisfying that sweet tooth while sneaking in some veggies. And the best part? You can make it ahead and it still tastes just as incredible the next day.
Ingredients
For the Main Batter:
– 1 1/2 cups all-purpose flour (I use unbleached for a richer flavor)
– 1/2 cup granulated sugar
– 1 teaspoon baking powder
– 1/2 teaspoon baking soda
– 1/4 teaspoon salt
– 1/4 cup unsweetened cocoa powder (preferably Dutch-processed for depth)
For the Filling:
– 1/2 cup semi-sweet chocolate chips or chopped dark chocolate
– 1/4 cup milk (or almond milk if you want it dairy-free)
For the Glaze:
– 1/4 cup powdered sugar
– 1-2 teaspoons milk or cream
– A splash of vanilla extract (optional)
– Extra cocoa powder or chocolate shavings for topping (optional)
Step-by-Step Instructions
Step 1: Preheat & Prep Pan
Preheat your oven to 350°F (175°C). Grease a standard loaf pan (8×4 inches) generously with butter or non-stick spray, then line it with parchment paper. This helps with clean, easy slicing later on. I always do this so I don’t end up fighting the loaf when it’s done baking!
Step 2: Mix Dry Ingredients
In a large mixing bowl, whisk together the flour, sugar, baking powder, baking soda, salt, and cocoa powder until evenly combined. This step ensures your leavening agents are distributed well, preventing clumps of dry ingredients and giving you a uniform rise.
Step 3: Mix Wet Ingredients
In a separate bowl, beat together the eggs, oil (or melted butter), vanilla, and milk. I like to use a fork or a whisk—quick and straightforward. The oil keeps everything moist, while the eggs create stability. When I tested this with almond milk, I found it made the batter even creamier, so don’t be afraid to experiment!
Step 4: Combine
Pour the wet mixture into the dry ingredients and gently fold with a spatula until just combined. Be careful here—overmixing can make the bread dense. You want just enough moisture to combine everything without losing the lightness.
Step 5: Prepare Filling
In a small bowl, melt your chocolate chips with a splash of milk in the microwave in 20-second bursts, stirring between each. This creates a lovely ganache-like filling. Let it cool slightly; it should be pourable but not hot. You can also chop up some chocolate and fold it into the batter if you prefer chunks or a more rustic look.
Step 6: Layer & Swirl
Pour half of your batter into the loaf pan, then spread half of the melted chocolate over it. Add the remaining batter on top and carefully swirl with a toothpick or skewer to create a beautiful marbled effect. This swirling is where the magic happens—don’t worry if it’s a little messy; that’s part of the charm.
Step 7: Bake
Pop the loaf into your preheated oven and bake for about 50-60 minutes. Check doneness by inserting a toothpick into the center; if it comes out clean, you’re good! Ovens vary, so start checking around 50 minutes to avoid overbaking. The top should be slightly domed and have a crackly surface, with a faint chocolate smell wafting out.
Step 8: Cool & Glaze
Let your loaf cool in the pan for at least 15 minutes before transferring to a wire rack. Once cooled, mix your powdered sugar with a splash of milk and vanilla for a quick glaze. Drizzle it over the loaf for that beautiful finishing touch. I like to add a few sprinkles or a dusting of cocoa powder for extra flair.
Step 9: Slice & Serve
Using a serrated bread knife, slice gently to prevent squishing the layers. Serve slightly warm or at room temperature. I love pairing a slice with a dollop of whipped cream or a side of fresh berries. The contrast of warm, gooey chocolate and the fresh, slightly vegetal zucchini makes every bite a little adventure.
What to Serve It With
This loaf is so versatile, and I typically serve it in different ways depending on the occasion. For breakfast, I slice it and toast it with a pat of butter, maybe a smear of jam or honey — I mean, who doesn’t love waking up to the smell of warm bread? My family loves it for brunch, paired with coffee or hot cocoa, especially when we’re lounging on a lazy weekend. It’s also a fantastic dessert — warm slices with a scoop of vanilla ice cream or a drizzle of caramel sauce make it feel downright decadent. When I want something casual, I’ll cube leftovers and make a bread pudding or share slices with cheese and fresh fruit. This is one of those recipes that just feels like home—comforting, flexible, and always a hit.
Top Tips for Perfecting Your Zucchini Chocolate Swirl Loaf
Through a lot of trial and error, I’ve picked up a few tips to make sure your loaf turns out amazing every time. First, when prepping the zucchini, I always squeeze out excess moisture using a clean kitchen towel — it prevents your batter from becoming too watery. I’ve tested this with various zucchinis, and the drier it is, the better the loaf holds its shape and gets that perfect moist crumb. If you overmix the batter, even slightly, the loaf can turn dense and tough — so fold gently and stop when just combined. For the swirl, I like to use a skewer or a chopstick—they create more defined marbling without smudging everything together. You can also play around with adding different types of chocolate, like white or milk chocolate, or even cinnamon to elevate the flavor. When baking, don’t be afraid to test early—you want a toothpick to come out with only a few moist crumbs. If your loaf browns too fast, tent it with foil during the last 10-15 minutes. And I learned the hard way that letting it cool fully before slicing prevents cracking and keeps the layers intact. As for ingredient swaps, using coconut oil instead of vegetable oil adds a subtle tropical flavor and makes it even more moist. I’ve also tried reducing the sugar for a less sweet version, and it still tastes fantastic — just more balanced and less dessert-like. Remember, baking variations happen, so trust your nose and toothpick here. Every oven is different, and a little patience always pays off.
Storing and Reheating Tips
This loaf keeps beautifully—once cooled, I usually wrap it tightly in plastic wrap or store it in an airtight container. At room temperature, it stays fresh for about 2 days, especially if you plan to eat it within that time. For longer storage, pop it into the refrigerator—just remember to let it warm slightly before slicing, as cold bread can be a bit crumbly. If you want to keep it for even longer, freezing slices individually is my go-to trick. Wrap each slice well in plastic, then slip them into a freezer bag — they’ll keep for up to 3 months. Thaw at room temperature or warm in the microwave for a few seconds. About the glaze—if you like that glossy finish, wait to drizzle it on until just before serving. You can reheat individual slices for a warm treat, but note that the swirl may lose some of its pretty marbling if you microwave it too long. Sometimes, I skip the glaze when reheating and just dust with a little powdered sugar or cocoa powder—simple, fuss-free, and just as tasty. The key is to keep it wrapped well and avoid exposure to air for the best texture and flavor.
Frequently Asked Questions
Final Thoughts
This zucchini chocolate swirl loaf is one of those recipes that secretly became a household favorite for me. It’s cozy, nourishing, and—let’s be honest—pretty delicious with that luscious chocolate ripple. Every time I bake it, I’m reminded of how simple ingredients can come together to create something truly satisfying. Whether I’m making it for a family brunch, a quick snack, or just because I need a little pick-me-up, it never disappoints. I love experimenting with different chocolates, adding nuts, or even sneaking in a touch of cinnamon just for kicks. It’s an adaptable, forgiving recipe—homey and effortless—but with a touch of that ‘wow’ factor that keeps everyone guessing. I hope you give it a try and make it your own. Feel free to play with the swirl pattern or add your favorite extras. And hey — don’t forget to let me know how yours turns out! Happy baking!

Oreo Peanut Butter Dip
Ingredients
Method
- In microwave, mix peanut butter, Nutella, and white chocolate morsels. Microwave on medium heat for 1 minute. Stir and heat in 15 second intervals until white chocolate is completely melted.
- Fold in crushed Oreos and store in a glass jar, completely sealed.
- Serve with crackers and fruit, enjoy! Also great with Pretzel Crisps!