Easy Backyard Poultry Coop Build
There’s something about waking up early on a weekend, the smell of freshly baked cake drifting through the house — it’s like an invitation to slow down and savor. I grew up with my mom’s coffee cake on brunch mornings, and honestly, there’s nothing quite like it. But lately, I’ve been experimenting with something a little healthier, a little more sneaky — and surprise, surprise, it’s become a household favorite. This zucchini swirl coffee cake is so good, I swear, it disappeared in minutes at my house. My kids ask for seconds, and my husband swears it’s better than anything bakery bought. The best part? It’s incredibly easy to throw together, doesn’t require fancy ingredients, and hides zucchini in a way that even the pickiest eaters won’t fuss over. If you’re craving something sweet and moist but want to sneak in some veggies, this one’s a lifesaver on busy nights or lazy weekends when all you want to do is enjoy a slice with your coffee.
What is Zucchini Swirl Coffee Cake?
Think of this as a cozy breakfast cake that’s got a little bit of everything — tender crumb, swirls of cinnamon sugar, and hidden zucchini that keeps it moist and flavorful. It’s essentially a mashup of classic coffee cake and a zucchini bread, with a beautiful marbled effect from the cinnamon-sugar swirl. The name itself is playful — it’s a cake that’s perfect with your morning coffee, but also fancy enough for brunch or an afternoon treat. The zucchini gets grated super fine, almost like rice, so you don’t end up with chunks — instead, you get a subtle vegetable boost that keeps the cake moist and adds a slight sweetness. Think of it as a way to make your breakfast just a little smarter, a little more indulgent, without any fuss. I always do this with my kids’ permission (“Nope, totally healthy, I swear!”), and they eat it up every time.
Why you’ll love this recipe?
What I love most about this zucchini swirl coffee cake is how it balances richness with wholesomeness. The flavor is divine — cozy cinnamon, sweet undertones from the sugar, and the surprise of zucchini that doesn’t make it heavy. It’s super simple to make, too — perfect for those mornings when you want to whip up something from scratch but don’t have hours to spend. Plus, it’s budget-friendly; most of us have the ingredients in the pantry. The versatility is another win — you can enjoy it warm with a dollop of whipped cream or just plain, sliced for breakfast or a snack. I’ve made this countless times and it never fails. It’s great if you’re feeding a crowd because there’s nothing like the look on a friend’s face when they realize there’s zucchini in the cake — and how moist and flavorful it is! And seriously, I’ve tested this with all kinds of variations: almond flour, coconut sugar, even dairy-free milks, and it’s always a hit. This one’s my go-to comfort food baked with a little twist.
How do I make Zucchini Swirl Coffee Cake?
Quick Overview
This cake is a walk in the park. You start by preparing the zucchini, mixing up a simple batter, and then layering everything in your favorite baking pan. The cinnamon-sugar swirl is what makes it special — perfect for creating that marbled look. Then, it’s just a matter of baking until golden and fragrant. No complicated steps or fancy gadgets required. I love making this because it’s almost foolproof, and the smell alone is enough to bring everyone to the kitchen. Once it’s out of the oven, you let it cool just enough so it doesn’t fall apart when you slice it — then, the best part: glazing or serving as is, with a cup of coffee or tea. I promise, once you’ve tried this, it will become a weekly staple.
Ingredients
For the Main Batter:
– 2 cups all-purpose flour (or gluten-free blend, I’ve tested with success!)
– 1 cup granulated sugar
– 1 teaspoon baking powder
– 1/2 teaspoon baking soda
– 1/2 teaspoon salt
– 1 teaspoon ground cinnamon
– 1/2 cup vegetable oil (or melted coconut oil for richer flavor)
– 3 large eggs
– 1 teaspoon vanilla extract
– 1 cup grated zucchini (really fine, squeeze out excess moisture)
For the Filling:
– 1/2 cup brown sugar
– 1 tablespoon ground cinnamon
– 2 tablespoons softened butter or coconut oil
For the Glaze:
– 1 cup confectioners’ sugar
– 2-3 teaspoons milk or cream
– 1/2 teaspoon vanilla extract
– Optional: a sprinkle of cinnamon or lemon zest for extra flavor
Step-by-Step Instructions
Step 1: Preheat & Prep Pan
Set your oven to 350°F (175°C). Grease a 9-inch square baking pan or line it with parchment paper. I sometimes like to put a little butter on the paper, just so nothing sticks — makes for easier slicing later.
Step 2: Mix Dry Ingredients
In a big bowl, whisk together the flour, sugar, baking powder, baking soda, salt, and cinnamon. Do a quick sift if you’re feeling fancy — it helps keep everything light and fluffy. This step guarantees a nice even crumb and stops any lumps from forming.
Step 3: Mix Wet Ingredients
In another bowl, beat the eggs, then whisk in the oil, vanilla, and grated zucchini. It should look slightly glossy and well combined. A tip I learned over the years — I like to squeeze out some extra moisture from the zucchini to keep the batter from getting too wet. Trust me, this makes a big difference in keeping the cake fluffy and light.
Step 4: Combine
Pour the wet mixture into the dry ingredients and fold gently — don’t overmix! You want just enough to combine. Overmixing can turn your cake dense, and nobody wants that. You’ll notice the batter is thick but smooth — perfect for swirling.
Step 5: Prepare Filling
In a small bowl, mix the brown sugar with cinnamon. Add the softened butter and mix with a fork until crumbly. If you want a nutty crunch, throw in chopped pecans or walnuts — I do that sometimes for added texture.
Step 6: Layer & Swirl
Pour about half of the batter into your prepared pan. Spread evenly. Sprinkle the cinnamon-sugar mixture over, then add the remaining batter on top. Use a knife or a skewer to swirl through the layers — go slow and create pretty marbled patterns. Trust me, this looks way more complicated than it actually is, and the swirl makes each bite extra special.
Step 7: Bake
Bake for about 35-40 minutes, until a toothpick inserted in the center comes out clean. The top should be golden and slightly cracked — that’s a good sign. Keep an eye on your oven because every one’s a bit different; if it’s browning too quickly, tent it with foil.
Step 8: Cool & Glaze
Let the cake cool in the pan for about 10-15 minutes — it’s tempting to dig in right away, but patience pays off. Then, make your simple glaze by mixing the sugar, milk, and vanilla until smooth. Drizzle it over the slightly warm cake and let it set for a few minutes. You can also skip the glaze if you prefer a less sweet finish.
Step 9: Slice & Serve
Use a sharp serrated knife and cut into squares. Serve warm with a splash of coffee or tea, or at room temperature — it’s delicious either way. Add a dollop of whipped cream or a sprinkle of extra cinnamon, if you’re feeling fancy. I like to get a good look at that beautiful swirl — it makes me proud every time!
What to Serve It With
This cake is pretty versatile. For breakfast, serve it with a scoop of Greek yogurt or a fresh fruit compote. My family loves topping slices with a little whipped cream or even a dollop of mascarpone — it’s like breakfast and dessert all in one. On brunch tables, pair it with brewed coffee, chai, or a light sparkling juice. For dessert, a drizzle of caramel sauce or a dusting of powdered sugar makes it look super fancy. It’s also perfect as an afternoon snack with a warm cup of tea — cozy times, I tell you. Sometimes, I even freeze slices and pop them in the toaster oven for an easy, quick treat. Trust me, the flavor gets even better after a day or two, and the zucchini just keeps it extra moist and tender.
Top Tips for Perfecting Your Zucchini Swirl Coffee Cake
After baking this so many times, I’ve picked up a few tricks that make all the difference. First, always squeeze out excess moisture from your zucchini; it keeps the cake from turning dense. I learned this lesson the hard way — soggy cake is no fun! When mixing the batter, fold gently to keep things airy. Over-mixing is a common mistake that can make the crumb tough. For the swirl pattern, I recommend using a skewer or a butter knife and dragging it gently through the batter, creating a marbled effect. The more random, the prettier it looks when baked. If you’re feeling adventurous, add chopped nuts or chocolate chips into the cinnamon-sugar filling — my kids love the chocolate bits! When baking, keep an eye on your oven’s temperature — every oven bakes a little differently. I also like to bake a little lighter than the time suggests; a slight underbake means gooey, moist slices. For the glaze, I prefer adding just enough milk to make a slightly runny consistency that drizzles easily without pooling too much. Trust me, perfecting this cake takes some practice, but it’s so worth it. The smell of cinnamon wafting through the house alone makes every hassle worth it. Oh, and one more tip — if you want a richer flavor, swap some of the oil for melted butter or brown butter — seriously elevates everything!
Storing and Reheating Tips
This cake keeps really well for a few days, especially if wrapped tightly with plastic wrap or stored in an airtight container. At room temperature, it’s good for about two days — just keep it covered so it doesn’t dry out. If you want it to stay fresh longer, store it in the fridge for up to a week. Just bring slices to room temperature before serving for the best texture and flavor. To freeze, wrap individual slices in plastic wrap, then pop them in a resealable bag or airtight container. They stay fresh for up to three months. When you’re ready to enjoy them, just thaw at room temp or warm them briefly in the microwave or oven. A quick zap in the microwave makes it nice and warm, like just baked — perfect for those days when you want comfort fast. Just remember, if you glazed it, wait until it’s fully thawed to add the glaze or drizzle, so it doesn’t get all sticky or runny. This cake is one of those things that only gets better with time — the flavors deepen, and the moisture stays perfect.
Frequently Asked Questions
Final Thoughts
Honestly, I can’t tell you how many times I’ve baked this cake, and each time it feels like a warm hug from the kitchen. It’s simple, cozy, and adaptable — the kind of recipe that gets passed around, shared at brunches, or kept on hand for those spontaneous sweet cravings. The fact that it sneaks in a vegetable makes me feel good about offering something nourishing, even when it’s a treat. The smell alone is enough to fill the house with comfort, and the marbled swirl adds a touch of homemade elegance. If you try it, I’d love to hear how it turns out — maybe tweak the spices, add nuts, or even swap the glaze for fresh berries. Whatever you do, enjoy every bite. Happy baking, and don’t forget to share that first slice with someone you love!
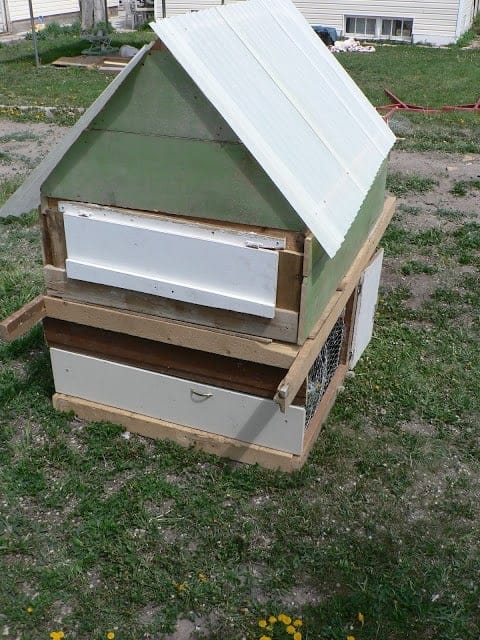
chicken coop
Ingredients
Method
- Gather all materials including wooden pallets, wire mesh, hinges, and wood stain.
- Construct the frame of the coop using the wooden pallets, securing with nails and hinges.
- Attach wire mesh to the sides and top for ventilation and predator protection.
- Apply wood stain to outdoor surfaces to protect against weather.
- Set up the coop in a shaded area with access to food and water for chickens.