Fragrant Cinnamon Sticks A Simple Treat
If you’re like me, there’s nothing better than biting into a slice of warm, moist coffee cake, especially one packed with fresh zucchini. It’s one of those recipes I’ve been making for years—my kids ask for it all the time, and it’s comfort food at its finest. I love how the zucchini keeps everything super moist, and the sweet, tangy cream cheese swirl just melts in your mouth. Plus, it’s a sneaky way to get a veggie into your kids’ diet without any fuss. I always do this when I want to treat myself without turning the kitchen upside down. It’s ridiculously easy, totally adaptable, and, honestly, smells like heaven wafting through your house. Trust me on this one: the smell alone will bring everyone running. I tested this with almond milk, and it actually made it even creamier—so good! Whether you’re making it for brunch, a casual coffee date, or just because someone in your house deserves a little sweet indulgence, this zucchini coffee cake is a total lifesaver on busy nights.
What is Zucchini Coffee Cake?
Think of this zucchini coffee cake as the love child of a classic crumb cake and a gentle vegetable upgrade. It’s essentially a tender, buttery cake infused with shredded zucchini, which keeps it irresistibly moist. The name “coffee cake” comes from its perfect pairing with a hot cup of coffee or tea, making it your go-to for lazy Sunday mornings or afternoon pick-me-ups. The best part? It’s got a generous swirl of cream cheese in the middle, adding a slightly tangy, luscious surprise that balances the sweetness perfectly. So, it’s not just a cake; it’s that comforting, cozy treat you turn to when you want something sweet but not overly heavy. Think of it as a breakfast-in-bed kind of dish with the added bonus that it’s way easier to make than it sounds. Really, it’s a versatile, family-approved recipe that you’ll find yourself coming back to—because once you get the hang of it, it’s hard to beat this combo of moist, nutty, and cheesy goodness.
Why you’ll love this recipe?
What I love most about this zucchini coffee cake is how forgiving it is—no fancy techniques, just good honest baking. The flavor? Oh, it’s amazing. The zucchini adds a subtle earthiness, but the sweetness easily takes center stage. Plus, the cream cheese swirl is a game-changer. It’s tangy, creamy, and just melts into each slice—my kids literally fight over the last piece. The texture is supremely moist with that slight crumb on top that’s perfect for snuggling into a mug of coffee or tea. And let’s talk about the simplicity: I always keep shredded zucchini in the freezer, so I can whip this up last-minute—no fuss. Budget-wise, it’s super friendly because most ingredients are pantry staples or seasonal zucchini from the garden. The versatility? You can add nuts, berries, or even swap the cream cheese filling for fruit preserves. Honestly, this one’s a lifesaver on busy nights or when you need a little “hug” in dessert form. I’ve made this countless times, and it never fails to make everyone smile.
How do I make Zucchini Coffee Cake?
Quick Overview
In a nutshell, making this zucchini coffee cake is all about simplicity. You prepare the batter by mixing dry ingredients, then gently fold in grated zucchini and wet ingredients—no overmixing allowed! The cream cheese swirl gets layered right in the middle, and a quick swirl with a knife pulls everything into a beautiful marbled pattern. Into a preheated oven it goes, usually around 350°F, for about 45-50 minutes, until a toothpick comes out clean. While it’s baking, your house will start to smell like a bakery. Once cooled a bit, a simple glaze or dusting of powdered sugar finishes the look, but honestly, it’s stunning just as it is. The whole process takes less than an hour active hands-on time. It’s so straightforward that you’ll wonder why you haven’t been baking this forever!
Ingredients
For the Main Batter:
– 2 cups all-purpose flour (I like unbleached for more flavor but regular works too)
– 1 cup granulated sugar (or coconut sugar for a healthier tweak)
– 1 teaspoon baking powder
– ½ teaspoon baking soda
– ½ teaspoon salt
– 1 teaspoon ground cinnamon (trust me, it makes a difference)
For the Filling:
– 8 oz cream cheese, softened
– ½ cup powdered sugar
– 1 teaspoon vanilla extract
*(You can add a pinch of lemon zest or a splash of lemon juice for brightness)*
For the Glaze (optional but recommended):
– 1 cup powdered sugar
– 2-3 tablespoons milk or heavy cream
– ½ teaspoon vanilla (or almond extract for a different twist)
Step-by-Step Instructions
Step 1: Preheat & Prep Pan
Set your oven to 350°F and grease a 9-inch round or square baking dish—trust me, I always line mine with parchment paper for easy removal. It’s my little trick to keep everything tidy and bubble-free when slicing. While the oven heats up, grate your zucchini and squeeze out excess moisture—this is key to prevent a soggy cake. I do this with a clean kitchen towel or paper towels—press out all the extra water so your batter stays fluffy.
Step 2: Mix Dry Ingredients
In a big bowl, whisk together the flour, sugar, baking powder, baking soda, salt, and cinnamon. I like to do this first, so everything is evenly distributed. The smell of cinnamon plus flour always makes me smile—it’s like baking in my grandma’s kitchen. Make sure your dry mixture is free of lumps and everything’s nicely combined.
Step 3: Mix Wet Ingredients
In a separate bowl, whisk together eggs (or flax eggs if vegan), oil (vegetable or melted butter), vanilla, and milk. I’ve tested this with almond milk, and it’s actually made it even creamier—so good! The mixture should be smooth and slightly frothy. Remember to check that your eggs or plant-based milk aren’t too cold or they might seize up when combined with the oil.
Step 4: Combine
Gradually add the wet ingredients into the dry, folding gently—don’t overmix, or you’ll end up with a dense cake. Stop as soon as everything’s just combined. The batter will be thick but silky. At this point, fold in your grated zucchini—make sure it’s evenly distributed. I always do this right before filling the pan to keep everything nice and fresh.
Step 5: Prepare Filling
In a small bowl, mix softened cream cheese with powdered sugar and vanilla. The filling should be smooth but not runny—you want it thick enough to hold its shape. For a zestier flavor, I sometimes add a little lemon or orange zest—makes the swirl even brighter!
Step 6: Layer & Swirl
Pour half of the batter into your prepared pan. Dollop spoonfuls of the cream cheese mixture on top, then add the rest of the batter over that. Using a knife or toothpick, swirl gently—think of it as painting a marbled picture. The goal is to have a lovely pattern, not to mix everything into one color. This part’s so fun—each cake looks completely unique when you’re done!
Step 7: Bake
Pop it into the oven and bake for about 45-50 minutes. Check doneness by inserting a toothpick in the center—if it comes out clean, you’re golden. Sometimes my oven runs a little hot, so I start checking at 45 minutes; ovens vary, after all. The top should be golden and slightly cracked, giving it a perfect rustic look.
Step 8: Cool & Glaze
Allow the cake to cool for at least 15 minutes—hot cakes fall apart! If you want a shiny glaze, whisk together powdered sugar, milk, and vanilla. Pour it over the slightly warm cake and watch it seep into all the nooks and crannies. If you prefer, just dust with powdered sugar instead. The glaze adds a beautiful sheen and extra sweetness, but honestly, this cake is good enough on its own.
Step 9: Slice & Serve
Use a sharp serrated knife for neat slices—this cake is tender, so gentle cuts help. Serve it warm or room temperature, perhaps with a dollop of whipped cream or a drizzle of honey. Leftovers keep beautifully covered at room temp for a day and in the fridge for up to 3 days. Reheat gently in the microwave if you like that cozy, warm feeling. This cake is perfect for breakfast (yes, I eat dessert for breakfast), brunch, or an afternoon coffee break. My family loves it with a cup of strong black coffee—trust me, it’s comfort in every bite.
What to Serve It With
This zucchini coffee cake is super versatile, so I like to play around depending on the occasion. For breakfast, I love pairing it with a mug of dark roast coffee or a frothy cappuccino. The subtle zucchini flavor kind of sneaks in, making it feel healthy enough to start your day. For brunch, serve it alongside fresh fruit like berries or sliced peaches—add a dollop of Greek yogurt, and you’ve got a feast. As a dessert, it’s perfect with a dusting of cinnamon sugar or even a splash of caramel sauce. When I want something casual, I cut thick slices and serve it with a glass of cold milk or a cup of tea. This cake also makes a lovely gift—you can wrap slices in parchment and tie them with pretty ribbons for friends or family. My mom always says this reminds her of those cozy mornings in the countryside—really, there’s just something about this cake that makes everything feel a little more special.
Top Tips for Perfecting Your Zucchini Coffee Cake
Experimenting with baking is always a journey, and over the years I’ve picked up some little tricks that make this cake turn out just right. First, don’t skip squeezing the zucchini—I’ve learned that excess moisture is the enemy of fluffy cake. I’ve tried grating zucchini and letting it sit for a few minutes to drain, then squeezing out all the water in a clean towel—that’s the secret to avoiding a soggy crumb. When mixing, always fold gently—overmixing will develop gluten and make the cake rubbery. For the swirl, I recommend layering generous dollops of cream cheese and using a toothpick to pull a figure-eight pattern—it creates a beautiful marbling effect. Want to switch it up? Replace the cream cheese filling with fruit preserves, but add a teaspoon of cornstarch to help it set. Baking temperature is pretty forgiving, but I always rotate my pan halfway through for even browning. Lastly, the glaze is optional, but a little extra sweetness and shine never hurt anyone. I tested this with a splash of vanilla extract in the glaze, giving it a warm aroma—trust me, it’s addictive. From texture to flavor, these little tweaks help me nudge the cake from good to extraordinary. It’s honestly a matter of personal taste and practice—don’t be afraid to customize until it feels just right.
Storing and Reheating Tips
This cake keeps beautifully, and knowing how to store it is key to enjoying it over several days. At room temperature, it stays fresh for about a day—just cover it with a clean towel or airtight container. If you want to keep it longer, your best bet is the refrigerator; store slices in an airtight container or wrapped tightly in plastic wrap. It rewarms nicely in the microwave—around 20 seconds—just enough to bring back the cozy warmth. For freezing, wrap individual slices in plastic wrap and then foil—this prevents freezer burn. They’ll last up to three months; just thaw at room temp or gently reheat. Be mindful of the glaze—if you freeze the cake, it’s better to add the glaze after thawing, not before, to keep that shiny finish looking fresh. I’ve found that a little reheating softens the cake and enhances flavors, making that next slice feel just as good as when it came out of the oven.
Frequently Asked Questions
Final Thoughts
If you’re looking for a cozy, delicious way to use up zucchini or just want a foolproof coffee cake that feels like a warm hug, give this recipe a try. Over the years, I’ve tested all kinds of tweaks—from swapping flours to playing with fillings—and I swear, this version hits all the right notes every single time. It’s moist, fluffy, and just slightly decadent without being overwhelming. Plus, the hints of cinnamon and that creamy swirl make each bite a little celebration. The best part? It’s so flexible—feel free to mix in nuts, berries, or whatever you have on hand. I promise, once you try this, it’ll become a staple in your baking rotation. And hey, don’t forget to leave a comment or send me a photo of your masterpiece—I’d love to see your creations! Happy baking, my friend, and enjoy every delicious slice — because, honestly, this one’s a keeper.
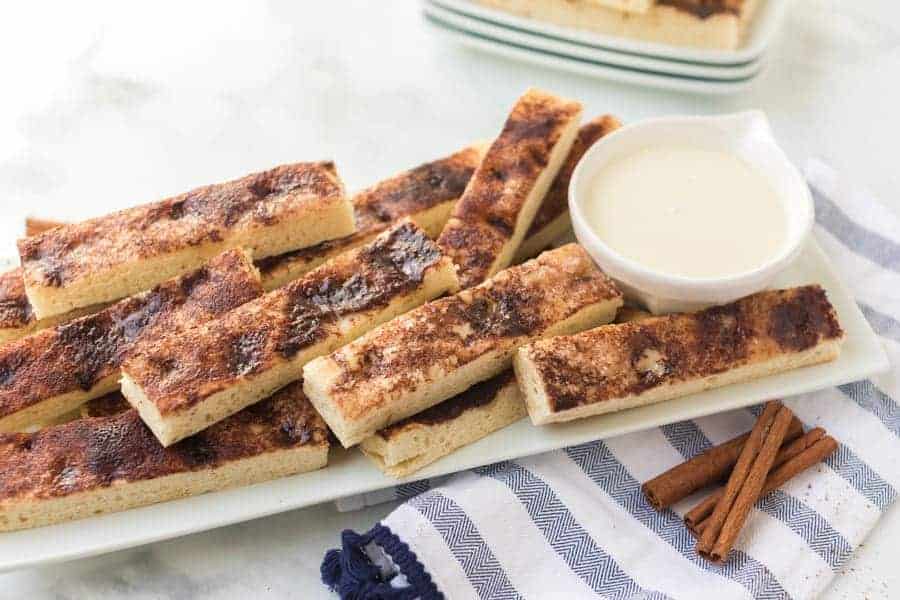
cinnamon sticks
Ingredients
Method
- In a large mixing bowl, add water, yeast, sugar, salt, and olive oil. Let it stand for 5 minutes. Add 1 cup of flour, and mix until combined. Add another cup of flour, and mix for 1-2 minutes until batter-like. The dough will develop gluten with this process.
- Add the remaining flour, knead by hand until smooth and elastic, about 6 to 10 minutes. Cover with a towel and let rise in a warm place for 15 to 60 minutes.
- Preheat oven to 375°F. Divide dough in half. Roll out one half on parchment to about 1/2 inch thick. Deeply dimple the surface, pour melted butter, sprinkle cinnamon and sugar. Bake for 15-18 minutes until golden. Cool for 5 minutes, then cut into 4-inch sticks.
- To prepare the dipping sauce, mix melted 3 tablespoons butter with powdered sugar and 1.5 tablespoons milk until smooth.