Boozy Chocolate Truffle Cake How to Make
If you’ve ever bitten into a slice of warm, tender cake that somehow manages to be both subtly sweet and just a little healthy (thanks to that sneaky zucchini), then you know exactly what I’m talking about. I swear, this zucchini cake has saved me more times than I can count—on lazy Sunday afternoons, busy weeknights, or whenever the sweet tooth hits at 10 PM when I really shouldn’t be baking a giant cake. The smell alone—wafting from the oven, all warm cinnamon and grated zucchini—brings everyone rushing into the kitchen, even my kids, who ask for seconds before I’ve even finished slicing. It’s become a little tradition around here to have a piece with a scoop of coffee, or sometimes just on its own. Trust me, once you make this, it’ll be part of your regular rotation. And the best part? It’s incredibly forgiving, super versatile, and honestly, so much fun to customize. I can’t wait to show you how simple it is—grab your zucchinis, and let’s do this!
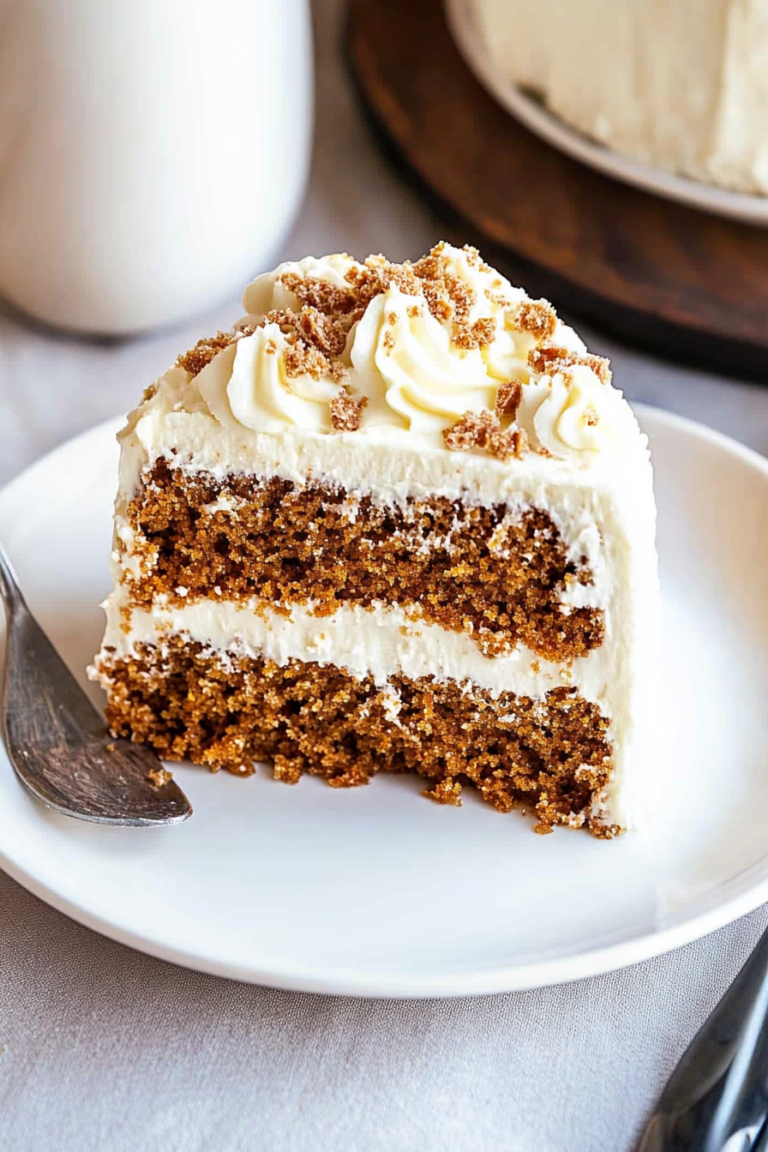
What is Zucchini cake?
Think of this as a cross between your favorite quick bread and a cozy afternoon cake. It’s essentially a moist, fluffy cake packed with shredded zucchini—hence the name—plus warm spices like cinnamon and nutmeg. The cool thing about this recipe? It’s all about balance. The zucchini keeps the cake insanely tender but doesn’t leave it soggy or watery like you might worry. Instead, it acts like a little secret weapon: adding moisture and nutrients without making the texture heavy. The name “zucchini cake” might make you imagine something super veggie-heavy, but trust me, it’s all about the flavor, not a vegetable overload. I’ve tested this with a handful of variations—from applesauce to Greek yogurt—and honestly, it’s almost impossible to go wrong. If you’re a fan of carrot cake or banana bread, you’re gonna love how this hits that sweet spot—soft, fragrant, and just a little indulgent.
Why you’ll love this recipe?
What I love most about this zucchini cake is how it feels like a little hug in dessert form—sweet, warm, and totally satisfying. The flavor is rich and inviting, with the spices giving it that cozy, fall-weather vibe, but it’s light enough to eat any time of day. Plus, it’s a lifesaver on busy nights because you just toss all the ingredients in one bowl, mix, pour, and bake. No fancy equipment needed—just a whisk, a bowl, and your grater. Budget-friendly, too: you probably already have everything in your pantry, and those zucchinis—well, they’re pretty much the star of the show, and if they’re a bit past their prime, this cake will rescue them perfectly. I also love how versatile it is—serve it plain, glaze it with vanilla or lemon, or add a handful of nuts or chocolate chips for a little something extra. It’s family-approved, and every time I make it, my kids ask for seconds—and that’s saying a lot!
How do I make Zucchini cake?
Quick Overview
This cake comes together in about 10 minutes of prep, then it’s all about the wait while it bakes to fluffy, fragrant perfection. You start by shredding the zucchini (no need to peel), then mixing dry ingredients like flour, baking soda, and spices. In a separate bowl, whisk up eggs, oil, and sugar, then fold everything together gently—less is more here to keep it tender. Pour half the batter into your baking dish, sprinkle on your favorite filling if you like—think chopped walnuts or chocolate chips—and swirl in the rest of the batter. Bake at about 350°F until a toothpick comes out clean. While it cools, I always make a quick glaze—vanilla, lemon, or even a simple dusting of powdered sugar—and watch it disappear before my eyes. Honestly, I’ve made this so many times that I can do it without looking — it’s become part of my culinary DNA!
Ingredients
For the Main Batter:
– 2 cups grated zucchini (about 2 medium zucchinis, shredded and loosely packed)
– 1 ½ cups all-purpose flour (you can substitute part with almond flour for a nuttier touch)
– 1 teaspoon baking soda
– 1 teaspoon ground cinnamon
– ½ teaspoon nutmeg
– ¼ teaspoon salt
– 1 cup granulated sugar (or coconut sugar for a healthier vibe)
– ⅓ cup vegetable oil (or melted coconut oil)
– 2 large eggs
– 1 teaspoon vanilla extract
For the Filling (optional but lovely):
– ½ cup chopped walnuts or pecans
– ¼ cup mini chocolate chips
– 2 tablespoons brown sugar or maple syrup (for a caramelized flavor)
For the Glaze:
– ½ cup powdered sugar
– 1-2 teaspoons milk (or lemon juice for brightness)
– ½ teaspoon vanilla extract
– Zest of lemon or orange (optional, for extra zing)
Step-by-Step Instructions
Step 1: Preheat & Prep Pan
Set your oven to 350°F (175°C). Grease your baking dish—16×8 inch loaf, square pan, or even mini muffin tins work—and line with parchment if you like. This first step is crucial so nothing sticks, especially if you’re using a metal pan. I always do this early so I don’t forget — baking is all about timing and preparation!
Step 2: Mix Dry Ingredients
In a big bowl, whisk together the flour, baking soda, cinnamon, nutmeg, and salt. Toss in the brown sugar at this stage for flavor and moisture. Mix just enough to combine—overmixing here can make the cake dense, which is the opposite of what we want!
Step 3: Mix Wet Ingredients
In a separate bowl, beat the eggs, then whisk in the oil and vanilla. I’ve experimented with applesauce instead of oil (trust me, it keeps it moist), but I still go for the oil because it gives that coziness I crave. Add the sugar gradually and keep whisking until the mixture is smooth and shiny.
Step 4: Combine
Make a well in the dry ingredients, then gently fold in the wet mixture, just until everything is barely combined. It’s okay if there are a few streaks—overmixing at this stage will make your cake tough. Fold in the grated zucchini last, making sure it’s evenly dispersed without overdoing it.
Step 5: Prepare Filling
If you’re adding nuts or chocolate chips, stir them into the batter now. For a richer flavor, sprinkle some brown sugar on top before baking—it caramelizes beautifully. My personal trick is to add a handful of chopped walnuts—gives a nice crunch, and the flavor pairs perfectly with cinnamon.
Step 6: Layer & Swirl
Pour half the batter into your prepared pan, then sprinkle the filling (nuts, chocolate, or both) evenly across. Cover with the rest of the batter, then gently swirl with a knife or skewer—nothing fancy, just enough to create a marbled look. This makes every slice Instagram-worthy and adds a delightful surprise of flavors.
Step 7: Bake
Place in the oven, bake for about 40-45 minutes, or until a toothpick poked into the center comes out clean. Every oven is different—I’ve learned that if I bake too long, it gets dry, so I start checking at 38 minutes. If you see the top browning too quickly, cover loosely with foil. When it’s done, let it cool in the pan for 10-15 minutes before transferring to a wire rack.
Step 8: Cool & Glaze
This is the hardest part—waiting! But honestly, cooling a little makes slicing so much easier. Once cooled, mix your powdered sugar glaze, drizzle over the top, and let it set for a few minutes. Or just dust with powdered sugar if you prefer a lighter touch.
Step 9: Slice & Serve
Cut with a sharp serrated knife—patience is key here! Serve it warm or at room temperature, with a cup of coffee, tea, or a glass of milk. For an elegant twist, add some fresh berries or a dollop of whipped cream. I swear, this cake is best enjoyed almost instantly—it’s just so good that leftovers rarely last more than a day around here.
What to Serve It With
This cake is incredibly adaptable. For breakfast, I love it with a shot of espresso or a dollop of Greek yogurt on the side—fresh and filling. During brunch, serve a thick slice with a side of fruit salad or even as part of a breakfast buffet. As a dessert, I’ve done a fancy dusting of powdered sugar, a drizzle of honey, or extra glaze, and it turns into a showstopper. My kids ask for it just plain or with a spoonful of vanilla ice cream melting on top. For cozy snacktimes, it’s perfect with a warm mug of hot cocoa or a glass of cold milk. Honestly, it’s the kind of treat that feels indulgent but secretly sneaks in some good stuff, making it perfect for all occasions.
Top Tips for Perfecting Your Zucchini Cake
After making this dozens of times, I’ve picked up a few tricks. First, zucchini prep is everything—make sure to squeeze out excess moisture after shredding; otherwise, your cake might turn out dense or soggy. I always use a clean kitchen towel or cheesecloth to wring out the water—trust me, it’s a total game changer. When mixing, fold gently and don’t rush—this keeps the cake light. If you want more pronounced spices, add a pinch extra cinnamon or even a splash of ginger. Want to make it healthier? Swap out some of the flour for almond or coconut flour, but remember, it affects moisture and texture—test in small batches first. I also learned that swirling the batter creates a pretty marbled effect and distributes flavors evenly—looks Instagram-worthy too! And don’t skip the glaze—adding zest or a splash of lemon juice elevates the flavor from good to extraordinary. Honestly, each batch I make teaches me something new, and that’s part of the fun.
Storing and Reheating Tips
This cake stays fresh for a couple of days at room temperature, covered tightly with foil or a cake dome. Just remember, if it’s hot or humid outside, refrigerate it—doing so helps prevent mold and keeps it tasting fresh. To reheat, a quick 10-15 seconds in the microwave does the trick, especially if you want that cozy warmth. If you’re freezing it, wrap slices individually with plastic wrap and store in an airtight container—this way, you can grab a slice whenever that sweet craving hits. When thawing, leave it at room temperature for about 20 minutes. The glaze can be reapplied or freshened up if needed, but honestly, this cake is pretty forgiving—sometimes I just sprinkle powdered sugar on top right before serving and it looks adorable. The key is to keep it airtight, especially if you plan to store it longer, so it doesn’t dry out. And trust me, it tastes just as good reheated or even cold—your choice!
Frequently Asked Questions
Final Thoughts
Honestly, this zucchini cake has become one of my favorites because it’s like a little slice of home—comforting, flavorful, and effortlessly delicious. It’s perfect for sharing with loved ones or enjoying solo with a cup of coffee. Every time I make it, I remember childhood afternoons in my grandma’s kitchen, where she’d toss zucchinis into everything, sneaking in those extra nutrients without sacrificing an ounce of flavor. The versatility of this recipe is what makes it special—add your favorite nuts, switch up the glaze, or swap the spices to match your mood. It’s forgiving enough for beginners but refined enough to impress, and honestly, it’s so satisfying knowing that a humble veggie can turn into such a lovely treat. So go ahead, give this a try—it’s a recipe that feels like a warm hug, and I promise, your family will ask for it again and again. Happy baking, and can’t wait to hear how yours turns out!
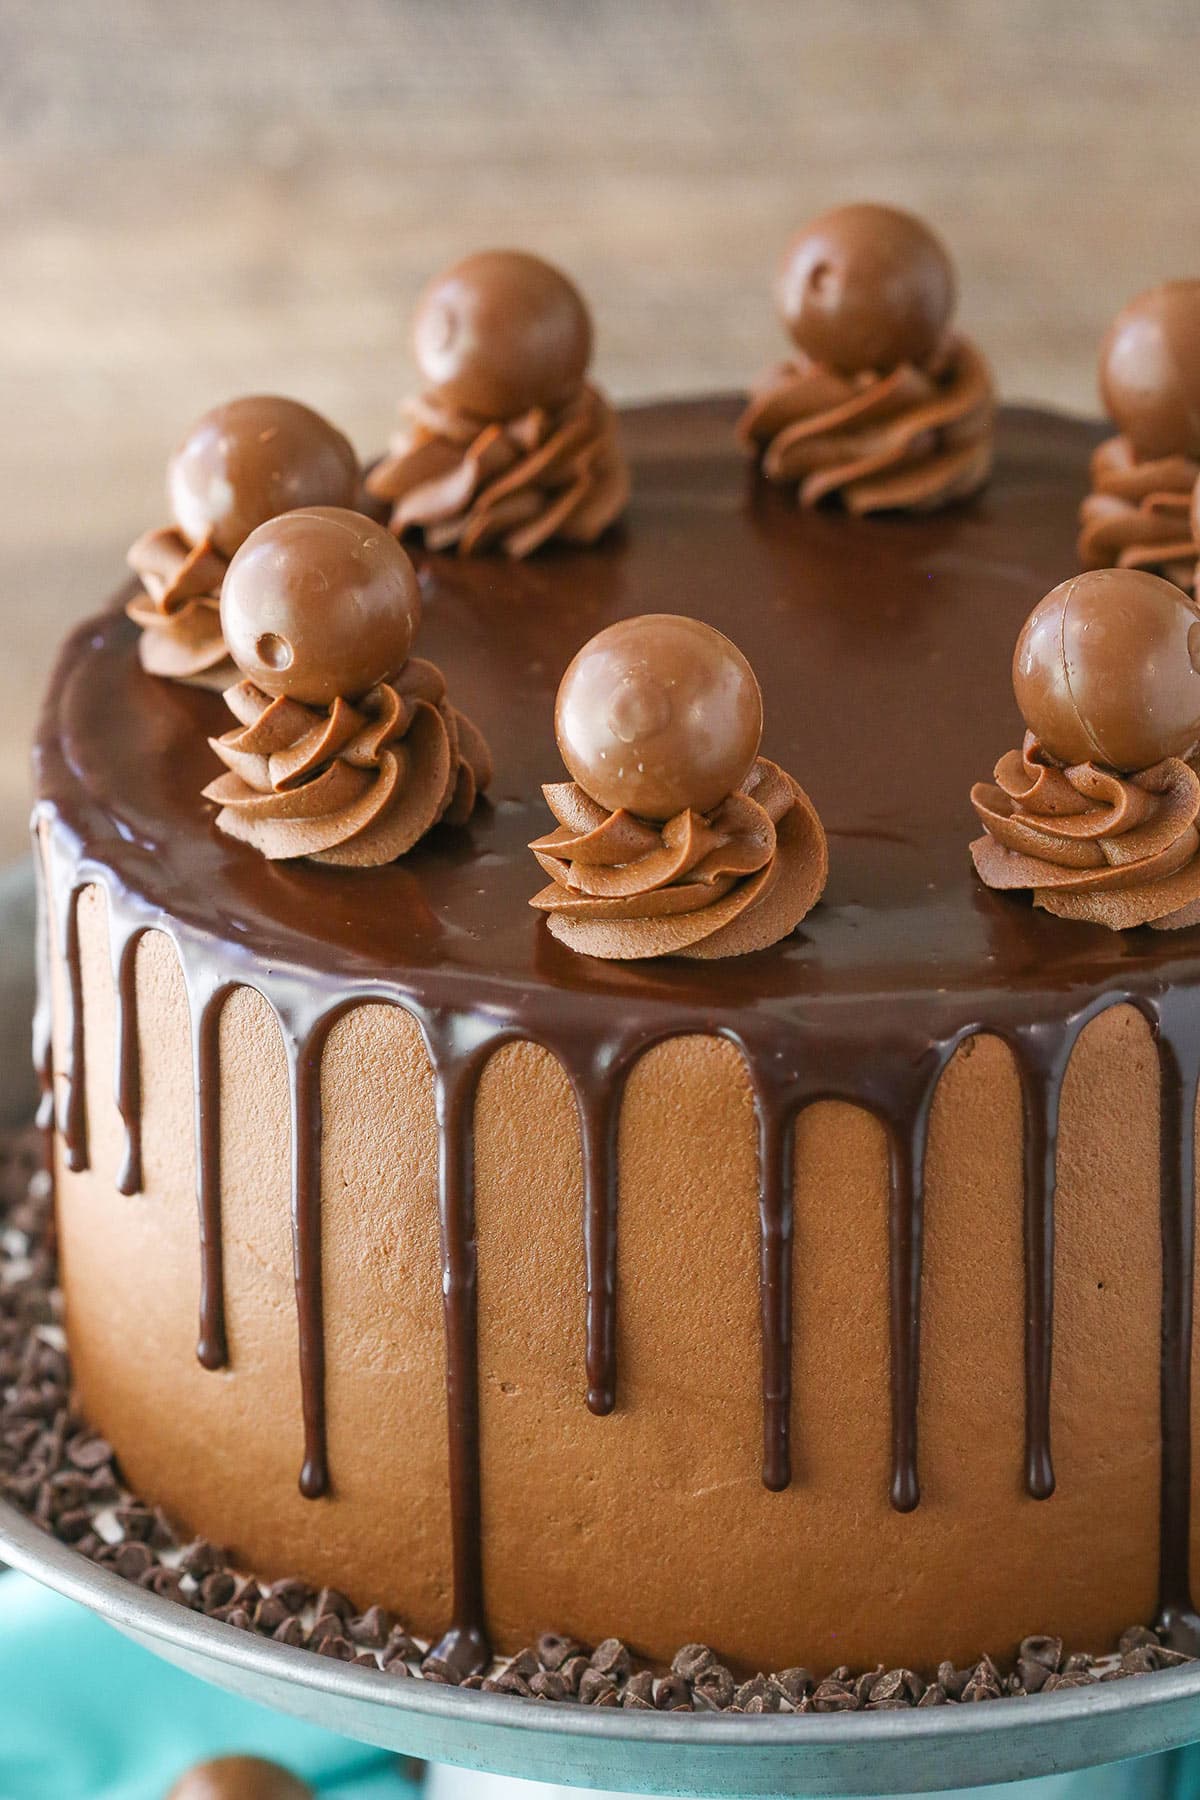
chocolate truffle cake
Ingredients
Method
- Preheat oven to 350°F. Prepare three 8-inch cake pans with non-stick spray and parchment paper.
- Mix dry ingredients: flour, cocoa, baking soda, and salt in a bowl.
- Cream butter, sugar, oil, and vanilla in a large bowl until light and fluffy, about 3-4 minutes.
- Add eggs one at a time, mixing well after each addition.
- Alternate adding dry ingredients and milk to the batter, starting and ending with dry ingredients. Mix until just combined.
- Divide batter evenly into prepared pans and bake for 22-25 minutes, or until a toothpick comes out with moist crumbs.
- Cool cakes for 2-3 minutes in pans, then transfer to a wire rack to cool completely.
- Prepare frosting by beating butter until smooth, then mix in melted chocolate and cocoa powder.
- Gradually add powdered sugar, salt, and chocolate liqueur until desired consistency is reached.
- Level cakes, brush with reserved chocolate liqueur, spread filling and frost layers, then assemble.
- Make ganache by heating cream and pouring over chocolate chips, then whisk until smooth.
- Pour ganache over the assembled cake, let set, and decorate as desired.