Easy Samoa Cheesecake Without Baking
There’s just something about the smell of baking that instantly makes my house feel like a warm hug. I remember growing up, my mom would always whip up a zucchini bread on lazy Sunday mornings, filling the kitchen with that cozy sweetness. And honestly, I’ve become a bit obsessed with how versatile zucchini is in baking — it’s almost magical how it transforms into something indulgent yet healthy. This zucchini cocoa swirl cake has become a go-to in my recipe box; it’s got that perfect crumb, a hint of chocolate, and that lovely swirl that makes it look fancy but is totally foolproof. Plus, it’s a sneaky vegetable that my kids don’t even complain about — they just ask for seconds! If you love a cake that’s moist, not overly sweet, and surprisingly simple to make, you’re in luck. I promise, once you try this, it’ll be a staple at your house too — especially when you want something comforting but don’t have hours to spend in the kitchen.
What is Zucchini Swirl Cake?
This cake is essentially a tender, moist sponge cake that’s subtly infused with shredded zucchini, giving it a wonderful richness without adding any fuss. Think of it as a more elegant, chocolatey cousin to your favorite banana bread. The magic happens in the swirl — a swirl of rich cocoa batter swirled into the plain batter that gives the cake a beautiful marbled effect. The name might sound fancy, but trust me, it’s just like baking your favorite brownie batter but turned into a stunning cake. The zucchini keeps everything moist and tender, so you get that melt-in-your-mouth feeling with every bite. It’s equal parts homey and elegant — perfect for чай-with-friends, afternoon treats, or even dessert after a cozy family dinner. And don’t worry if you’re new to baking — this recipe is so forgiving and adaptable, you’ll be surprised how effortless it is to make.
Why you’ll love this recipe?
What I love most about this zucchini cocoa swirl cake is how it somehow manages to look really special while being ridiculously easy to pull off. It’s a total crowd-pleaser too — I’ve served it at everything from casual brunches to potluck gatherings, and it always disappears in minutes. The flavor profile is just right: not too sweet, with that deep chocolate note contrasting beautifully with the mild zucchini flavor, making every bite feel rich yet fresh. Plus, it’s surprisingly budget-friendly — most of these ingredients are staples in my pantry. The shredded zucchini adds moisture, so I don’t need to fuss over overly dry cakes, and it’s a sneaky way to get some veggies into the kids without a whimper. This cake can be personalized easily, too: swap out the cocoa for some cinnamon, toss in chopped nuts, or even add a handful of chocolate chips. That flexibility makes it my secret weapon for when I want something quick, beautiful, and satisfying. It’s one of those recipes you’ll want to keep handy because it’s just so reliable. And honestly, the smell alone when it’s baking — the warm cocoa, the subtle zucchini — it’s pure comfort.
How do I make Zucchini Swirl Cake?
Quick Overview
This cake comes together in three simple steps: make the batter, prepare the chocolate swirl, and bake. First, you mix your basic sponge batter with shredded zucchini folded in for added moisture. Then, you whip up a quick cocoa batter for that gorgeous swirl. Pour half of the plain batter into your pan, dollop the cocoa mixture on top, and use a toothpick or skewer to create that beautiful marbled effect. Pop it in the oven, and before you know it, you’ll have a golden, fragrant cake that’s hard to resist. Trust me, once you’ve done this a few times, it’ll become a regular treat — the kind everyone asks for.
Ingredients
For the Main Batter:
– 2 cups all-purpose flour (high quality — I like King Arthur or Bob’s Red Mill)
– 1 1/2 teaspoons baking powder
– 1/2 teaspoon baking soda
– 1/4 teaspoon salt
– 3/4 cup granulated sugar
– 1/2 cup vegetable oil (or melted coconut oil for a tropical twist)
– 3 large eggs
– 1 teaspoon vanilla extract
– 1 cup shredded zucchini (squeeze out excess moisture with a clean towel)
– 1/2 cup buttermilk or regular milk (I’ve tested with almond milk too — made it even creamier!)
For the Cocoa Swirl:
– 1/4 cup unsweetened cocoa powder
– 1/4 cup sugar (adjust if you prefer more or less sweetness)
– 2-3 tablespoons hot water or warm milk
For the Glaze (Optional):
– 1/2 cup powdered sugar
– 1-2 teaspoons milk or cream
– 1/4 teaspoon vanilla extract
– A dash of cocoa powder (for a dusting)
Step-by-Step Instructions
Step 1: Preheat & Prep Pan
I usually set my oven to 350°F (175°C). Grease a 9-inch round cake pan or line it with parchment paper — makes the whole unmolding thing easier. And trust me, I learned the hard way that sticking parchment is your best friend. Set it aside while you get your batter ready.
Step 2: Mix Dry Ingredients
In a large bowl, whisk together the flour, baking powder, baking soda, and salt. This step is key to avoiding lumps and ensuring the leavening agents distribute evenly. I always do this first — it’s like giving the foundation a solid start.
Step 3: Mix Wet Ingredients
In another bowl, beat the eggs with sugar until light and slightly fluffy. Add in the oil, vanilla, and milk, mixing well. Now’s the time to gather that lovely zucchini — squeeze out any excess moisture, so the batter isn’t too wet. Fold the zucchini into your wet ingredients gently; this keeps everything tender and moist.
Step 4: Combine
Pour the wet mixture into your dry ingredients and fold gently — do not overmix! Overmixing can make the cake dense. Just stir until everything is combined, and the batter is smooth. I always check for lumps, but a few are okay; we want tender, not tough.
Step 5: Prepare Filling
In a small bowl, whisk together the cocoa powder, sugar, and hot water until smooth. You want a pourable but not runny consistency. Taste to adjust sweetness if needed. This batter is the star of the swirl, so make sure it’s thick enough to hold its shape but fluid enough to dollop easily.
Step 6: Layer & Swirl
Pour half of the plain batter into your prepared pan, smoothing the top. Drop spoonfuls of the cocoa batter all over, then use a skewer or toothpick to swirl it into the plain batter — go in circles or zigzags. The swirl doesn’t have to be perfect; I love a rustic look, so I usually just do a few swirls and leave it.
Step 7: Bake
Pop the cake into your preheated oven and bake for about 40-45 minutes. Check for doneness by inserting a toothpick in the center — it should come out clean or with a few moist crumbs. Every oven is different, so I suggest checking around 38 minutes the first time.
Step 8: Cool & Glaze
Let the cake cool in the pan for about 10-15 minutes, then transfer it to a wire rack. The smell will pull you right to it! If you’re making a glaze, whisk together powdered sugar and milk until smooth. Drizzle over the cooled cake — the warmth helps it seep into all those little crevices.
Step 9: Slice & Serve
Use a sharp serrated knife to cut neat slices. This cake is best served slightly warm or at room temperature. I love enjoying it with a drizzle of heavy cream or a dollop of Greek yogurt — it takes the indulgence up a notch. It looks pretty on a plate — those swirls are just so satisfying to see.
What to Serve It With
This cake is incredibly versatile, and I rotate what I serve it with depending on the occasion. For brunch, I love pairing it with fresh coffee and a side of fruit — maybe some ripe strawberries or tangy orange slices. It makes a stunning centerpiece on a weekend breakfast table, and the subtle zucchini flavor pairs beautifully with a hot cup of coffee or tea. When I’m craving a sweet treat after dinner, I just add a dollop of whipped cream or a scoop of vanilla ice cream, and it’s like a fancy dessert but with zero fuss. And if I’m just grabbing a quick snack, I slice it up and pack it in the kids’ lunchboxes — they love the chocolate and the surprise of the veg hidden inside. It’s become our family’s secret weapon for when I want something homemade, comforting, and a little bit special. Plus, leftovers are great the next day — just warm it up in the microwave for a few seconds or enjoy it at room temperature. No matter how you serve it, this cake always brings smiles.
Top Tips for Perfecting Your Zucchini Cocoa Swirl Cake
Over the years, I’ve learned a few tricks that make all the difference with this cake. First, prep your zucchini well — I always squeeze out excess moisture using a clean kitchen towel. Too much moisture and the batter can become a bit runny, which affects the rise and moistness. When mixing your dry ingredients, make sure it’s thoroughly combined to prevent clumps and ensure even baking. For the swirl, I recommend dropping spoonfuls of the cocoa batter randomly — the more irregular, the more attractive the marbled look will be. If you want to make this even prettier, try creating different swirling patterns — diagonal, circular, or zigzag. Ingredient swaps? Feel free to experiment with alternative flours like spelt or whole wheat — just adjust the liquids slightly if your batter seems thick. Around the baking, I always use an oven thermometer to verify my oven temperature, and I test doneness with a toothpick — don’t rely solely on timing. And I’ve tested different glazes and toppings — a simple dusting of powdered sugar works wonders, but a cream cheese frosting would be divine too. The key is to keep things simple but playful — you’ll find that this cake is forgiving and flexible, which makes it perfect for both weeknights and special weekends.
Storing and Reheating Tips
This cake stays fresh nicely for a couple of days, but proper storage makes all the difference. If you’re enjoying it within a day or two, cover it tightly with foil or store it in an airtight container at room temperature — just don’t leave it out too long in the heat. I find that refrigerating it extends its life by a day or so without sacrificing too much moisture, just wrap it well or keep it in a sealed container. For longer storage, freezing slices individually in zip-top bags works great — just thaw at room temperature or briefly microwave. As for the glaze, I often add it after the cake has cooled completely to avoid sogginess. If you want to keep the glaze fresh for later, store it separately and drizzle just before serving. The key to reheating is gentle — a quick 10-15 seconds in the microwave or a low oven. This keeps the cake moist and tender rather than dried out or rubbery. Trust me, this cake is worth a little extra effort in storage. It’s better the next day, I promise — the flavors meld and deepen overnight.
Frequently Asked Questions
Final Thoughts
This zucchini cocoa swirl cake is one of those recipes that feels like a little hug in every slice. It’s endlessly adaptable, full of flavor, and so satisfying to make — I always get a sense of pride when I pull this out for friends or family. The best part? It’s forgiving enough to experiment with, so don’t be afraid to tweak ingredients or toppings to suit your taste. I love that it’s a way to sneak in those veggies, satisfy my chocolate cravings, and keep my kitchen smelling like a bakery. Every time I make this, I think about how food connects us — the shared smiles over a slice, the moments of comfort and joy. So gather your ingredients, put on some good music, and enjoy the process. Happy baking! And don’t forget to leave a comment or share your own twists and pics — I can’t wait to see how yours turns out!
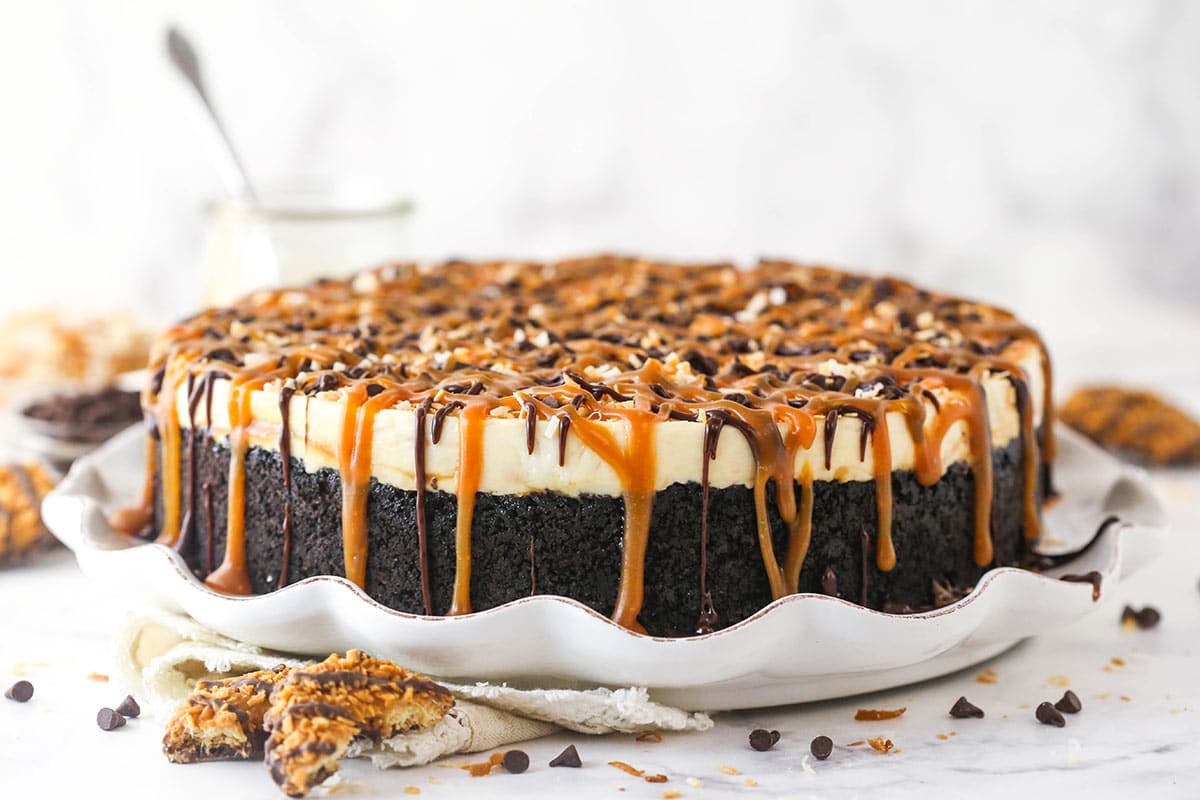
Samoa Cheesecake
Ingredients
Method
- Line a 9-inch springform pan with parchment paper in the bottom and grease the sides.
- Combine the Oreo crumbs and melted butter in a small bowl. Press the mixture into the bottom and up the sides of the springform pan.
- Refrigerate the crust while preparing the filling.
- Toast the coconut flakes in the oven at 350°F for 5-10 minutes until lightly browned, stirring every few minutes.
- In a large mixing bowl, beat the cream cheese, sugar, brown sugar, vanilla extract, and coconut extract until smooth.
- Add 1/2 cup of caramel sauce and mix until combined.
- Fold in broken vanilla wafers and toasted coconut flakes into the cream cheese mixture.
- In another bowl, whip the heavy cream and powdered sugar until stiff peaks form.
- Gently fold the whipped cream into the cream cheese mixture in two additions.
- Add about one-third of the filling to the crust and spread evenly. Drizzle with a quarter cup of remaining caramel sauce and swirl gently.
- Repeat layers, adding remaining filling and caramel sauce, swirling as needed.
- Refrigerate the cheesecake for 4-5 hours until set.
- Top with mini chocolate chips and toasted coconut flakes.
- For the chocolate ganache, microwave the semi-sweet chocolate chips and heavy cream until the chocolate is melted and smooth.
- Drizzle chocolate ganache and remaining caramel sauce over the cheesecake before serving.