Sweet Pretzel Toffee Treats How To Make
There’s something about baking with zucchini that always feels a little sneaky—like you’re getting away with sneaking in vegetables without anyone noticing. I remember my grandma’s garden bursting with the green stuff every summer, and this zucchini layer cake became our family’s secret weapon. The smell alone—warm, slightly nutty, with that hint of citrus from the glaze—brings me straight back to those lazy weekend afternoons. Honestly, I’m obsessed with how moist and tender this cake is; you’d never guess it’s packed with zucchini! This one’s a lifesaver on busy nights when I need something sweet but don’t want to fuss with complicated recipes. My kids ask for this all the time, and honestly, I never mind baking it because it’s just that good. Plus, it’s so versatile—perfect for a casual brunch or a special occasion. Trust me, once you try it, you’ll be making it all year long. It’s like a warm hug in cake form, and the best part? It’s ridiculously easy to throw together. Let’s dive into the recipe that’s been a hit in my kitchen for years!
What is Zucchini Layer Cake?
Think of this zucchini layer cake as a cozy, moist cake with a hidden veggie boost. It’s essentially a fluffy, tender cake layered with a bright lemon glaze that adds just enough zing to keep things interesting. The name might make you think of a savory dish, but I promise, this is pure dessert magic. It’s baked with shredded zucchini, which keeps the cake incredibly moist and adds a subtle, almost caramelly note—plus, it sneaks in some extra veggies for good measure. Originally, I stumbled across this recipe out of desperation—something to use up a massive zucchini from my garden— and it turned out to be one of those happy accidents. It’s similar to a carrot cake but milder, fresher, and with a lovely tang from the lemon glaze. Think of it as comfort food that’s all grown-up, with the kind of flavor that makes everyone ask for seconds. Honestly, it’s the kind of cake you keep in your back pocket for whenever you want to impress but don’t want to spend hours baking.
Why you’ll love this recipe?
What I love most about this zucchini layer cake is how it ticks all the boxes—delicious, easy, affordable, and adaptable. First of all, the flavor combination is just unbeatable. The sweetness from the cake balances perfectly with that tangy, citrusy glaze, making every bite a little burst of happiness. And let’s talk about how simple this is to make: I’ve tested this with just a handful of pantry staples, and it’s honestly a one-bowl kind of dessert. It’s budget-friendly, too—you likely already have everything you need sitting in your kitchen. Plus, it’s so versatile. This cake can be served warm with a dollop of whipped cream or chilled as a summery treat. If you love zucchini bread, you’ll be hooked on this layered version. I also love that it’s not overly sweet but just enough to satisfy that dessert craving without feeling heavy. For me, it’s a go-to when I want something homemade that feels fancy but is actually foolproof. Whenever I bake this, the house fills with sweet, citrusy aroma, and everyone gathers around—perfect for family gatherings, homework afternoons, or just when you deserve a little treat.
How do I make Zucchini Layer Cake?
Quick Overview
This cake comes together in a breeze—think simple mixing, layering, and baking. You start by shredding zucchini and mixing it into a tender batter made with basic ingredients like flour, sugar, and eggs. The batter is poured into two cake pans, layered with a quick lemon glaze, and baked until golden and fluffy. The entire process is forgiving and perfect for busy weekdays or relaxed weekends. I love that you don’t need fancy tools—just a bowl, a spoon, and some patience. The best part? The zucchini keeps the cake insanely moist, so even if you forget to check on it, it won’t dry out. Once baked and cooled, a generous drizzle of that bright, tangy glaze transforms it from good to absolutely irresistible. This cake is proof that a simple ingredient like zucchini can turn into a show-stopping dessert.
Ingredients
For the Main Batter:
- 2 cups finely shredded zucchini (about 2 medium zucchinis, grated and excess moisture squeezed out)
- 1 1/2 cups all-purpose flour (I prefer unbleached for flavor)
- 1 cup granulated sugar (you can reduce to ¾ cup for less sweetness)
- 1/2 teaspoon baking powder
- 1/2 teaspoon baking soda
- 1/4 teaspoon salt
- 3 large eggs
- 1/2 cup vegetable oil or melted coconut oil
- 1 teaspoon vanilla extract
For the Filling (Optional):
- None needed for the cake, but you can add a layer of cream cheese frosting if you’re feeling fancy.
For the Glaze:
- 1 cup powdered sugar
- 2-3 tablespoons fresh lemon juice (start with less and add as needed)
- Optional: a teaspoon of lemon zest for extra zing
Step-by-Step Instructions
Step 1: Preheat & Prep Pan
Set your oven to 350°F (175°C). Grease two 8-inch round cake pans and line the bottoms with parchment paper for easy removal. I always do this — makes life so much simpler when I’m trying to get these out without breaking them!
Step 2: Mix Dry Ingredients
In a large bowl, whisk together the flour, sugar, baking powder, baking soda, and salt. This step ensures the leavening agents are evenly distributed, so your cake rises beautifully without lumps.
Step 3: Mix Wet Ingredients
In another bowl, beat the eggs, then whisk in the oil and vanilla. I like to do this with a fork or whisk—whisking until everything’s smooth and shiny. If you’re feeling fancy, try using almond or coconut oil for a subtle flavor twist.
Step 4: Combine
Pour the wet into the dry ingredients. Gently fold together using a spoon or spatula — don’t overmix! You want just combined batter with a little lumps still visible, which keeps the cake tender. It’s okay if it’s a little thick; that’s what gives it that moist crumb.
Step 5: Prepare Filling
Only if you want layers of cream cheese or fruit inside—this recipe is fantastic on its own, but I sometimes mix in blueberries or a swirl of lemon curd for extra flavor. For the filling, just blend your choice of ingredients and set aside.
Step 6: Layer & Swirl
If layering with filling, spread a bit on the first cake, add the second, then give it a gentle swirl with a toothpick or skewer — this creates those pretty marbled effects I love. If you’re just making a plain cake, skip to pouring the batter into the pans.
Step 7: Bake
Bake at 350°F for about 30-35 minutes, or until a toothpick inserted in the center comes out clean. Every oven is different—my tip is to start checking around 30 minutes, and don’t open the oven door too often or you risk deflating the cakes.
Step 8: Cool & Glaze
Let the cakes cool in the pans for about 10 minutes, then transfer to a wire rack. Pour the lemon glaze over the top while they’re still slightly warm—that way, it seeps into all those nooks and crannies. Trust me on this! If the glaze is too thick, just whisk in a bit more lemon juice or powdered sugar until you reach a pourable consistency.
Step 9: Slice & Serve
Once cooled and glazed, cut with a serrated knife—gentle saw motions work best. Serve slices on a pretty plate, maybe with a sprig of mint or a dusting of powdered sugar. It’s delightful served at room temperature or slightly chilled—whatever your mood calls for.
What to Serve It With
This cake pairs beautifully with a steaming cup of coffee or tea for breakfast or an afternoon pick-me-up. For brunch, serve slices alongside fresh berries or a dollop of whipped cream, and maybe a mimosa or sparkling water with lemon. It’s such a crowd-pleaser that I often bring it to potlucks and family parties—trust me, it disappears fast! For dessert, I love piling a few slices on a platter with a drizzle of extra lemon glaze and a sprinkle of fresh zest. If you’re craving something cozy, warm a slice and top with vanilla ice cream. This cake is also fantastic as a casual snack—kids love it, and quite honestly, I do too. It’s perfect for summer picnics or winter afternoons curled up by the fire. Honestly, I often keep a slice in the fridge for when a sweet craving hits—cold and slightly fudge-like, it’s still delicious!
Top Tips for Perfecting Your Zucchini Layer Cake
After making this plenty of times, I’ve learned a few tricks. First, make sure to squeeze out as much moisture from the zucchini as possible—wet zucchini can make the cake dense, not tender. I use a clean kitchen towel or cheesecloth and give it a good squeeze. Also, don’t overmix the batter once the wet ingredients hit the dry—this keeps the cake light. When it comes to swirling in your filling, a gentle touch goes a long way; you want that pretty marbled effect without losing the layers. Feel free to experiment with flavor swaps—lime instead of lemon, orange zest, or even a splash of Grand Marnier for a grown-up twist. When baking, position your racks in the middle of the oven—this helps it cook evenly. And for the glaze, I’ve tested adding a pinch of cayenne or a splash of vanilla—surprisingly good with the lemon. My biggest lesson? Always taste your glaze before pouring—balance is everything. Trust me, neat little tricks like these make all the difference between a good cake and an unforgettable one.
Storing and Reheating Tips
This cake keeps surprisingly well. Store leftovers in an airtight container at room temperature for about a day—cover it lightly with foil so it doesn’t dry out. If you want to keep it longer, I recommend refrigerating it for up to 3 days. Just make sure it’s sealed well; the zucchini keeps it moist. When reheating, you can warm a slice in the microwave for about 15-20 seconds—perfect to bring back that fresh-baked warmth. If you’ve added glaze, it’s best to add it just before serving, especially if you’re storing it in the fridge, so it stays shiny and fresh. Freezing is also an option: wrap individual slices tightly in plastic wrap and then foil, and they’ll last up to 3 months. Thaw overnight in the fridge or at room temperature. Keep in mind that the glaze might soften after freezing, so a quick re-glaze can make it look brand new. Honestly, I’ve found that this cake is resilient and forgiving—my kind of baking, really!
Frequently Asked Questions
Final Thoughts
If you’re looking for a dessert that feels familiar and comforting but with a little fresh twist, this zucchini layer cake will become your new favorite. It’s one of those recipes I keep coming back to because it’s reliable, simple, and foolproof. Plus, you get to sneak some veggies into a sweet treat—something my kids and I secretly love. The bright lemon glaze elevates the entire experience, making each bite lively and refreshing. Over the years, I’ve adapted and tweaked this cake to suit my taste—adding a splash of vanilla here, swapping lemon for orange zest, or mixing in some blueberries—but honestly, the original is what I make most often. I hope you give it a try and find your own little tweaks. Baking should be fun, not stressful, and this recipe is a testament to that. Can’t wait to hear how yours turns out—drop a comment, share your photos, and enjoy every slice! Happy baking!
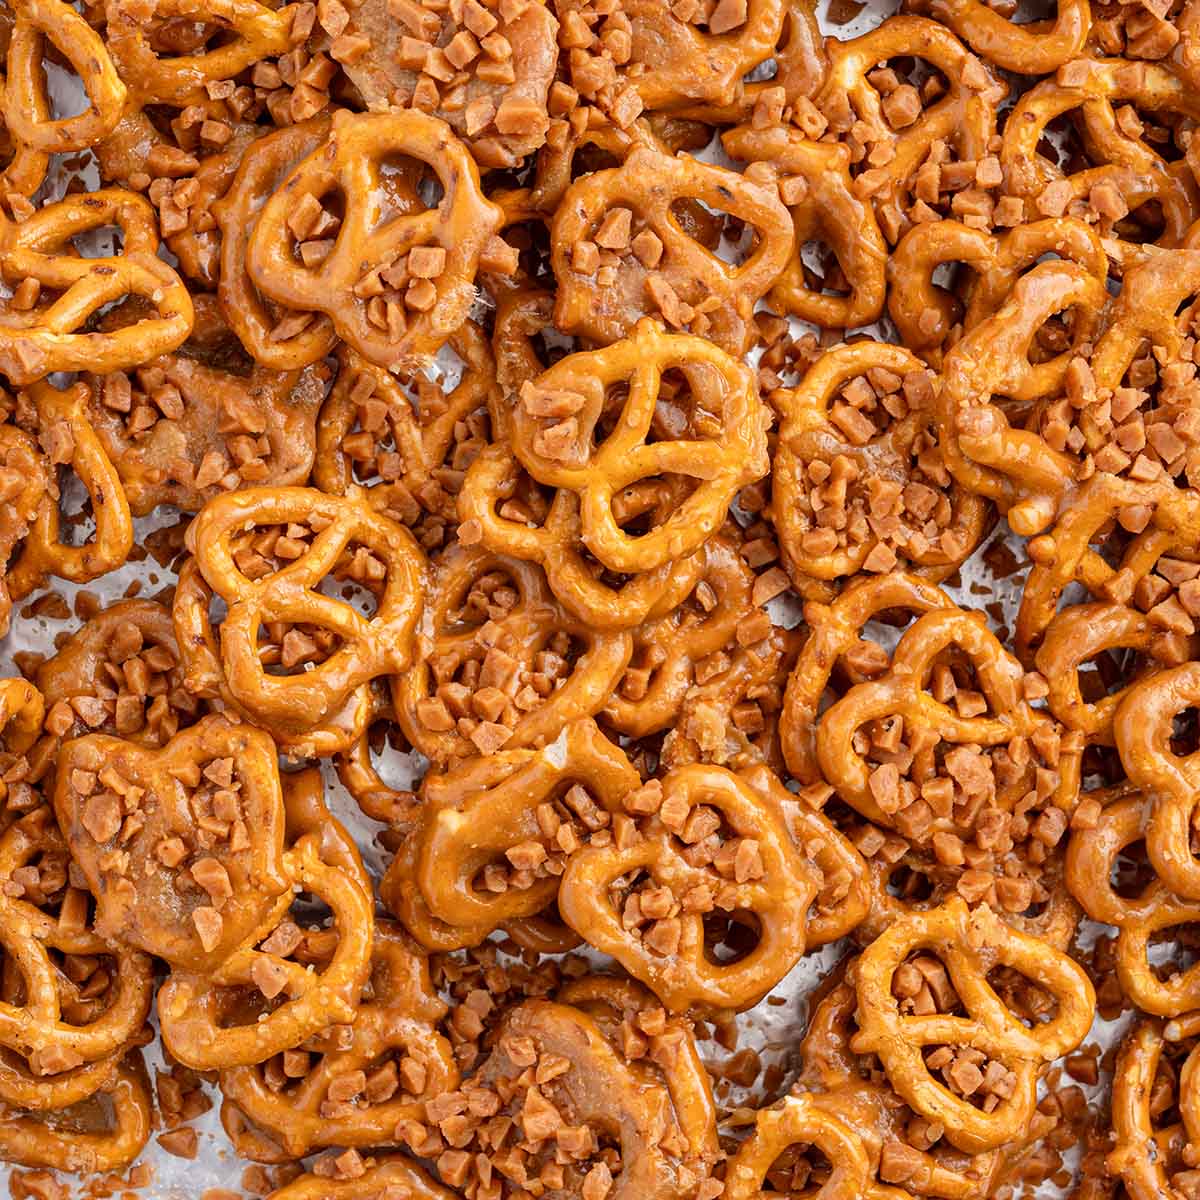
butter toffee pretzels
Ingredients
Method
- Preheat the oven to 200°F. Line a baking sheet with heavy duty aluminum foil and generously spray with nonstick cooking spray.
- Pour the pretzels into an extra large heat safe bowl.
- In a 3 to 4 quart saucepan over medium heat, add the light brown sugar, sliced butter pats and light corn syrup and bring to a low boil, stirring constantly. Allow the mixture to boil for 5 minutes.
- Remove the saucepan from the heat and carefully stir in the vanilla extract and baking soda. Be cautious, as the toffee mixture will bubble up and thicken quickly.
- Immediately pour the hot mixture over the pretzels. Use a wooden spoon or a silicone spatula to carefully stir the toffee and pretzels together until completely coated.
- Use the spoon or spatula to spread the pretzels out on the prepared baking sheet. Sprinkle half of the toffee bits over the coated pretzels.
- Bake for 1 hour, turning the pretzels in 15-minute intervals.
- As soon as the pretzels are removed from the oven, sprinkle the remaining toffee bits over the toffee pretzels.
- Allow the toffee pretzels to cool completely before breaking apart.