Crispy Pizza Sandwiches How to Make Them
If I had to pick one thing that instantly transports me back to my childhood, it’s the smell of this chocolate zucchini cake baking in the oven. There’s something about the warm, fudgy aroma that makes the house feel cozy, and honestly, it’s irresistible. My kids ask for this all the time, especially when I tell them it sneaks some veggies into their dessert — they think they’re getting away with something! I always do this when I want a sweet treat that’s a little healthier but still decadent. It’s my go-to when I need a quick dessert or just want to indulge without feeling guilty. And trust me on this one — once you try it, it’ll become a staple in your kitchen, too. The best part? It’s crazy easy to make, so no stressful baking sessions here, just pure comfort in every bite.
What is chocolate Zucchini cake?
Think of this as a moist, tender chocolate cake, packed with grated zucchini, but you’d never guess it just by tasting. The name sounds fancy, but it’s honestly super simple to whip up. It’s essentially a quick cake that combines the richness of cocoa with the subtle sweetness of zucchini, turning into a deliciously fudgy dessert. The zucchini disappears into the batter, leaving behind nothing but moisture and a gentle vegetable boost — it’s a sneaky but clever way to get more greens into your day. This recipe has roots in the classic zucchini bread, but I’ve taken it to the next level with a luscious cream cheese glaze that makes every slice feel like a little celebration. It’s perfect for brunch, an afternoon snack, or even a special kids’ dessert, and it always gets rave reviews at my house.
Why you’ll love this recipe?
What are some good reasons to make a zucchini cake?
- Flavor: The cocoa and chocolate chips create a deeply chocolaty taste that’s rich but not overwhelming. And that hidden zucchini? It keeps the cake moist and tender every time. Plus, the hint of natural sweetness from the zucchini means I can cut back just a tiny bit on added sugar without sacrificing flavor.
- Simplicity: I’ve made this so many times that I already have my shortcut tricks down. No fancy equipment needed — just a whisk, a grater, and a trusty loaf or cake pan. It’s perfect when you’re craving something sweet but don’t want to spend hours in the kitchen.
- Cost-efficiency: What is the best way to measure cost-efficiency? This recipe uses humble pantry staples like flour, sugar, cocoa powder, and zucchini from the garden — or your fridge stash, if you’re like me and buy those big zucchini in season.
- Versatility: Want to make muffins instead? Just portion the batter into muffin tins and adjust baking time. Craving a gluten-free version? Swap in your favorite gluten-free flour blend. I love that you can tweak it to fit your mood or dietary needs.
- 1 ½ cups all-purpose flour (or gluten-free blend if needed)
- ½ cup unsweetened cocoa powder — good quality, sifted if clumpy
- 1 teaspoon baking soda
- ½ teaspoon salt
- 1 cup granulated sugar (feel free to cut back slightly for less sweetness)
- ½ cup brown sugar (adds depth and a slight caramel note)
- ⅓ cup vegetable oil or melted coconut oil
- 2 large eggs, at room temperature
- 1 teaspoon vanilla extract
- 1 cup grated zucchini, squeezed dry
- ½ cup mini chocolate chips (or chopped dark chocolate)
- 4 oz cream cheese, softened
- ½ cup powdered sugar (more if you like it sweet)
- 1 teaspoon vanilla extract
- 2-3 tablespoons milk or heavy cream, to loosen
- Zucchini Prep: Grate and then squeeze out as much moisture as possible. I usually do this with my clean hands or a clean tea towel. Moisture can make your batter too thin, which leads to uneven baking or a dense cake. If your zucchini is especially watery, just let it sit in a sieve for a few minutes or pat dry with paper towels.
- Mixing Advice: Be gentle when folding the wet into the dry. Using a spatula and mixing just until no streaks remain keeps the cake tender. Overmixing ruins the crumb, so patience is key.
- Swirl Customization: Want a marbled look? Drop teaspoons of peanut butter or caramel into the batter and use a chopstick to swirl it around gently. It creates a pretty, homemade look that’s totally Instagram-worthy.
- Ingredient Swaps: For a dairy-free version, swap out the cream cheese glaze for a coconut cream frosting. Or, use dark chocolate chunks instead of chips for a more sophisticated flavor. I’ve experimented with mashed bananas in place of zucchini, and honestly, it works well — just reduce the sugar a bit.
- Baking Tips: Always check your oven’s temperature with an oven thermometer; mine runs a little hot and sometimes overbakes. And don’t forget to do the toothpick test. If it comes out with moist crumbs, it’s perfect.
- Glaze Variations: For a brighter flavor, add a splash of orange liqueur or a teaspoon of espresso powder to your glaze. Brush it on after cooling for that shiny, professional finish.
What I love most about this is how forgiving it is. Even if I overmix a little or forget to buy chocolate chips, it still rises perfectly and tastes amazing. It’s one of those recipes I trust to turn out beautifully — and my family always asks for extra slices.
How to Make Chocolate Zucchini Cake
Quick Overview
This cake comes together really quickly. You start by grating your zucchini — don’t forget to squeeze out some excess moisture so it doesn’t make your batter too runny. Mix up your dry ingredients in one bowl, whisk your wet ingredients in another, then gently fold everything together. Pour it into a pan, swirl a handful of chocolate chips in, bake until it’s just set, and let it cool. The icing is just a simple cream cheese glaze that you spread on while the cake’s still warm. It’s a straightforward process with results that look and taste like a bakery masterpiece — but it’s honestly just a few pantry staples and a little love.
Ingredients
For the Main Batter:
For the Filling (optional but recommended):
For the Glaze:
Step-by-Step Instructions
Step 1: Preheat & Prep Pan
Set your oven to 350°F (175°C). Grease a 9-inch round cake pan or line it with parchment paper. I always do this when I want a clean, easy release. For muffins, just line a muffin tin with paper liners or grease them lightly. Having everything ready makes the baking process so much smoother.
Step 2: Mix Dry Ingredients
Whisk together the flour, cocoa powder, baking soda, and salt in a large bowl. This step ensures everything’s evenly combined, which is crucial for an even rise. I always do this first so that I don’t forget any ingredients once I start adding the liquids.
Step 3: Mix Wet Ingredients
In a separate bowl, whisk the sugars, oil, eggs, and vanilla until smooth. It should look a little glossy and well combined. I’ve tested this with almond milk when I run out of dairy, and it made the batter even creamier — trust me, it’s a win!
Step 4: Combine
Pour the wet into the dry, then gently fold with a spatula until just combined. Don’t overmix — that’s how you get a tender cake. The batter will be thick but moist, with a beautiful dark chocolate hue.
Step 5: Prepare Filling
If using chocolate chips, fold half into the batter now. It’ll melt just slightly in the oven for that gooey surprise in every slice.
Step 6: Layer & Swirl
Pour the batter into your prepared pan. If you want, add a few more chocolate chips on top for presentation. For extra fun, I sometimes swirl in a spoonful of peanut butter or a dash of cinnamon — it’s all about personal touches!
Step 7: Bake
Bake for 30-35 minutes, or until a toothpick inserted in the center comes out with a few moist crumbs. I always check around the 30-minute mark because ovens can vary. If it looks done but isn’t quite, just a few more minutes—better to underbake slightly than over-bake and dry out.
Step 8: Cool & Glaze
Let the cake cool in the pan for about 15 minutes before transferring to a wire rack. Spread the cream cheese glaze while the cake is still warm — this way, it sinks in just right and looks beautiful. The glaze sets quickly, so work fast!
Step 9: Slice & Serve
Once cooled completely, slice with a sharp knife. I prefer to cut this into small squares or triangles because it’s rich and deeply chocolaty. Serve with a cold glass of milk or a cup of strong coffee. Honestly, this disappeared in minutes at my house.
What to Serve It With
This cake is so versatile that I often serve it in different ways depending on the occasion. For a cozy breakfast, I love slightly warming slices and topping them with a dollop of Greek yogurt and fresh berries — a real treat to start the day. When I’ve got guests over for brunch, I’ll serve it alongside crispy bacon, fresh fruit salad, and big mugs of coffee. If I’m feeling fancy (or when it’s just for me), I like to dust it with powdered sugar or a drizzle of caramel sauce for an elegant touch.
As a dessert, paired with vanilla ice cream or whipped cream, it’s what I call a crowd-pleaser. Kids love it because it tastes like a fudgy brownie, and I love it because I get to sneak in some veggies. When I serve this as a casual snack, I often cut small pieces and nibble on them during movie night with a warm cup of tea. It’s like a hug in every slice.
Top Tips for Perfecting Your Chocolate Zucchini Cake
After making this so many times, I’ve learned a couple of tricks to get it just right every single time:
This recipe is pretty forgiving, but these small touches make a noticeable difference. I’ve learned that patience and gentle handling matter more than anything else — and the end result is always worth it.
Storing and Reheating Tips
This cake stays moist for days if stored well. I usually cover it with plastic wrap or keep it in an airtight container. At room temperature, it’s good for about two days, especially if your house is cool. I’ve found that the flavor and texture are best enjoyed within that timeframe, but if I want to keep it longer, I pop it in the fridge. It’s perfect to cut into small slices and store in a container — just cover tightly to keep it from drying out.
Reheating is simple — microwave a slice for about 15-20 seconds until warm, or if you prefer, warm it gently in the oven wrapped in foil at 350°F for about 10 minutes. I like to add a little extra glaze or a dollop of whipped cream after reheating for that fresh-baked feel. Freezing is also easy — just wrap slices individually with plastic wrap and stash in a freezer bag for up to three months. Thaw at room temperature or gently warm for best results.
Frequently Asked Questions
Final Thoughts
This chocolate zucchini cake is one of those recipes that I’ve made countless times, and it never disappoints. It’s rich, moist, and has that perfect balance of chocolatey goodness and vegetable nutrition hidden inside. It’s incredible how the zucchini keeps the crumb so tender, and the addition of that tangy cream cheese glaze takes it over the top. Every time I pull it out of the oven, my kitchen fills with that warm, chocolatey smell — it’s pure comfort. Plus, it’s easily adaptable to different diets and occasions. Whether you’re celebrating a birthday, looking for a cozy weekend treat, or just need a little dessert that’s a bit healthier, this cake is always a hit. I hope you give it a try and fall in love with it as much as my family and I do. Happy baking!
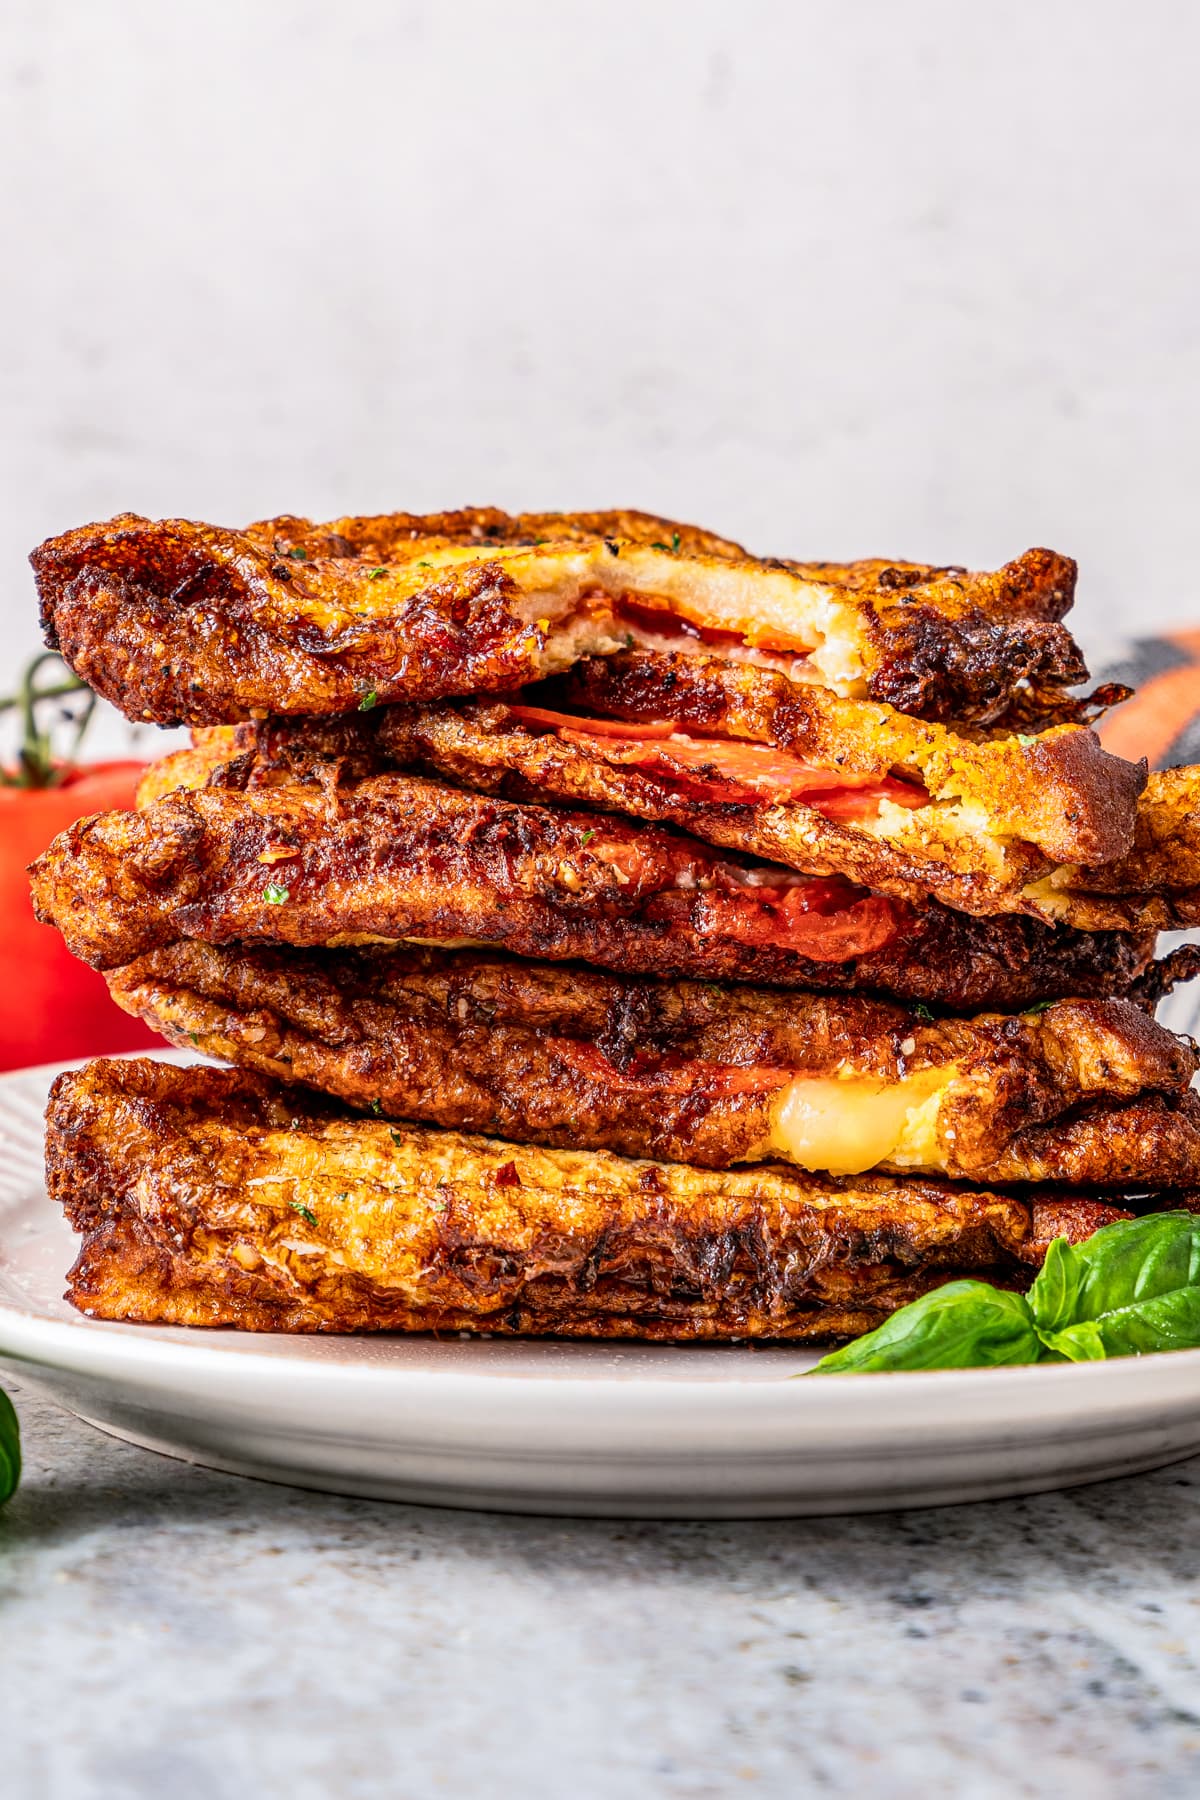
fried pizza
Ingredients
Method
- Combine the beaten eggs and milk in a dish. Whisk in salt and pepper and set aside.
- Heat the oil in a frying pan over medium-high heat.
- Top 8 of the bread triangles with a slice of tomato, mozzarella, and 2 pepperoni slices.
- Cover the sandwiches with the remaining 8 slices of bread, press down on top of the sandwich and seal together the edges.
- Place the sandwiches in the egg mixture for about 20 seconds on each side.
- Seal the sandwiches again before adding them to the hot oil, one at a time.
- Fry for about 2 minutes on one side and flip it over carefully with a pair of tongs. Continue to cook for another 30 seconds to 1 minute.
- Remove the sandwiches with a slotted spoon and drain well on paper towels.
- Serve hot with your favorite dipping sauce.